Let us introduce you to the first part of our WoW Classic: Horde Leveling Guide. Here you will find out all the small and hidden details of the long and winding road, named leveling. We will show you the best grinding spots, and give you irreplaceable and helpful advice. We will carefully lead you through all the danger and horrors of the Azeroth. Remember that the journey is going to be painful, tough, perilous, and full of unexpected meetings, and merciless foes. You might even get a few gray hairs. Considering this, let us save your youth for more important things.
 4.9
4.9Leveling Tips and Tricks
Everyone who has the MMO experience knows that the most difficult and sometimes even boring thing is leveling. Well, double it, because we are talking here about Classic WoW. Not only you will have to travel by foot — Mounts are available after you reach level 40 and cost a fortune. Regular visits to your class and profession trainers, constant looking for vendors, and hours spent on searching for that one NPC will take you weeks to reach the cap. Let us save you time and help you reach the maximum level quickly and effortlessly with our Power Leveling service!
These are general rules which will help you in the leveling process:
- Kill every single yellow mob you come across to get more XP. Green mobs are good too, but choose the ones that have 3-4 levels less than you, not more — it will be just a waste of time and resources. From the other side, ignoring creatures as you travel while at full resources is not only a waste of XP but also a waste of your spirit-based HP and Mana regeneration.
Note: Do not save your cooldowns for another «right moment», utilize them to your advantage here and there.
- Train and use the most damaging abilities and talents while leveling. For example, if you have chosen a hybrid class and plan on tanking or healing at level 60, it is wise to level as a DPS spec instead. No worries, the specialization may be changed, though it will cost you. Try to focus on the following groups of talents:
- Talents that increase movement speed;
- Talents that increase regeneration and decrease downtime;
- Talents that provide Hit or Critical rating;
- Talents that increase resource pool capacity.
- However do not go back to your trainer every time you receive a Talent Point, because new skills are often unnecessary right away but become useful later. For example, rather than training at level 22, 24, 26, 28, it might be more optimal to train at 22 and 28 only, depending on your class.
- Avoid leveling crafting professions while leveling yourself, because it will cost you additional time and gold. An exception is made for First Aid, for it is an absolute must-have for everyone. There is also an argument to be made for Skinning, and possibly Herbalism and Mining, but not the others.
- Set a new “home” each time you come to a new zone and use your Hearthstone by default. Remember, that an unused Hearthstone is a wasted Hearthstone.
- It is wise to complete as many Quests in your quest log as possible before going back to town to turn them in because travels in Azeroth are such a large time-sink.
Note: Not all Quests, by the way, are vitally needed for the continuation of the story. Do not be afraid to skip them.
- Try not to run Dungeons unless you have several quests stockpiled. Usually, Dungeons themselves take too much time and effort, and the corresponding Quest chains are exceedingly long and involve a lot of travel. Fortunately, four of them are definitely worth doing and are full of easily acquirable and high-reward quests:
- Uldaman (41+)
- Zul’Farrak (42+)
- Maraudon (46+)
- Blackrock Depths (52+)
- Appropriate gear is a very important thing, but do not make it your main goal while you are leveling. For melee DPS, a good weapon is crucial, yes, but anything apart of that — isn’t. A little unexpected may be the value of Spirit for every class and every spec. Spirit increases both out of combat Mana and Health regeneration. Minimizing downtime and using travel time to regenerate rather than taking time to drink/eat will increase your efficiency, so do not shy away from items with Spirit on them.
- Create a bank alt – an additional Character, which is placed in the capital city and circulates between a bank and the auction house. It will keep and sell your stuff.
- Plan your level 40 Mount. Running is so slow, and most zones are so big, so try to save money beforehand.
- Leave your Character in taverns or in the capital cities before logging out of the game, for this will give you a Rested Bonus.
And again. Save Money! In every possible way! Gold in Classic World of Warcraft costs more than a real gold bar in a Swiss Bank. You will collect every single Copper coin, especially when you’ll understand that you do not have enough currency for a “slow” Mount. And do you know how much does the “fast” Mount cost? A THOUSAND! We can help. You can get Gold from Overgear, using our wide range of offers which is really convinient.
Leveling Specs
Different classes use different strategies while leveling. This is stipulated by their class specifics. Every class has three specializations, each of which is created to accomplish certain game needs, but some of them may not be useful until Level 60. Here we will talk about the most viable ones.
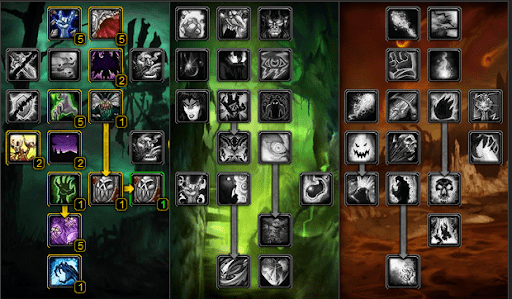
Druid
The main Druid stats are STR, AGI, STAM, INT. The best leveling specialization is Feral Combat. The Talent tree, in this case, should look the following way:
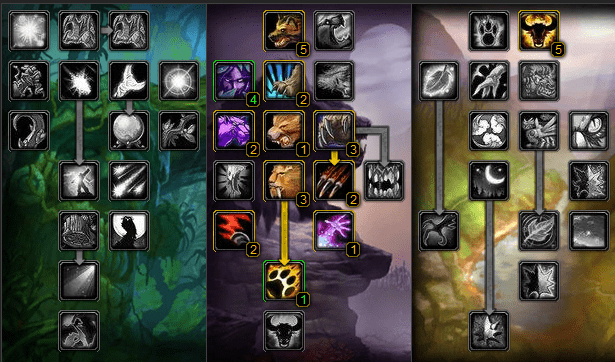
Talent Build: 5/5 Ferocity, 2/2 Brutal Impact, 3/5 Feral Instinct, 2/2 Feline Swiftness, Feral Charge, 5/5 Furor, 3/3 Sharpened Claws, 2/2 Blood Frenzy, 2/3 Predatory Strikes, Faerie Fire (Feral), 3/3 Predatory Strikes, 2/2 Savage Fury, 1/5 Heart of the Wild.
Hunter
The main Hunter stats are AGI, AP, STAM. Beast Mastery is considered to be the best leveling specialization, as it boosts your Pet and is quite useful in PvP. The Talent tree is better looking the following way:
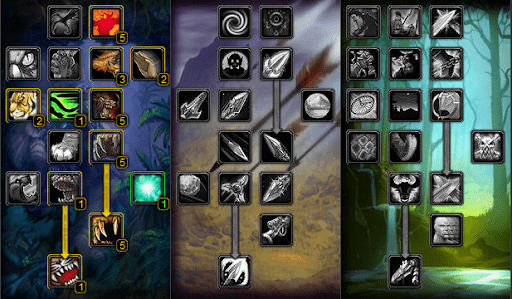
Talent Build: 5/5 Endurance Training, 2/2 Improved Revive Pet, 3/3 Thick Hide, Bestial Swiftness, 2/2 Pathfinding, 2/5 Unleashed Fury, 5/5 Ferocity, Intimidation, 1/2 Bestial Discipline, 5/5 Unleashed Fury, 5/5 Frenzy, Bestial Wrath.
Mage
The main Mages stats are SP, INT, STAM. Mages have several options while leveling: Fire, Frost, or Frost AoE. Each has pros and cons, so only you can decide what to choose. There are three Talent trees represented. The first one:
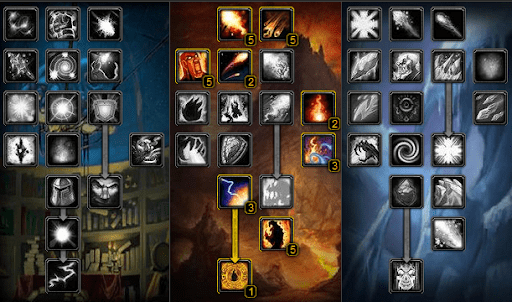
Talent Build: 5/5 Improved Fireball, 2/2 Flame Throwing, 3/5 Impact, 2/2 Burning Soul, 5/5 Impact, 1/5 Ignite, 3/3 Master of Elements, 3/5 Ignite, 3/3 Critical Mass, 5/5 Ignite, 5/5 Fire Power, Combustion.
Note that you can move 2 points from Ignite into Pyroblast and Blast Wave if playing on a PvP server.
The second variant of a Talent tree:
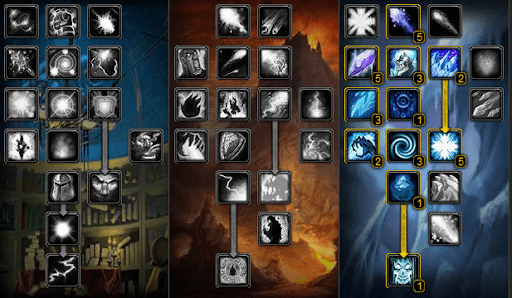
Talent Build: 5/5 Improved Frostbolt, 2/2 Frost Nova, 3/3 Frostbite, Cold Snap, 4/5 Ice Shards, 2/2 Arctic Reach, 3/3 Frost Channeling, Ice Block, 5/5 Shatter, 5/5 Ice Shards, 3/3 Piercing Ice, Ice Barrier.
The third variant of a Talent tree:
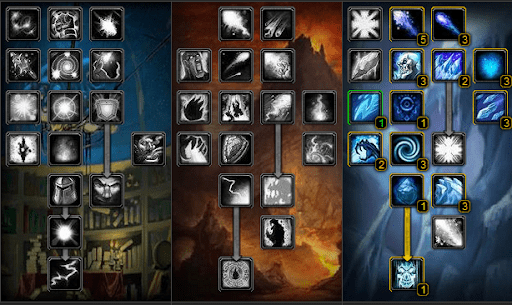
Talent Build: 5/5 Improved Frostbolt, 2/2 Frost Nova, 3/3 Frostbite, Cold Snap, 3/3 Elemental Precision, 1/3 Improved Blizzard, 2/2 Arctic Reach, 3/3 Frost Channeling, Ice Block, 5/5 Shatter, 3/3 Improved Blizzard, 3/3 Improved Cone of Cold, 3/3 Permafrost, 1/3 Piercing Ice, Ice Barrier.
Priest
The main Priest stats are SP, SPI, INT, STAM. Priests have a lot of choices while leveling. But the Shadow specialization is still the best. The Talent tree is better to look the following way:
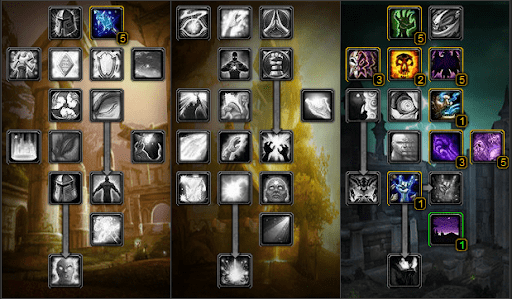
Talent Build: 5/5 Spirit Tap, 5/5 Wand Specialization, 2/2 Improved Shadow Word: Pain, 5/5 Shadow Focus, 3/3 Shadow Affinity, 3/3 Shadow Reach, 2/5 Shadow Weaving, Vampiric Embrace, Mind Flay, 5/5 Shadow Weaving, 1/5 Darkness.
Rogue
The main Rogue stats are Rogues: AGI, AP, STR, STAM. Combat is the fastest leveling spec a rogue can use, because it’s not dependent on stealth, while other specializations do not provide the same consistent damage. The Rogue Talent tree should look the following way:
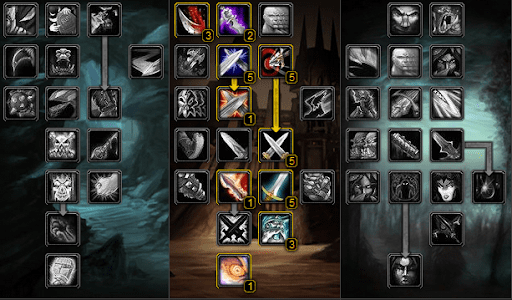
Talent Build: 2/2 Improved Sinister Strike, 3/3 Improved Gouge, 5/5 Deflection, Riposte, 5/5 Precision, 4/5 Dual Wield Specialization, Blade Flurry, 5/5 Sword Specialization, 5/5 Dual Wield Specialization, 3/3 Aggression, Adrenaline Rush.
Shaman
The main Shaman stats are STR, STAM, AGI, INT. Shamans are an auto-attack class like Paladins, but they have to choose to be this way due to their lack of Mana conservation rather than not having a toolbox. The best choice for a Classic Shaman is Enhancement specialization. The Talent tree is better to look the following way:
Talent Build: 5/5 Ancestral Knowledge, 2/2 Improved Ghost Wolf, 3/5 Thundering Strikes, Two-Handed Axes and Maces, 5/5 Thundering Strikes, 2/3 Improved Lightning Shield, 5/5 Flurry, Parry, 3/3 Elemental Weapons, 3/3 Improved Lightning Shield, 5/5 Weapon Mastery, Stormstrike.
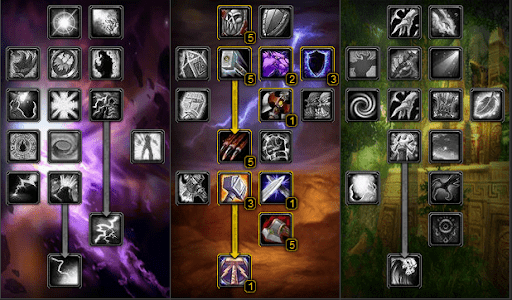
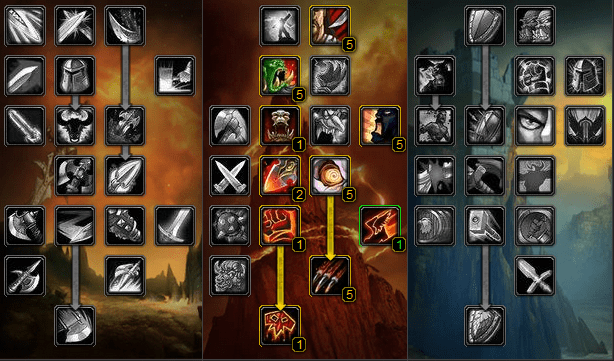
Warlock
The main stats for Warlocks are SP, INT, STAM. Warlocks get a plethora of choices while leveling, but Affliction is the recommended spec due to having such little downtime. Use the Voidwalker as a tank, but after level 34, if you find yourself pulling a threat from it, switch to another minion and start “drain tanking” instead. The Talent tree is better to look the following way:
Talent Build: 5/5 Improved Corruption, 5/5 Improved Life Tap, 3/5 Suppression, Amplify Curse, 5/5 Suppression, 2/5 Fel Concentration, 2/2 Nightfall, 2/2 Grim Reach, 3/5 Fel Concentration, Siphon Life, Curse of Exhaustion, 1/5 Improved Curse of Exhaustion, 5/5 Fel Concentration, 5/5 Shadow Mastery, Dark Pact.
Warrior
The main stats for Warrior are STR, STAM, AGI. This class has the most difficult time leveling because they are weapon-dependent. Fury is, probably the best choice. Dual-wielding while leveling is not recommended though. The Talent tree is better to look the following way:
Talent Build: 5/5 Cruelty, 5/5 Improved Demoralizing Shout, Piercing Howl, 4/5 Improved Battle Shout, 5/5 Enrage, Death Wish, 5/5 Improved Battle Shout, 2/2 Improved Execute, 1/2 Improved Intercept, 5/5 Flurry, Bloodthirst.
Horde Leveling Guide
The Character is created, the intro is watched and now you are left alone in a new location. What to do? It does not particularly matter where you have started and what class have you chosen, because a specific race will only level in their starting zones.
Our professional players are ready to support you at any time with our Hourly Driving service!
Starting Zones (1-12)
The starting zones for different Horde Races would be the following: Tauren in Mulgore, Orcs and Trolls in Durotar, and the Undead in Tirisfal Glades. The starting Quests are quite simple and intuitively obvious, so there won’t be any troubles with them. Each race stays in its starting zone until about Level 10 or 12, so just follow the White Ra… err… the yellow exclamation mark!
After you have reached level 10, or have made all the Quests in the starting zone (approximately Level 12), you may go either to Silverpine Forest for the Undead, or to The Barrens for the other races. The first thing you need to do in both zones — is find an inn to place your Hearthstone in there, and a Flight Master to learn a new Flight Point.
Note: Please remember, these simple actions must be done every time you come to a new location.
Barrens (10-15)
There are dozens of ways to level up your character, depending on your priorities, the free time you have, and the locations you would love to visit. Everything matters. But what if you had seen each and every zone for about fifty times already? What if you had started your Journey ten or even fifteen years ago and you could do any Quest in the Azeroth while keeping your eyes closed? What if the leveling process brings nothing, but a nervous tic? We’ve got a decision. Check our Power Leveling offer and choose an option that suits your needs. We won’t stop until you are satisfied.

Ok. So, you have come to The Barrens. Welcome! Go to the Crossroads (Section A), to pick up a number of useful and easy quests.
The Inn is at 52.30; the Flying Master is at 51.30.
Here is the list of the most useful Quests:
- Raptor Thieves (52.30)
— Medium difficulty kill quest.
— Start with Gazrog in Crossroads.
— The Raptors can be found surrounding section A/B. - The Forgotten Pools (52.32)
— Easy find quest.
— Start with Tonga Runetotem in Crossroads.
— The oasis is Northwest of section A (44.22). - The Stagnant Oasis (52.32)
— Easy find quest.
— Starts with Tonga Runetotem in Crossroads.
— The oasis is southeast of section A (44.22). - Altered Beings (52.32)
— Easy kill/gather quest.
— Start with Tonga Runetotem in Crossroads.
— The Snapjaws can be found in section B (around 47.40 and 56.42). - Wharfmaster Dizzywig (51.30)
— Easy delivery quest.
— Starts with Apothecary Helbrim in Crossroads.
— The Wharfmaster is on the docks in Ratchet, 63.38 (section B). - Supplies for the Crossroads (51.30)
— Medium find quest.
— Start with Thork in Crossroads.
— The crates are at a Gnoll camp, north of section B (around 58.25). - Disrupt the attacks (51.30)
— Medium kill quest.
— Starts with Thork in Crossroads.
— The Gnolls for this mission are northeast of section A, along the mountains (around 55.25). - Plainstrider Menace (52.31)
— Easy kill quest.
— Starts with Sergra Darkthorn in Crossroads.
— The beaks are dropped by Plainstriders all around the East part of Crossroads. - The Zhevra (52.31)
— Easy kill quest.
— Starts with Sergra Darkthorn in Crossroads.
— Zhevras can be found all around sections A and B. - Samophlange series quest (63.37)
— Medium find quest.
— Start with Sputtervalve in Ratchet (section B).
— The control console is northeast of section A (52.11).
— All other parts of the quest can be found in the same area.
— Part 2, Part 3, Part 4. - Southsea Freebooters series quest (63.38)
— Easy kill quest.
— Starts from Wharfmaster Dizzywig in Ratchet.
— Brigands can be found on the coast, south of Ratchet (around 64.47).
— Part 2, Part 3, Part 4.
— The Shipment of boots and lens for Part 4 can be found a little more south (both around 63.49). - Centaur Bracers (45.28)
— Medium kill quest.
— Starts with Regthar Deathgate in a bunker on the west road of Crossroads.
— The Bracers drop off centaurs northwest where the Quest starts (around section A and C).
Try to reach Level 15 at this point. Use grinding style if needed — raptors, horses, and centaurs in the area will be a perfect choice, as they offer easy XP and good sell loot.
Silverpine Forest (10-15)
If you are an Undead, your second stop is here, in Silverpine Forest. Welcome.
Go to Silverpine Forest (54.76 Tirisfal Glades), and take these steps:
- At 56.9 accept and do the escort “Escorting Erland“. Turn in “Escorting Erland” at (53.13), and accept “The Deathstalkers’ Report“. Do NOT accept “Wild Hearts” yet.
- Die on purpose and resurrect in spirit to get to The Sepulcher. Save any Discolored Worg Hearts you may have.
- Turn in “The Deathstalkers’ Report” (down at 43.41), accept “Speak with Renferrel“, “Lost Deathstalkers“, and “The Dead Fields“.
- At 43.41 turn in “Speak with Renferrel“, and skip “Zinge’s Delivery” for now. Accept “A Recipe For Death“.
- Accept “Border Crossings” (44.41).
- Accept “Prove Your Worth” (44.40).
Repair/resupply.
- Kill/loot any bears you see along the way for “A Recipe For Death“.
- Around 52.25 do “Prove Your Worth“.
- Turn in “Lost Deathstalkers” (53.13). Accept “Wild Hearts“.
- Do “Wild Hearts“.
- Do “The Dead Fields” (45.21).
- Do a part of “A Recipe For Death” (36.14).
- Resupply from the Fisherman (33.18). Be careful not to sell your Discolored Worg Hearts!
- Finish “A Recipe For Death“.
- Die on purpose to get to The Sepulcher.
- Turn in “The Dead Fields” and “Wild Hearts” (down 43.41); accept “The Decrepit Ferry” and “Return to Quinn“
- Turn in “Prove Your Worth” (44.40); accept “Arugal’s Folly“.
Repair/resupply.
- Go East (58.35) turn in “The Decrepit Ferry“, accept “Rot Hide Clues“.
- Go North, do “Arugal’s Folly” (53.29).
- Go North, turn in “Return to Quinn” (53.13). Accept “Ivar the Foul” and do it at 51.14. Go back and turn it in after.
- Die on purpose to get to The Sepulcher.
- Turn in “Rot Hide Clues” (down 43.41); skip “Rot Hide Ichor“.
- Turn in “Arugal’s Folly” (44.40), and accept the next Arugal’s Folly part.
Repair/resupply.
- Go East (around 56.46), and do “Arugal’s Folly“.
- Go SW, click on the Dalaran Crate (50.60) to turn in “Border Crossings“; accept “Maps and Runes“.
- Die on purpose to get to The Sepulcher.
- Turn in “Maps and Runes” (44.41); accept “Dalar’s Analysis“.
- Turn in “Arugal’s Folly” (44.40), and accept the next part. Turn in “Dalar’s Analysis“; accept “Dalaran’s Intentions“.
- Turn in “Dalaran’s Intentions” (44.41), and accept “Ambermill Investigations“.
- Go SE to do “Arugal’s Folly” (entrance at 57.46).
- Go South (around 56.63), and do “Ambermill Investigations“.
- Die on purpose to get to The Sepulcher.
Repair/resupply.
- Once there, accept “Supplying the Sepulcher” (43.42).
- Accept “Zinge’s Delivery” (43.41).
- Turn in “Ambermill Investigations” (44.41), skip “The Weaver“.
- Turn in “Arugal’s Folly” (44.40), and skip the next Arugal’s Folly part.
- Turn in “Supplying the Sepulcher” (46.43); accept “Ride to the Undercity“. Fly there.
- Once they go in the Trade Quarter, turn in “Ride to the Undercity” (61.42 UC), and accept “Michael Garrett“.
- Turn in “Michael Garrett” (63.48 UC), accept “Return to Podrig“. Skip the ride for now.
- Go SW and turn in “A Recipe For Death” (49.69 UC), skip the next Arugal’s Folly part.
- Turn in “Zinge’s Delivery” (50.68 UC), accept “Sample for Helbrim“.
- Hearth to The Sepulcher.
Repair/resupply.
- Once there, turn in “Return to Podrig” (43.42).
- Take a bat ride to Undercity, Tirisfal (46.43).
- Once at the UC, exit it and head North to the Zeppelin to go to Orgrimmar (61.59 in Tirisfal Glades).
- Leave Orgrimmar, run to Razor Hill, Durotar to get new spells and abilities.
- Accept “Conscript of the Horde” (51.44 Durotar).
Head west on the main path to The Barrens. Start doing Barrens Quests until you are at least level 20. After that, you may either stay in Barrens or go to Stonetalon Mountains.
Stonetalon Mountains (20-25)
Note: however, that some Quests here must have been taken in The Barrens earlier.
- Run west into Stonetalon Mountains starting at 82.98 in Stonetalon.
- Accept “Jin’Zil’s Forest Magiс” and “Blood Feeders” (71.95).
- Go NW, accept “Arachnophobia” (59.76).
- Go west and do “Blood Feeders” and “Arachnophobia“.
- Go north, accept “Super Reaper 6000” (59.63).
- Do “Goblin Invaders“, “Super Reaper 6000“, and “Deepmoss Spider Eggs” (63.54).
- Turn in “Super Reaper 6000” (59.63), accept “Further Instructions“.
- Turn in “Arachnophobia” (47.61), “Kaya’s Alive” (47.58). Accept “Cycle of Rebirth“.
Repair/resupply.
Some of these Quests take part in Barrens.
- Go SW, accept “Boulderslide Ravine” and “Trouble in the Deeps” (47.64).
- Go SE to Boulderslide Cavern (entrance at 61.93), do “Boulderslide Ravine“.
- Go east; turn in “Blood Feeders” (71.95).
- Run east to the Barrens; turn in “Goblin Invaders” (35.28 Barrens). Accept “Shredding Machines“.
- Go up NE, turn in “Wenikee Boltbucket” (49.11 Barrens), skip “Nugget Slugs“.
- Go north, turn in “Report to Kadrak” (48.5), skip “The Warsong Reports“.
Repair/resupply.
- At Sun Rock Retreat accept “Cenarius’ Legacy” (46.60) and “Harpies Threaten” (47.61).
- Go SW, turn in “Boulderslide Ravine” (47.64); accept “Elemental War“.
- Go north (50.43), do “Cycle of Rebirth“.
- Go north and do “Jin’Zil’s Forest Magiс” meanwhile. Do “Cenarius’ Legacy” (36.13).
- Go SE, turn in “Further Instructions” (59.63), accept “Gerenzo Wrenchwhistle“.
Repair/resupply.
- Go north, do “Shredding Machines” (around 65.46).
- Go NE to the path at (70.41).
- Do “Gerenzo Wrenchwhistle” (65.40).
- Go back and turn in “Gerenzo Wrenchwhistle” (59.63).
- Go SE, turn in “Jin’Zil’s Forest Magiс” (74.98).
- Go east, turn in “Shredding Machines” (35.28 Barrens).
- Hearth back to Sun Rock Retreat.
Repair/resupply.
- Once there, turn in “Cycle of Rebirth” (48.58). Accept “New Life“. Turn in “Cenarius’ Legacy” (46.60).
- Go SW (37.67), do “Harpies Threaten“, “Elemental War” and “New Life“.
- At 47.64 turn in “Elemental War” and “Harpies Threaten“. Skip “Bloodfury Bloodline“.
- At 48.58 turn in “New Life“.
Repair/resupply.
Note: Grind if you are not Level 25.
Barrens (15-25)
” …Where is Mankrik’s wife, anyway?!”
At Level 15, you should go to Orgrimmar to do the Ragefire Chasm Dungeon. You will need a solid group to complete this. Here are the quests for that area:
- Testing an Enemy’s Strength;
— You receive this kill quest from Rahauro in Thunder Bluff (70.30). - The Power to Destroy;
— You receive this quest from Varimathras in Undercity (57.91). - Searching for the Lost Satchel;
— You receive this gathering quest from Rahauro in Thunder Bluff (70.30). - Slaying the Beast;
— You receive this kill quest from Neeru Fireblade in Orgrimmar (49.50). - Hidden Enemies;
— You receive this quest from Thrall in Orgrimmar (32.37).
Complete Ragefire Chasm several times for great XP boost and many items. You should leave there around Level 18.
Move back to the Crossroads in The Barrens. Do the following Quests:
- WANTED: Baron Longshore (62.37)
— Easy kill quest.
— Starts with a wanted sign in Ratchet (section B), 63.49.
— The Baron can be found on the shores south of section B. - Stolen Silver (51.30)
— Easy find quest.
— Starts with Gazrog in section A.
— The silver can be found in section D (58.53). - Miners Fortune (63.38)
— Medium find quest.
— Starts with Wharfmaster Dizzywig in section B.
— Kill the Venture Co. Overseer mobs northeast of section A to get the Cats Eye Emerald. - Ignition (56.7)
— Medium find quest.
— Starts at Wizzlecrank’s Shredder north of section A.
— Key drop off of Supervisor Lugwizzle in the same area.
— Once done, return to Sputtervalve (63.37) in section B. - Verog the Dervish
— Easy kill quest.
— Start with Regthar Deathgate on the west road of Crossroads.
— Verog can be found southeast of section A (53.41).
— Part 2. Quests Hezrul Bloodmark objectives are at around 46.38. - Raptor Horns (62.37)
— Easy kill/gather quest.
— Starts with Mebok Mizzyrix in Ratchet.
— The Horns drop off of the Sunscale Scytheclaws around section C. - Lost in Battle (52.31)
— Extremely difficult find quest.— Start with Mankrik in Crossroads.

Mankrik wife Barrens — Mankrik’s wife can be found…
- The Guns of Northwatch (62.39)
— Hard kill quest.
— Starts with Captain Thalo’thas Brightsun in Ratchet.
— All of the kill mobs can be found in section D (63.56). - Counterattack (44.28)
— Medium kill quest.
— Start with Regthar Deathgate in section A.
— Warlord Krom’zar will spawn at the same place after some of his guardians are dead. - Egg Hunt (51.29)
— Easy kill/gather quest.
— Starts with Korran in section A.
— The Silithids can be found in section E, south of the camp (45.72). - Gann’s Reclamation (46.75)
— Hard kill quest.
— Starts with Gann Stonespire in section F.
— Bael’dun and Khazgorm can be found Razonfin Downs in section F (around 47.85). - Consumed by Hatred (52.31)
— Medium kill/gather quest.
— Starts with Mankrik in Crossroads.
— Quillboar can be found in sections C and D, Northeast of Camp Taurajo. - Tribes at War series quest (44.59).
— Medium kill quest.
— Start with Mangletooth in Camp Taurajo.
— The geomancers are the same mobs of the precedent quest.
— Kuz, Nak, and Lok can all be found in the west of a sector F (around 41.80). - Chen’s Empty Keg series Quest.
— Medium find/kill quest.
— Starts with an Chen’s Empty Keg Item in sections A, B, or E.
— Part 2, Part 3. - Gann’s Reclamation series quest (46.75)
— Medium kill/gather quest.
— Starts with Gann Stonespire in section E.
— All items drop from Bael’dun Excavator mobs section F (around 48.86).
— Part 2, Part 3.
Now, you should be level 25. If not — we can help you with Wailing Caverns Dungeon, to provide you extra loot and experience. Anyway, make sure not to leave the zone before you are level 25.
Thousand Needles (25-35)

- Message to Freewind Post (32.22)
— Bring the Urgent Message to Cliffwatcher Longhorn at 45.50. - Pacify the Centaur (45.50)
— Medium kill quest.
— Starts with Cliffwatcher Longhorn in Freewind post.
— The Centaurs are found north of section A. - Alien Egg (44.50)
— Hard kill/gather quest.
— Starts with Hagar Lightninghoof in Freewind post.
— The Alien Egg location is random. - Serpent Wild (44.50)
— Easy find quest.
— Starts with Hagar Lightninghoof in Freewind post.
— Motega Firemane is at 21.32. - Sacred Fire (21.32)
— Medium gather quest.
— Starts with Motega Firemane.
— Incendia Agave can be found directly between sections A and B. - Grimtotem Spying (45.50)
— Hard gather quest. - Starts with Cliffwatcher Longhorn in Freewind post.
— The path up starts at 31.36. - Wind Rider (44.49)
— Hard gathering quest.
— Start with Elu in Freewind Post.
— Highperch Wyvern eggs are all located around 11.35 in Highperch. - Hardened Shells (78.77)
— Medium gathering/kill quest.
— Starts with Wizzle Brassbolts in section D.
— Hardened Tortoise shells drop in section D. - Hypercapacitor Gizmo (21.32)
— Medium kill quest.
— Starts with Wizlo Bearingshiner in section B.
— Enraged Panther can be found around 23.25. - Load lightening (80.75)
— Hard gathering quest.
— Starts with Pozzik in section D.
— Hollow Vulture Bone drops all over the northern part of section D. - Salt flat Venom (78.77)
— Medium gathering quest.
— Starts with Fizzle Brassbolts in section D.
— Salty Scorpid Venom drop found all over northern section D. - Rocket Car Parts (77.77)
— Medium gathering quest. - Starts with Kravel Koalbeard in section D.
— Rocket Car Parts can be found all over the place. - A Bump in the Road (81.77)
— Hard kill quest.
— Starts with Trackmaster Zherin in section D.
— Needed mobs wander all throughout section D. - Delivery to the Gnomes (77.77)
— Easy delivery quest.
— Starts with Kravel Koalbeard, section D.
— Fizzle Brassbolts is there as well.
Now you finally must be Level 30 if not 35. Good Job, Well Done! Congratulations!
4.9Leveling in WoW Classic is no small feat, but with our guide, you’ll have a trusted companion every step of the way. The road ahead may be grueling, filled with danger and unexpected twists, but it’s also a path of growth and triumph. Stick with us, follow our advice, and you’ll not only survive Azeroth’s perils but conquer them. Let’s make the journey less painful and a lot more rewarding your gray hairs can wait!