Path of Exile is one of the most unique games. Usually, when you play any fantasy RPG, there are always some familiar classes and abilities. Rogues can assassinate their foes with bows and daggers. Warriors use shields to protect themselves, or massive weapons to slay monsters. Mages are Masters of Elemental magic and Dark arts. But in PoE, you can find mechanics that you can’t find anywhere else – traps and mines. But why are mines in Path of Exile so special? Because you can take almost every ability, and transform it into a trap or mine skill. All because of special support gems – “Trap support”, “Blastchain Mine support”, and “High-Impact Mine support”. In this guide, we will take a look at this very unique mechanic, and will make a build around it.
Playstyle, mechanics, and scaling
If you want to play trap or mine build in PoE, you must be ready for really unusual gameplay, especially if you choose mines. Both traps and mines in Path of Exile have similar mechanics – you throw them on the ground and upon detonation, they trigger some linked abilities. Traps are simply detonating when an enemy comes close. In the case of mines, you have to trigger them by yourself, using the “Detonate mine” ability. Also, there are some skill gems that are already mines or traps. You don’t have to link such gems with special support gems.
So, how does gameplay look for any miner build? You throw mines into your enemy, and when you think it will be enough, just use “Detonate mine”.

Also, if you use “Blastchain mine support” there is one trick to maximize your damage, but it requires some practice. When you use your “Detonate mine” ability, it doesn’t detonate all of your mines. Instead, it begins a chain reaction of detonations. So, what you have to do is to place the maximum amount of mines, then detonate them, and after about 1-1,5 sec start to throw new mines. If you do it correctly, it will begin a massive chain reaction that greatly increases detonation frequency. There is a good video that demonstrates this method.
As any mine skill is a spell, to scale its damage you will need “Spell damage”. “Spell Critical strike chance” and “Critical strike Multiplier” are also great ways to increase our damage. We will need some mine-specific nodes on the passive skill tree, especially ones that increase our maximum number of mines. And, finally, “Elemental damage” is our last main source of damage scaling.
Pros and Cons
Any miner build in PoE has similar strong and weak points. Let’s take a look at them:
Pros:
- Cheap and effective in basic version;
- Can do all content in the game;
- Solo self-found friendly;
- Great boss killer.
Cons:
- Specific gameplay;
- Need some experience to use the full potential of the build.
So if you decide to play a miner build, you should be ready for very uncommon gameplay. Some PoE players just “don’t like” the playstyle of mines build. Some people try it and never want to play anything else. But almost everyone in Path of Exile will tell you – miner build is one of the best league starters.
If you don’t have enough time to level up character and farm loot, you can just use our custom build service!
Miner build variations
As it was said, you can turn almost every ability in PoE into mine, and it will work fine. However, there are some “meta” and time-proved skills that are usually used with mines. Arc, Ball lightning, Purifying flame, and Glacial cascade are the Top-tier abilities for miner build. These skills have great scaling potential and are comfortable to play with.
Despite a huge variability of build creation in PoE, if you want to play mines, you almost don’t have a choice of what Ascendancy to pick. All because attack speed and cast speed don’t work with mines. Instead, there is a unique mechanic, named mine/trap throwing speed. So for good DPS and comfortable gameplay you really want to have it on your passive tree and, sometimes, on your gear. That means, we HAVE TO be close to shadow on our passive tree because all mine-specific passives are located in the shadow’s region. So we have only two good choices – Saboteur, which is pure miner Ascendancy, or Scion.
Scion

Because of Scion’s flexibility, you can still make a good-working miner build, but you have to be more experienced in the game and, probably, Saboteur still will be better. The main point of playing Scion, that you start your way from the center of the passive skill tree, and can choose two different Ascendancies on half of their power. Also, Scion has more skill points and if your build hard relies on cluster jewels, this Ascendance could be a great choice.
Saboteur

Master of deadly mechanisms, Saboteur specializes in destroying powerful enemies with traps and mines. This Ascendancy is the only one that has mine-specific talents, which provides both defensive and offensive bonuses.
For our build, we will choose Saboteur for Ascendancy and Glacial cascade as our main DPS ability.
Glacial Cascade Saboteur
Passive tree
Most miners have almost the same skill tree. You will need miner nodes, Spell Critical strike Chance, Critical strike Multiplier, Elemental damage, Life and Jewel sockets. Best jewels for us should have % Life (Energy shield for low life) and 2-3 spell or elemental Critical strike Multiplier.
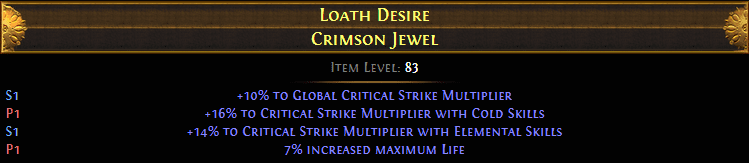 BiS jewel for life GC miner
For the High-end variant, we will use Pain Attunement (more spell damage while you are on low life) but we can start from the life-based version. Here is PoB for both skill tree variants and gear set for Low life.
Life-based build:
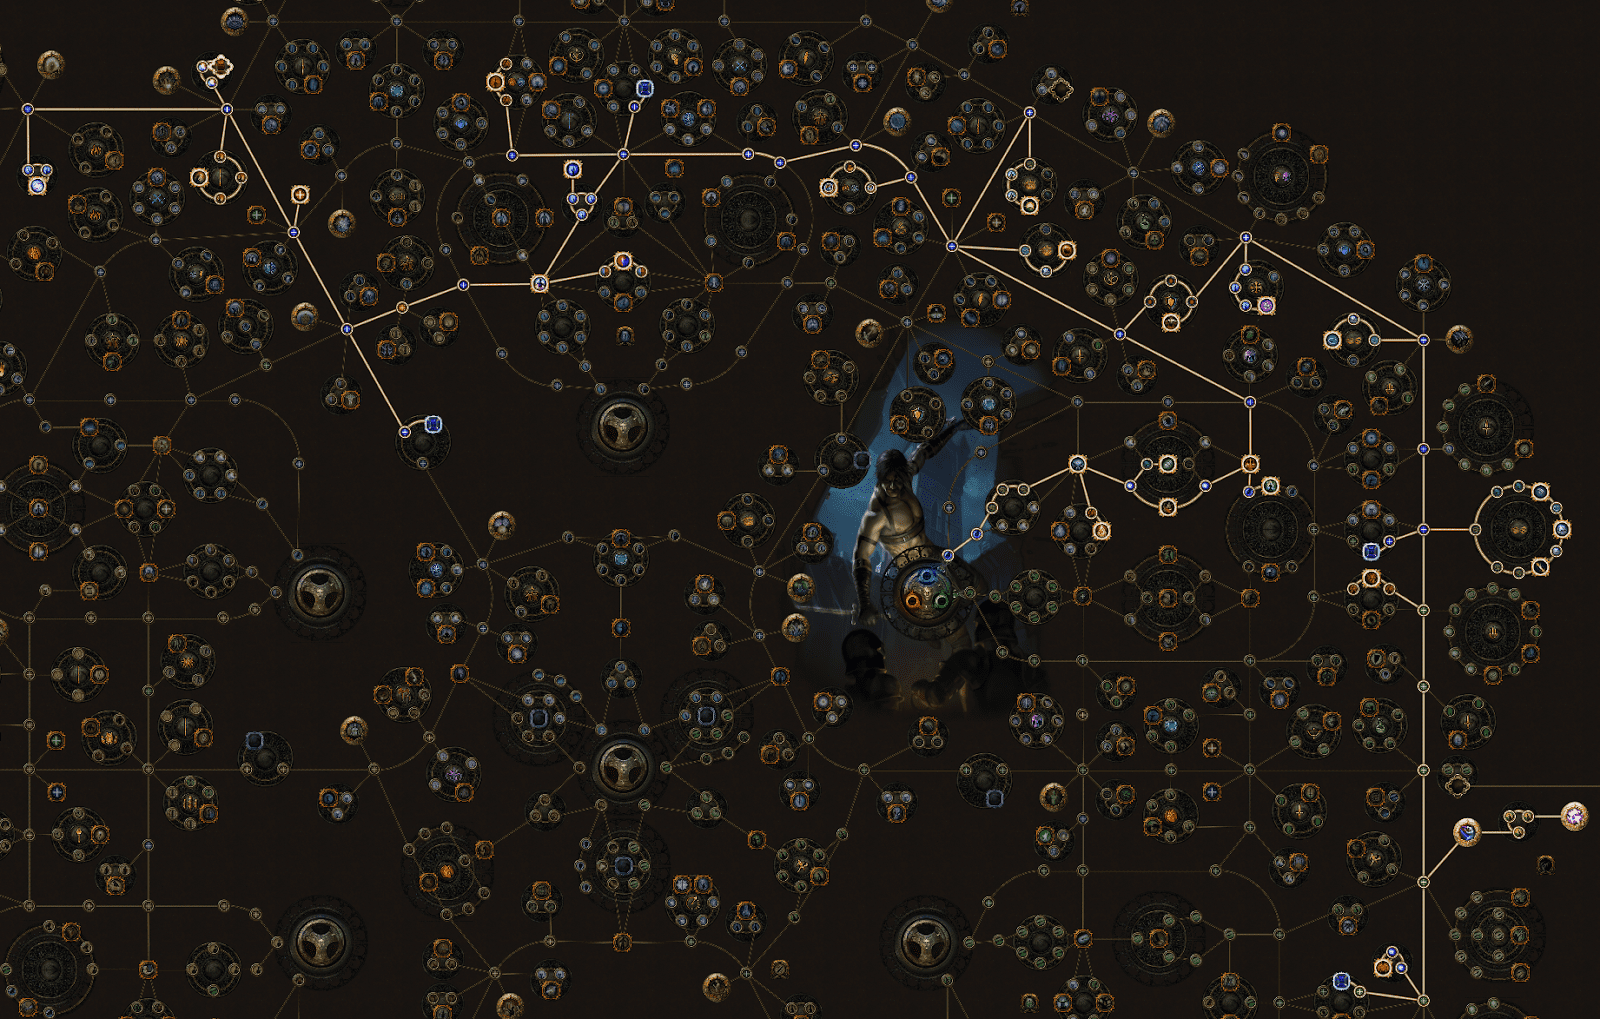 Life-based skill tree
In life-based build, we will rely on Dodge, Spell Dodge, Evasion, and Life regeneration. Our damage priority stats will be the same as for Low life.
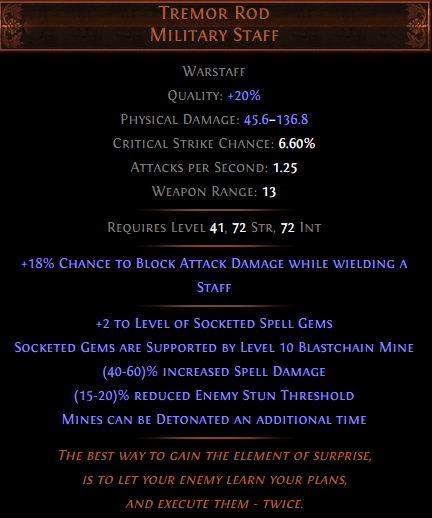
Our core item will be Tremor Rod – unique staff, that gives us an extra support gem link – lvl 10 Blastchain mine support. Other items should have Life, resists, and be Evasion-based.
Low life build:
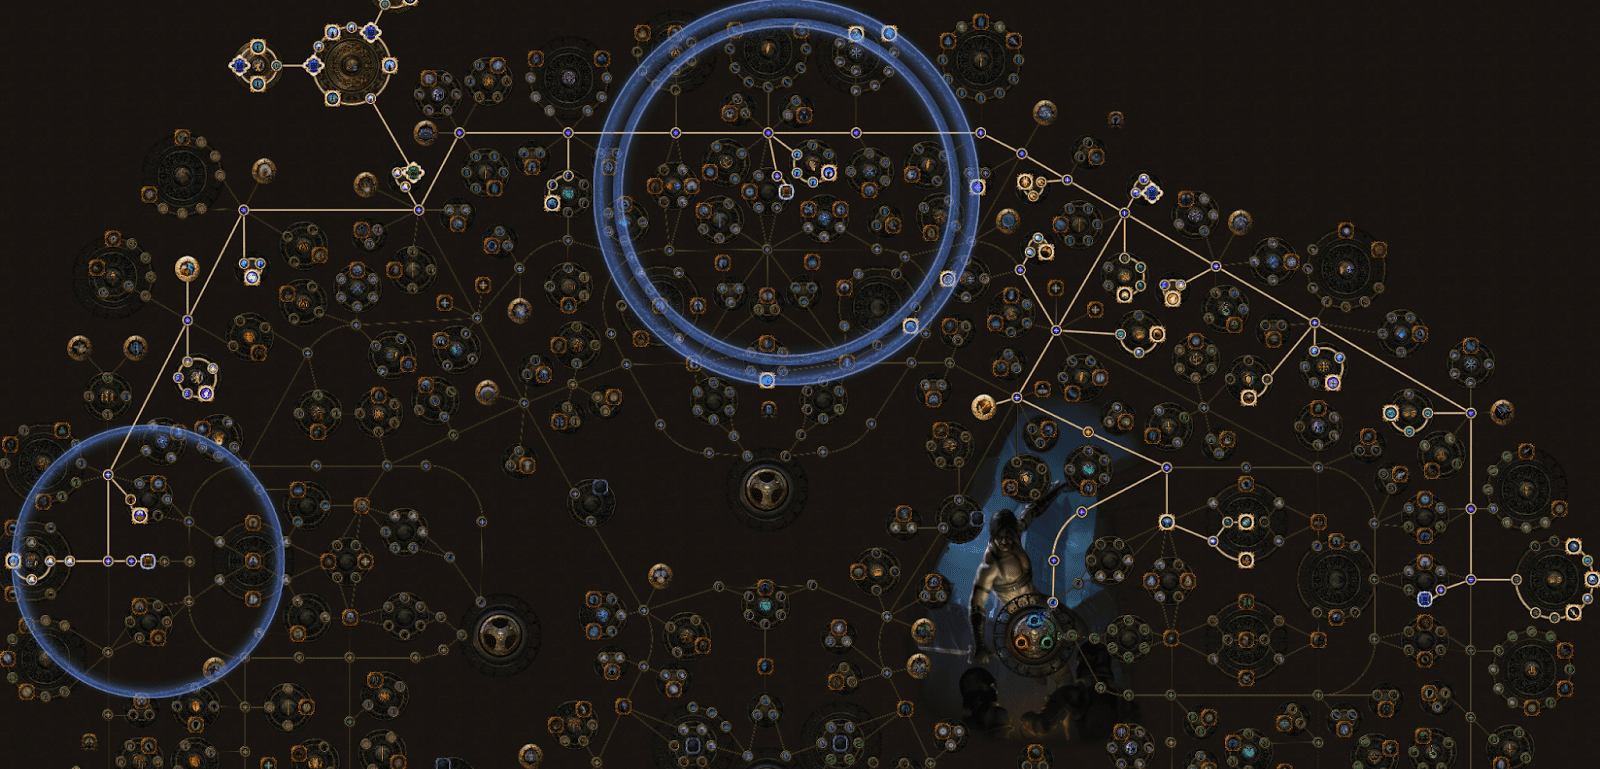 Low life skill tree
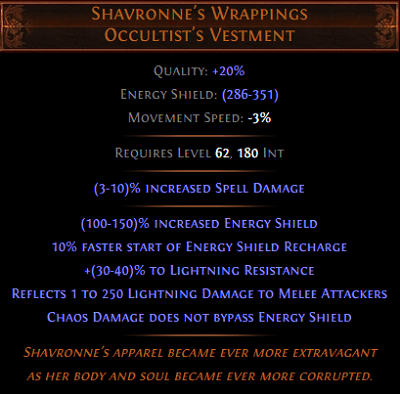
The main difference between life and low life builds, that we should pick Energy shield nodes instead of Life and take Pain Attunement. We will need Zealot’s Oath so we will regenerate Life instead of an Energy shield. Also to play low life you have to get two core items – Shavronne’s wrappings and the Presence of Chayula. The first item will make chaos damage to not bypass the Energy shield. The second one will give us more Energy shield as well as tons of chaos resistance and stun immunity. Also, we will need some cluster jewels. Large with Increased elemental damage and three passives – “Widespread destruction”, “Prismatic Hearth” and “Vengeful Commander”. Two medium clusters should have “Vengeful Commander”, “Purposeful Harbinger” and increase the Aura effect.
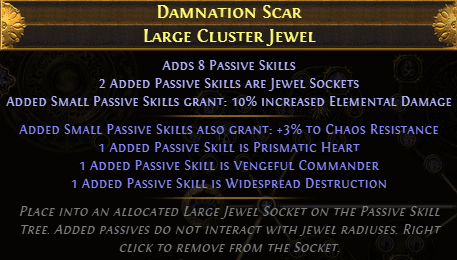
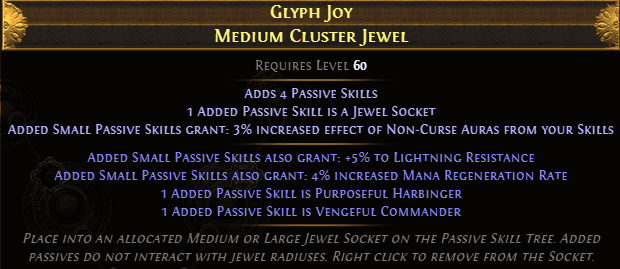 Good cluster jewels example
Ascendancy points:
Our first point will be “Bomb Specialist”. It will give us one of the most important stats – mine throwing speed.
The second ascendancy point we allocate will be “Explosives Expert”. It will greatly increase our damage and will help us to kill bosses in the blink of an eye.
“Pyromaniac” is our next choice. It will give us a lot of Life regeneration and will help us to sustain on maps and bosses.
“Born in the Shadows” is our last Ascendancy passive, which gives us huge survivability.
Gear progression
At the beginning of your miner journey in PoE you will need any good wand/mace with “Spell damage”, “Spell Critical strike Chance”,“+1 to Level of all spell skill gems” and Tabula Rasa or any rare 6-Link body armour with life and resists. You should get 6-Link Tremor Rod as soon as possible. It could cost a lot at the League start, but you always can buy some currency on Overgear. With Tremor Rod we don’t actually need six links in our body armour, so you can take any good rare chest with a lot of Life and resistances. But when you eventually swap to the Low life variant, you will need 6-Link Shavronne’s Wrappings, a good rare 1-handed caster weapon and Prism Guardian shield. So let’s check all gear slots progression in details.
Weapon:
As it was said, you will need Tremor Rod at the league start. When you realize that you have enough currency for switching to Low life, you will need a caster weapon with some special stats. The basic version can just have Spell damage, Critical strike chance for spells, +1 level to all Spell/Cold/Physical skill gems. On our High-end weapon, we also should have Chance to deal double damage, Extra damage as Chaos, and Hatred aura effect.

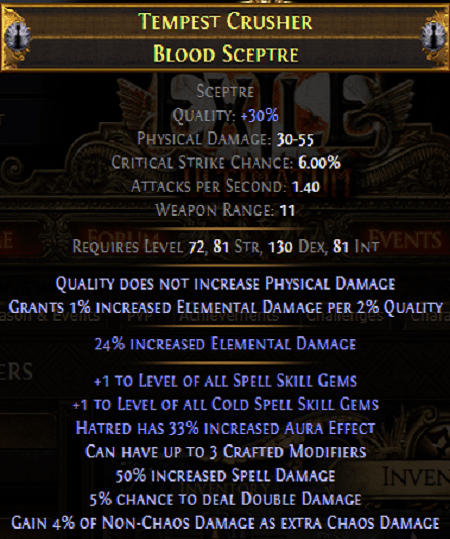
Starter weapon endgame weapon
Armour:
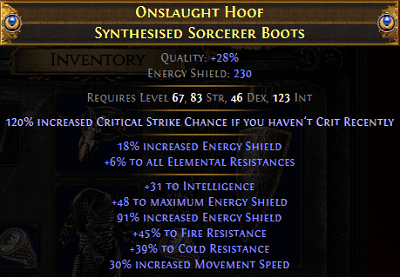
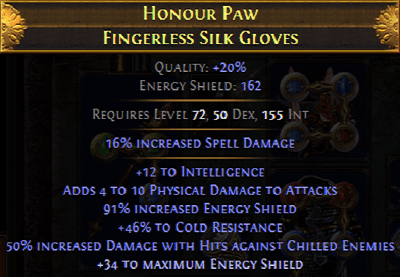
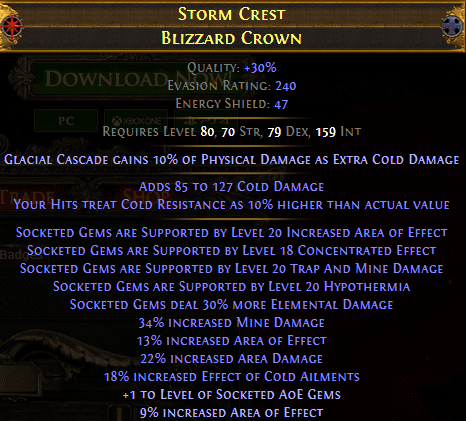
Your starter body armour will be Tabula Rasa or any rare 6-Link chest with good stats. After getting Tremor Rod, swap your chest to any good rare with Life and resistances. And our endgame variant is Shavronne’s Wrappings. Best corrupts for it should have + level of socketed AoE and Trap or Mine gems. On boots, we want to have movement speed and all Elemental resistances. The best gloves base for our build is Fingerless silk gloves because of the Spell damage bonus in implicit. There are no special stats for gloves for the starter version, so just take some with Life and resistances. Endgame variant should have “Increased damage with hits against chilled enemies”. For a basic helmet, you can take “Crown of the Inward Eye”. Our High-end helmet is one of the most expensive items in our build. It should have up to four modes that give us extra support links for gems, socketed in our helmet. Also, you should have a good helmet base, such as a Hubris circlet or Blizzard crown. And, when we swap to low life, we must have Prism Guardian as our shield. It allows us to reserve our life instead of mana for auras and activates our Pain Attunement node when you reserve more than 50% of your life.

Endgame armour examples
Jewelry:
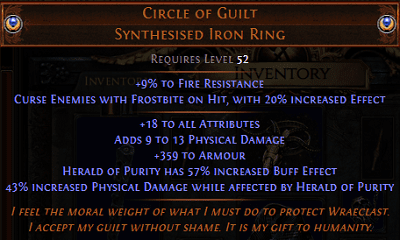
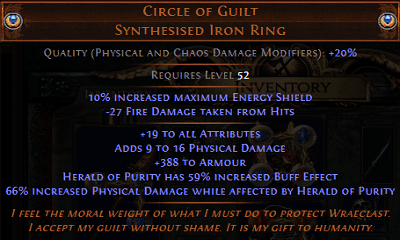
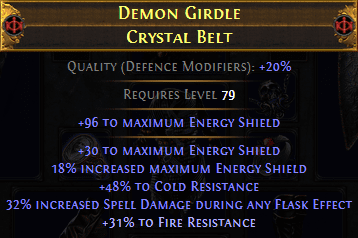
We will need some good rare rings and belt with life and resistances at the beginning. As almost every slot in our starter gear has resists, you can allow yourself to get one ring with just “Curse frostbite on hit” mode. Our endgame rings are two uniques – Circle of guilt. This unique has 4 different modes that give you buffs when you are affected by Herald of Purity, but it can only have two of them at the same time. And, depending on combinations of these mods, and up to three implicits, which are also random-rolled for each different ring, it can be really expensive in some variations. On our rings, we need “Herald of Purity buff effect” and “Increased Physical Damage while affected by Herald of Purity”. As our Hatred aura gives us Physical damage as extra cold damage, and Glacial Cascade is base physical damage that converts to cold damage, these two rings give us an insane amount of damage. The high-end belt for our build should have resistances, “+# to maximum energy shield”, “% increased energy shield”. Also, good mods are “Increased energy shield from body armour” and “Increased spell damage during any flask effect”.
Endgame jewelry
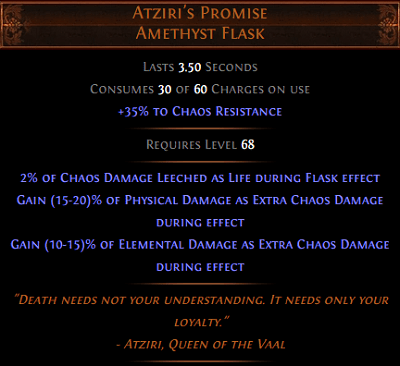
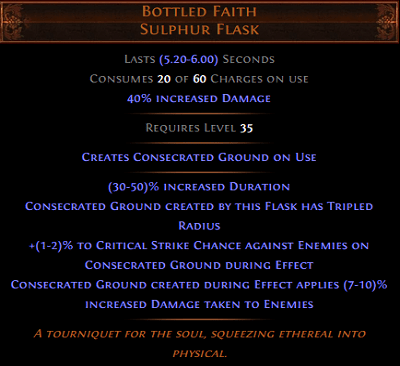
Flasks:
We will need two unique flasks – Atziri’s Promise and Bottled Faith. In the early game, you can use Taste of hate instead of Bottled Faith, but I recommend you get the second one as soon as possible. An important thing about Atziri’s Promise is that as Glacial Cascade has base physical damage which is converted to cold damage, you will get benefits from both its effects and your perfect flask should have both physical and elemental rolls at their maximum values.
The last three flasks should be Diamond flask, Quicksilver flask, and Divine mana flask. You should have Freeze, Bleed, and Curse immunities on these flasks. Also on the mana flask, you will need the “Enduring” prefix which reduces the amount of recovered mana but not removes recovery while you are on full mana.
Best flasks for our build
Gem setup
Main link:
With Tremor Rod our main DPS link will be Glacial Cascade + Controlled destruction/Awakened Controlled destruction + Inspiration + Trap and mine damage + Hypothermia + Cold penetration/Awakened cold penetration. You don’t really need awakened gems for your starter build, but if for some reason you decided to stay in the life version you should have them.
![]()
![]()


![]()
![]()
![]()
![]()
Glacial Awakened Inspiration Trap and mine Hypothermia Awakened
cascade Controlled destruction Damage Cold Penetration
In low life, we also have two different variants. First, if we have a crafted helmet with extra gem links on it. In this scenario, our main link will be Glacial Cascade + High-impact mine + Inspiration + Controlled destruction/Awakened Controlled destruction. That requires at least three support gems being crafted on our helmet – Trap and mine damage, Hypothermia, and Increased Area Effect/Concentrated Effect (the best variant is to have both).


Helmet with Glacial High-impact Inspiration Awakened
3 or 4crafted Cascade mine Controlled Destruction
support gems
If we don’t have a helmet with extra support links on it, our main link will be in our body armor and will look like Glacial Cascade + Controlled Destruction/Awakened Controlled Destruction + Inspiration + Hypothermia + High-impact mine + Trap and mine damage.


![]()
![]()
![]()
![]()
Glacial Awakened Inspiration Hypothermia High-impact Trap and Mine
Cascade Controlled Destruction mine Damage
Auras:
In the life version, we can’t use a lot of auras, so we have to take the most important – Hatred and Summon skitterbots.
![]()
![]()
![]()
![]()
Hatred Summon skitterbots
In low-life versions, there is much more flexibility and we can take a lot of auras, especially with good investments.
Prism Guardian has Blood magic by default as well as “Reduced mana reservation of socketed gems”, so we will use it for our most expensive in terms of mana cost auras – Hatred, Zealotry, and Discipline.


![]()
![]()
Prism Guardian Hatred Zealotry Discipline
If we use body armour for our main DPS link, we will put the rest of our auras in a helmet. We will need Summon skitterbots, Herald of Purity, Herald of Ash and Enlighten support. Skitterbots will shock and chill our enemies as well as give us more mine damage. Both Heralds give us extra damage based on basic skill’s physical damage (and Glacial Cascade has basic physical damage, which is converted to cold), and also, Herald of Purity has its buffs increased by Circle of Guilt rings.


![]()
![]()
Summon Herald Herald of Ash Enlighten
skitterbots of Purity
If our main DPS link uses a helmet, we can put our auras in body armour. Thus we can add two supports to our auras to increase their effects. The best choice will be to include in our aura link Bonechill support and Unbound Ailments/Awakened Unbound Ailments support. These two support gems will buff our skitterbots and will greatly increase our damage.


![]()
![]()
![]()
![]()
![]()
![]()
Summon Herald of Purity Herald of Ash Bonechill Awakened Enlighten
Skitterbots Unbound Ailment
Movement:
For movement, you can use Dash or Flame Dash linked with Second wind support and Arcane Surge support. As we don’t have an attack or cast speed it doesn’t really matter what skill to choose so it depends on your preferences.


Dash Second wind Arcane Surge

Flame Dash Second wind Arcane Surge
Defence:
Our defensive link will be Cast when damage taken + Immortal Call support. The main thing about this link is that you want maximum uptime of immortal call on your character. But when you level up your Cast when damage taken support (cwdt), the amount of damage you have to take to trigger the linked skill gem is increasing. That means you don’t want to level up “cwdt” gem, to trigger immortal call more often. And that means you can’t level up your immortal call higher than lvl 3, because your cwdt can only trigger gems required level 38 or lower. So we need lvl 1 “Cast when damage taken”, lvl 3 “Immortal call”
![]()
![]()
![]()
![]()
Cast when Immortal Call
damage taken
Debuffs and Curses:
For bosses, we will use Frost Bomb to apply exposure on target, which decreases enemies’ elemental resistances by 15%. You should link it with Bonechill support, so the target will take increased cold damage, based on the chill effect. If you don’t have a Curse ring you also can link Frost bomb with Hextouch support and Frostbite. And if you have Frostbite or Assassin’s mark on hit from your ring you can also buy lvl 5 Awakened Hextouch. This support gem will allow you to apply an additional curse, so you can add the Elemental weakness curse to your debuff link.


Circle of Guilt Frost Bomb Bonechill Awakened Elemental
with Curse Hextouch weakness
frostbite on hit

![]()
![]()
Frost Bomb Bonechill Hextouch Frostbite
Pantheon, Bandits and tips
Our build is crit-based, so Alira will be a great choice. She will give us Critical Strike Multiplier and All Elemental resistances which are both good at leveling and end game.
Soul of Arakaali is a good major god for us because of its bonuses to life regeneration as well as resistance to damage over time. And as we stand still while doing damage, Tukohama will be one of the best minor gods for our build.
Leveling process for miners is pretty simple – you just pick Stormblast mine on level 2 and rush toward the endgame with it. Tabula Rasa, Lifesprig wands and Goldrim helmet will help you on your way. Any rare or unique boots with movement speed also could be great. And if you have Berek’s Grip rings, it will greatly increase your damage during the leveling process.
![]()
![]()

![]()
![]()
Lifesprig Tabula Rasa Goldrim Berek’s Grip
