Barbarian seems to be one of the most balanced classes with a great variety of Diablo 4 Best Barbarian Builds. It is easy to start learning the game and it is extremely effective in the late game. Moreover, the Barbarian is not distinguished by the complexity of the mechanic: all their abilities are intuitive by name, and mistakes in the rotation will not lead to irreversible consequences. We are going to share the Best Barbarian Builds in Sins of the Horadrim for reaching level 60 and dealing with the Pit, all the needed Legendary Aspects and Endgame Items, as well as Paragon Boards and Glyphs.
 4.9
4.9Barbarian Builds Tier List
Even such a strong class as the Barbarian is very build-dependent. In this guide, we will talk about the general mechanics of the Barbarian, as well as give links to the strongest Barbarian builds in Diablo IV. Whether you aim to reach level 60, conquer Nightmare Dungeons, or pursue any other endeavors, these builds are tailored to suit your needs. And here’s our Diablo IV Barbarian Build Tier List:
| Tier | Leveling | Speedfarming | Endgame | PvP |
|---|---|---|---|---|
| S | Upheaval | Flay, Whirlwind | Flay, Bash, Frenzy Thorns | Flay, Bash |
| A | Double Swing, Whirlwind | Dust Devil Double Swing, Bash, Leap Quake, Death Blow, Rend, Upheaval | Mighty Throw, Rend, Double Swing Twisters, Death Blow Bonk | Rend, Double Swing Twisters, Death Blow Bonk |
| B | Hammer of the Ancients | Hammer of the Ancients | Hammer of the Ancients, Whirlwind Twisters | Hammer of the Ancients, Whirlwind Twisters |
| C | Rend | Thorns, Walking Arsenal | Leapquake, Upheaval | Leapquake, Upheaval |
Unfortunately, we need to warn you that changing builds is expensive, especially at a high level. Fortunately, you can buy Gold and fulfill any of your in-game desires!
Best Barbarian Endgame Build

In the current Season 9 of Diablo 4, there are several Barbarian builds that prove to be the best endgame builds. These are Bash Barbarian, Flay Barbarian, and Frenzy Thorns. Such a variety allows players to adjust the build to their playstyle, which is highly beneficial for those, who do not want to choose between enjoyment and performance. Here’s why best Diablo 4 Barbarian endgame builds are so powerful:
- Bash Barbarian — this build is considered single-target, and its power lies in massive critical strike attacks and stuns. The primary skill you are going to use is Lunging Strike, it generates Fury and allows you to reach the enemy faster. To amplify the damage use War Cry.
- Flay Barbarian — an excellent choice for those who like to make enemies bleed. Use Lunging Strike to gain Fury, taunt enemies with Challenging Shout, and fight them to their death. This build is DoT-oriented, so it might take a bit of time to deal with all the enemies, but it’s totally worth it!
- Frenzy Thorns — this is the best build if you want your enemies to regret attacking you. Your main abilities will be Frenzy, Challenging Shout, and Iron Skin. As you see, you have an arsenal of offensive and defensive abilities 2-in-1.
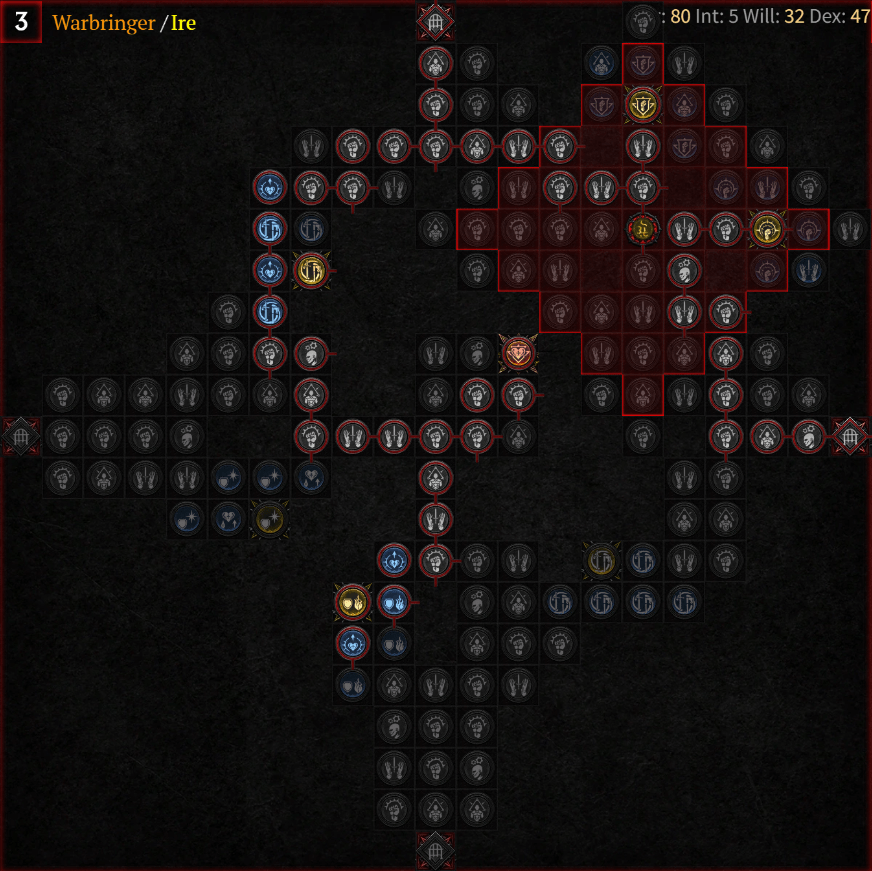
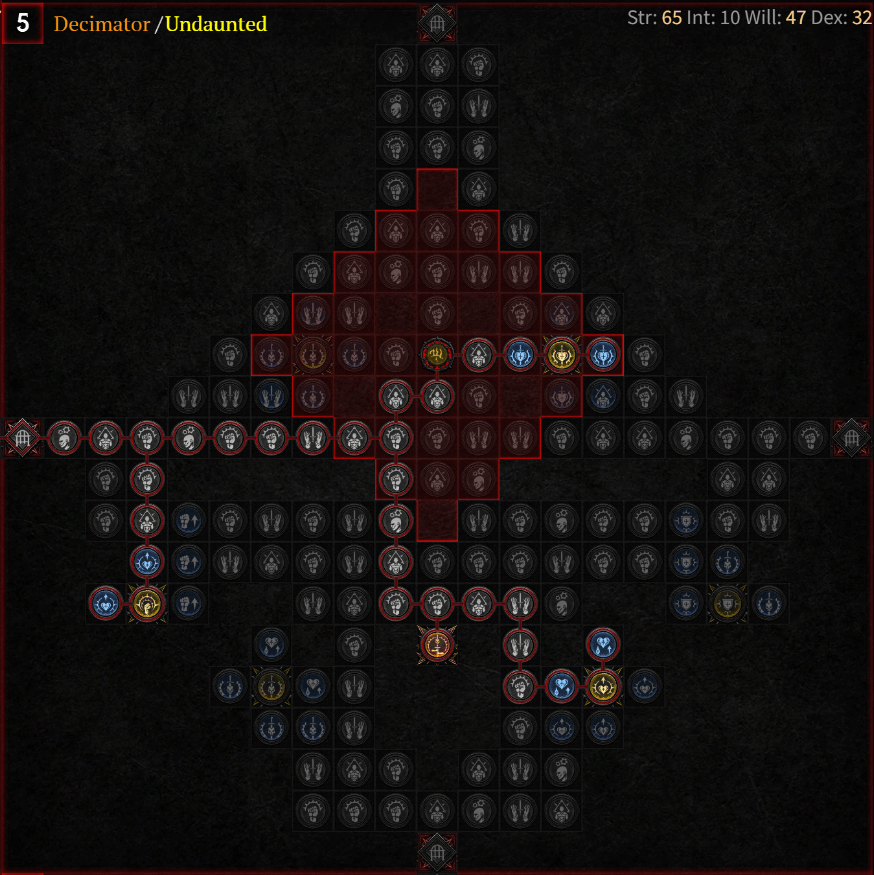
Paragon Boards
At level 50, unlock the Paragon Board for powerful bonuses. Prioritize Damage, Strength, Resistance, and Life. Seek Glyph Sockets and Legendary Nodes for the ultimate endgame Barbarian build.
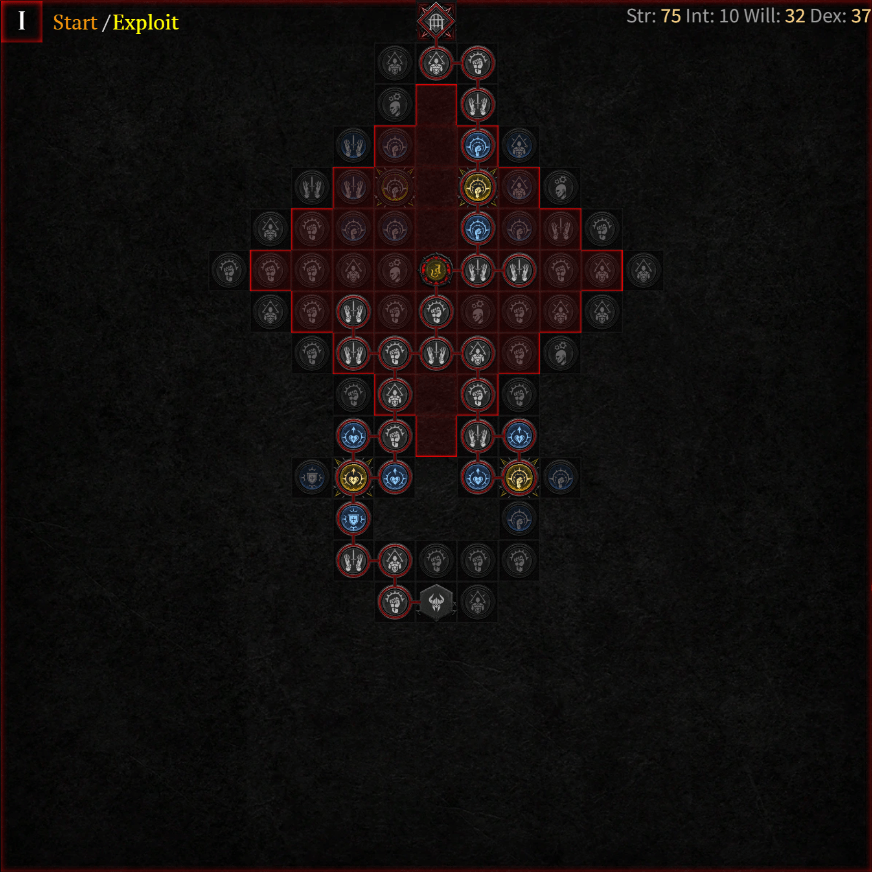
Start

Blood Rage
Warbringer

Carnage
Decimator

Bone Breaker
In Season 9 Barbarian Paragon Boards received minor changes and became larger and stronger. All the information about the updated Paragon Boards has been added to our Paragon Boards Guide, so you can find the details right there. For optimal Paragon Board distribution, follow this order:
- Start / Exploit;
- Blood Rage / Wrath;
- Warbringer / Ire;
- Carnage / Might;
- Decimator / Undaunted;
- Bone Breaker / Territorial.
This Paragon Board is aimed at building strong single-target attackers, who can stun and take down enemies one by one. If you need a particular Paragon Board layout for your favorite build, make sure to check other Barbarian Build guides on the Overgear platform.
Glyphs
Here are the Glyphs that we suggest activating while progressing through the Paragon Board:
| Starting Board | Carnage | Decimator |
|---|---|---|
| Brawn | Might | Brawn |
| Tenacity | Berserker + Fierce | Demolish |
| Exploit | Carnage | Crusher |
| Raw Power | Brash | Decimator |
| Iron Strength | Enraged | Destroyer |
| Warbringer | Blood Rage | |
| Hungering Fury | Marshal | |
| Warbringer | Wrath | |
| Ire | Blood Rage | |
| Brute Force + Raw Power | Restorative | |
| Core Reserve |
Legendary Aspects
Aspects are even more important than items with the right stats. If you manage to get an item with perfect stats and even a perfect aspect, then this is a success. And perhaps such an item will be even stronger than a unique item. With the help of our Coaching service, you will be able to know exactly what item you should equip in order to maximize the power of your character.
| Slot | Gems | Legendary Aspect / Unique Item |
|---|---|---|
| Helm | Grand Ruby | Ugly Bastard Helm |
| Chest | Grand Ruby | Rage of Harrogath |
| Gloves | N/A | Fists of Fate |
| Pants | Grand Ruby | Aspect of Bul-Kathos |
| Boots | N/A | Hooves of the Mountain God |
| Amulet | Scornful Light | Aspect of Adaptability |
| Ring 1 | Elemental Brand | Bold Chieftain’s Aspect |
| Ring 2 | The Starflux | Aspect of Inner Calm |
| Two-Handed Bludgeoning Weapon | Igni and Tec Runes or Grand Emerald | Aspect of the Moonrise |
| Two-Handed Slashing Weapon | Ahu and Qax or Grand Emerald | Aspect of Earthquakes |
| Dual Wield Weapon 1 | Grand Emerald | Ramaladni’s Magnum Opus |
| Dual Wield Weapon 2 | Grand Emerald | Shard of Verathiel |
Endgame Item Build
Season 9 brings some changes to the Barbarian Item Builds, and the Endgame builds are no exception. However, the items will differ for each of the S-Tier builds, so we offer you to adjust your items to a build of your choice. Here you can find one of the best endgame item build options for your Barbarian:
| Item | Effect | Affixes |
|---|---|---|
| Heir of Perdition (Helm) | Succumb to hatred and earn Mother’s Favor, increasing your damage dealt by 60%[x]. Slaughter enemies to briefly steal Mother’s Favor from Nearby allies. | +200.0% Damage to Angels and Demons+20.0% Critical Strike Chance+20.0% Lucky Hit Chance+20.0% Movement Speed+2 to Core Skills |
| Shroud of False Death (Chest) | If you haven’t dealt damage in the last 2 seconds, gain Stealth and 40%[+] Movement Speed. | +1 to All Passives+111 All Stats+333.0% Damage on Next Attack After Entering Stealth+222 Maximum Life11.1% Resource Generation |
| Anger Management (Gloves) | While above [55 – 40] Fury, you are Berserk, but lose 2 Fury per second. | |
| Arreat’s Bearing (Pants) | Ancients you summon are empowered. Korlic creates an Earthquake that deals [158 – 338] Physical damage over 4 seconds when he leaps. Talic leaves behind Dust Devils that deal [315 – 675] damage while he whirlwinds. Mawdac ignites the ground Burning enemies for an additional [158 – 338] damage over 4 seconds when he upheaves the ground. | +[251.0 – 350.0]% Ultimate Damage[23.5 – 32.5]% Call of the Ancients Cooldown Reduction+[489 – 526] Maximum Life+[26.0 – 35.0]% Resistance to All Elements |
| Yen’s Blessing (Boots) | Casting a Skill has a [40 – 60]% chance to cast a Non-Mobility, Non-Ultimate Skill that is currently on Cooldown. Can only occur once every 8 seconds. | +3 Maximum Evade Charges+[17.5 – 23.0]% Movement Speed+[51 – 65] All Stats[8.5 – 12.0]% Resource Generation+[26.0 – 35.0]% Resistance to All Elements |
| Herculean Spectacle (Bludgeoning Weapon) | Mighty Throw deals [15 – 35]%[x] increased damage and hurls another 2 weapons. | |
| Limitless Rage (Slicing Weapon) | Each point of Fury you generate while at Maximum Fury grants your next Core Skill within 5 seconds [1.00 – 3.00]%[x] increased damage, stacking up to 15 times. | |
| The Third Blade (Mainhand) | Your Weapon Mastery Skills are now also Core Skills that have no Cooldowns but cost Fury, dealing [50 – 70]% of normal damage. Their Fury costs are reduced by 5 for any additional Charges the Skill would have had. | +65.0% Damage to Close Enemies+[40.0 – 50.0]% Vulnerable Damage+[80 – 94] Strength+[57.5 – 80.0]% Weapon Mastery Damage+[1 – 2] Fury On Kill |
| Doombringer (Offhand) | Lucky Hit: Up to a 25% chance to deal 900 Shadow damage to surrounding enemies and reduce their damage dealt by 20% for 5 seconds. | +100.0% Damage+114 All Stats10.0% Damage ReductionLucky Hit: Up to a 15% Chance to Heal +530 Life35.0% Maximum Life |
| Inner Calm (Amulet) | Deal [5 – 13]%[x] increased damage. Triple this bonus after standing still for 3 seconds. | |
| Edgemaster’s (Ring 1) | Skills deal up to [5 – 25]%[x] increased damage based on your available Primary Resource when cast, receiving the maximum benefit while you have full Primary Resource. | |
| Ring of Starless Skies (Ring 2) | Spending your Primary Resource reduces the Resource cost of your Skills and increases your damage by 10%[x] for 3 seconds, up to 50%[x]. | +12.5% Resistance to All Elements+12.5% Resistance to All Elements+17.5% Attack Speed+12.5% Critical Strike Chance+12.5% Lucky Hit Chance+2 to Core Skills |
Runes
You can equip your Barbarian with up to 2 Runes, socketing them into your best weapon. There are two types of Runes — Ritual and Invocation — and you can equip one of each at a time to form a Runeword. Here you can find Barbarian best endgame rune combinations and their alternatives which will allow you to form Diablo 4 Season 9 Barbarian Runewords:
| Best in Slot | Alternative |
|---|---|
| Lith + Wat | Bac (Ritual) |
| Xol + Xal | Gar (Invocation) |
| Igni + Tec | Ohm (Invocation) |
| Ahu + Qax | Tec (Invocation) |
📌 Note: While the Best in Slot options provide the best results when combined, you can use alternative choices in case you haven’t come across the BiS one yet.
Our team can provide you with our assistance with any Runeword acquisition and equipping. You will be able to unlock powerful combinations of Runes without spending numerous hours on this activity and trying to get the needed combination.
Mercenaries

Mercenaries are a new feature added in Diablo IV Season 9. You can unlock Mercenaries during the Vessels of Hatred campaign. Generally, you will have 2 mercenaries by your side:
- Hired mercenary will assist you in your solo play. For this option, we recommend picking Raheir, who has a lot of useful spells to offer (e.g. Valiance, Bastion);
- Reinforcement mercenary is the one whom you can call to assist you from time to time. You can hire Aldkin as a reinforcement mercenary to utilize their mighty spells in critical situations (for instance, Field of Languish).
Choose of the Arsenal
Any Diablo IV Barbarian Build can be enhanced with the Arsenal System. The system is made to allow this class to wield 4 weapons and choose diverse weapons that suit best for the current situation. First of all, you need to choose the Two-Handed Axe Expertise to continuously gain the powerful damage multiplier provided by the following Weapon Expertise Effect:
[x]% (15% at Expertise Level 10) increased damage to Vulnerable enemies.
But keep in mind, that to swap your weapons, you need to equip them all in your inventory screen. You also need to assign weapons to the skills that you need via the Skill Menu. And if you want your character to be prepared for arsenal usage and endgame content, obtain the Ancestral Tier Bundle and forget abound grind.
Best Barbarian PvP Build
In a twist of fate, the most dominant PvP Barbarian builds in the current Diablo 4 meta are none other than Bash, Flay, and Rend Barbarian Builds. These Top 3 builds dominate the PvP area, with Bash Barbarian being S-Tier, and Flay + Rend falling slightly behind it into the A-Tier. These builds are tailored specifically to make your enemy cry and die.
- Bash allows you to control the target while dealing massive damage;
- Flay is all about bleed damage over time;
- Rend is famous for making your enemies bleed out but requires good CD management.
Best Barbarian Skills
In Diablo 4, the Barbarian is equipped with a total of 23 distinct skills. We’ve picked out the best abilities from each category that you’re sure to come across in any build.
| Category | Best example |
|---|---|
| Basic | Flay — stands out as a remarkable capability inherent to the Barbarian class, empowering them to accumulate significant base damage against formidable foes and boss characters, thereby gradually depleting their health reserves. Improved versions of the Flay attacks increase your damage against enemies and reduce their immunity. Moreover, this Basic skill is one of our ways to get Fury generation. |
| Core | Hammer of the Ancients (HotA) — is a formidable core skill with high damage output, consuming minimal Fury. Its full potential shines when combined with Enhanced Hammer of the Ancients, which regenerates Fury, and Furious Hammer of the Ancients, enabling devastating attacks with maximum resources. |
| Defensive | Iron Skin — offers valuable survival benefits. Iron Skin gives you a Barrier that absorbs 50% of your missing Life for 5 seconds. |
| Brawling | On the other hand, Leap addresses the Barbarian’s inherent maneuverability limitations, granting you a means to swiftly navigate the battlefield increasing your movement speed. |
| Weapon Mastery | Death Blow — A great spell that deals devastating damage in a huge AoE area. The goal is to maximize the damage output of Death Blow by creating a strategic flow where, when the ability is off cooldown, you can unleash significant damage. |
| Ultimate | Wrath of the Berserker is a primary spell to unleash your inner fury, creating an explosive force that knocks back enemies around you while empowering yourself with Berserking and Unstoppable for 5 seconds. In the aftermath of this eruption, your Basic Skills become even deadlier. Dealing direct damage with them grants you Berserking for 5 seconds, fueling your relentless onslaught for the next 10 seconds. |
Barbarian Unique Items
Unique items are an important component of any build, which increases its power. You can read more about unique items in our Unique Items guide.
Regarding the Barbarian, unique items are just as important as for any other class. However, this does not mean that your build will not work without them. You need unique items just to create a super-powerful build. Below are the best unique items for the Barbarian.
Weapon
| Equipment | Effect | Affixes |
|---|---|---|
| Ancients’ Oath | Steel Grasp launches 2 additional chains. Enemies hit by Steel Grasp take [40 – 60]%[x] increased damage from you for 5 seconds. | +[207.0 – 270.0]% Damage to Close Enemies [12.0 – 16.0]% Cooldown Reduction +[198 – 270] Strength +[4 – 6] to Steel Grasp |
| Doombringer | Lucky Hit: Up to a 25% chance to deal 900 Shadow damage to surrounding enemies and reduce their damage dealt by 20% for 5 seconds. | +114 All Stats 10.0% Damage Reduction Lucky Hit: Up to a 5% Chance to Heal +2,687 Life 35.0% Maximum Life |
| Fields of Crimson | While using this weapon, damaging at least one enemy with Rupture creates a blood pool that inflicts [53 – 98] Bleeding damage over 6 seconds. Enemies standing in the pool take 30%[x] increased damage. | +[406.0 – 550.0]% Damage to Bleeding Enemies +[52.0 – 70.0]% Enhanced Rupture Explosion Size +[198 – 270] Strength [16.0 – 25.0]% Rupture Cooldown Reduction |
| Hellhammer | Upheaval ignites the ground Burning enemies for an additional [225 – 375] damage over 4 seconds increased by 10%[x] for every 100 Strength you have. Current Bonus: 0%[x] | +[52.0 – 70.0]% Upheaval Size +[4 – 6] to Upheaval +[2 – 4] to Wallop +[252 – 360] Strength |
| Overkill | Death Blow creates a shockwave, dealing [25 – 45]% of its Base damage to enemies. Enemies who die to this effect also reset Death Blow’s Cooldown. | +[198 – 270] Strength +[342.0 – 450.0]% Physical Damage +[125.0 – 170.0]% Vulnerable Damage +[4 – 6] to Death Blow |
Armor
| Equipment | Effect | Affixes |
|---|---|---|
| 100,000 Steps (Boots) | When activating or refreshing the full Walking Arsenal Key Passive effect, you automatically cast Ground Stomp and gain [50 – 100] Fury. Can only occur once every 10 seconds. | +[12.5 – 18.0]% Movement Speed +[5.0 – 7.0]% Movement Speed per Walking Arsenal Bonus +[82.5 – 105.0]% Damage to Stunned (CC) Enemies +[46.5 – 60.0]% Ground Stomp Size |
| Arreat’s Bearing (Pants) | Ancients you summon are empowered. Korlic creates an Earthquake that deals [158 – 338] Physical damage over 4 seconds when he leaps. Talic leaves behind Dust Devils that deal [315 – 675] damage while he whirlwinds. Mawdac ignites the ground Burning enemies for an additional [158 – 338] damage over 4 seconds when he upheaves the ground. | +[251.0 – 350.0]% Ultimate Damage [23.5 – 32.5]% Call of the Ancients Cooldown Reduction +[638 – 873] Maximum Life +[26.0 – 35.0]% Resistance to All Elements |
| Gohr’s Devastating Grips (Gloves) | Whirlwind explodes every 2 seconds and after it ends, dealing [40 – 70]% of the Base damage dealt to surrounding enemies as Fire damage. | +[13.5 – 22.5]% Critical Strike Chance Against Close Enemies +[8.0 – 12.5]% Movement Speed +[10.5 – 15.0]% Attack Speed +[3 – 5] to Whirlwind |
| Rage of Harrogath (Chest) | Lucky Hit: Inflicting Bleeding on an enemy has up to a [20 – 60]% chance to reduce the Cooldowns of your Skills by 1.0 second. | +[638 – 873] Maximum Life [8.0 – 12.5]% Damage Reduction from Bleeding Enemies +[6.0 – 8.0]% Critical Strike Chance +[72.5 – 95.0]% Damage Over Time |
| Tuskhelm of Joritz the Mighty (Helm) | When you gain Berserking while already Berserk, you have a [40 – 60]% chance to become more enraged granting 15%[x] increased damage, 2 Fury per second, and 10% Cooldown Reduction. | +[103.5 – 135.0]% Damage while Berserking +[6.0 – 8.0]% Attack Speed while Berserking +[10.5 – 15.0]% Movement Speed while Berserking +[638 – 873] Maximum Life |
| Twin Strikes (Gloves) | After casting Double Swing 4 times, your next Double Swing will hit 2 additional times, each dealing [10 – 40]%[x] increased damage. | +[15.5 – 20.0]% Attack Speed +[9.0 – 11.0]% Critical Strike Chance +[76 – 90] Strength +[2 – 3] to Double Swing |
| Ugly Bastard Helm (Helm) | Casting Wrath of the Berserker causes you to explode, dealing [150 – 450] Fire damage. While Berserking, all damage you would deal is converted into Fire. You deal [10 – 30]%[x] increased Fire damage. | +[3 – 5] to Prolific Fury [8.0 – 12.5]% Wrath of the Berserker Cooldown Reduction +[26.0 – 35.0]% Resistance to All Elements Lucky Hit: Up to a 40% Chance to Deal +[4,250 – 6,750] Fire Damage |
Any required item, including the 100.000 Steps and more, you can obtain from our professional tea fast and easy. You won’t have to deal with long and boring grinding and will save time.
Jewelry
| Equipment | Effect | Affixes |
|---|---|---|
| Battle Trance (Amulet) | Increase Frenzy’s maximum stacks by 2. While at maximum stacks, you deal [15 – 30]%[x] increased damage and your other Skills gain [35 – 55]%[+] increased Attack Speed. | +[6.0 – 8.0]% Critical Strike Chance [8.0 – 12.5]% Damage Reduction from Close Enemies +[4 – 6] to Duelist +[2 – 3] to Frenzy |
| Ring of Red Furor (Ring) | After spending 100 Fury within 3 seconds, your next cast of Hammer of the Ancients, Upheaval, or Death Blow within 5 seconds is a guaranteed Critical Strike and deals [10 – 40]%[x] bonus Critical Strike Damage. | +[9 – 15] Maximum Resource +[7.0 – 9.0]% Attack Speed +[88.0 – 115.0]% Critical Strike Damage +[32.0 – 40.0]% Fire Resistance |
| Ring of the Ravenous (Ring) | Rend’s duration is increased by [4.0 – 8.0] seconds. Damaging enemies with your Brawling Skills applies 2 stacks of Rend’s Bleed. This can only affect each enemy once every 1 second. | +[9.0 – 11.0]% Critical Strike Chance +[46.5 – 60.0]% Vulnerable Damage +[1 – 2] to Brawling Skills +[2 – 3] to Rend |
| Unbroken Chain (Amulet) | Casting Steel Grasp reduces Iron Maelstrom’s Cooldown by [3.3 – 10.0] seconds. Enemies damaged by Iron Maelstrom deal [10 – 30]% less damage for 6 seconds. | +[12.5 – 18.0]% Movement Speed +[2 – 3] to Pit Fighter+[219.0 – 300.0]% Ultimate Damage [13.5 – 22.5]% Steel Grasp Cooldown Reduction |
4.9Now you are presented with a comprehensive manual outlining the Barbarian class in Diablo 4, exclusively tailored to construct a formidable character. This Best Barbarian Build in Season of Sins of the Horadrim guide encompasses an assortment of vital aspects, including optimal skills, invaluable gems, strategic stat prioritization, the revolutionary Arsenal system, and a multitude of other valuable insights. We pledge to continuously enhance and refresh this article, ensuring you possess the most up-to-date knowledge readily accessible.
