In the latest WoW SoD update, players will be able to complete a series of updated instances; all of them are filled with challenges and rewards. This guide contains all the information about Season of Discovery Phase 4 dungeons such as its layout, the best strategies to use, and the rewards that you are likely to get once you complete them. Also in Season of Discovery Phase 4, a new dungeon, Demon Fall Canyon, has been added. You can find out more about it in our separate guide.
 4.9
4.9Season of Discovery Phase 4 Dungeons List
In the latest update there are several revamped WoW Season of Discovery dungeons will be available for players. Here is the WoW SoD Phase 4 dungeons list:
- Upper Blackrock Spire
- Lower Blackrock Spire
- Blackrock Depths Upper City
- Dire Maul (3 wings)
- Scholomance
- Stratholme
- Demon Fall Canyon
Season of Discovery Phase 4 Dungeons Rewards
The revamped WoW SoD dungeons come with a treasure trove of updated rewards tailored for max-level adventurers. Each WoW Vanilla dungeon has been meticulously redesigned to provide a challenging yet rewarding experience, ensuring that players are well-equipped for the battles that lie ahead. Our professional boosters are also ready to assemble a Dungeon Set for you, freeing up your time.
UBRS Rewards
Accessories
| Slot | Item |
|---|---|
| Finger | Band of Rumination |
| Finger | Painweaver Band |
| Finger | Rune Band of Wizardry |
| Neck | Emberfury Talisman |
| Neck | Pendant of Celerity |
| Neck | Tooth of Gnarr |
| Trinket | Draconic Infused Emblem |
Cloth Armor
| Slot | Item |
|---|---|
| Feet | Ironweave Boots |
| Head | Ironweave Cowl |
| Head | Spellweaver’s Turban |
| Head | Starfire Tiara |
| Waist | Dustfeather Sash |
Leather Armor
| Slot | Item |
|---|---|
| Head | Eye of Rend |
| Legs | Blademaster Leggings |
| Shoulfer | Truestrike Shoulders |
| Waist | Crystallized Girdle |
| Wrist | Blackmist Armguards |
Mail Armor
| Slot | Item |
|---|---|
| Feet | Flame Walkers |
| Feet | Wind Dancer Boots |
| Legs | Tristam Legguards |
| Shoulder | Bonespike Shoulder |
| Waist | Feralsurge Girdle |
Plate Armor
| Slot | Item |
|---|---|
| Legs | Warmaster Legguards |
| Waist | Brigam Girdle |
| Waist | Handcrafted Mastersmith Girdle |
| Wrist | Battleborn Armbraces |
Weapons
| Slot | Item |
|---|---|
| Main-Hand | Dal’Rend’s Sacred Charge |
| Off-Hand | Dal’Rend’s Tribal Guardian |
| One-Hand | Felstriker |
| Ranged | Serpentine Skuller |
| Two Hand | Lord Valthalak’s Staff of Command |
| Two Hand | Blackblade of Shahram |
| Two Hand | Seeping Willow |
| Two-Hand | Blackhand Doomsaw |
Cloak
| Slot | Item |
|---|---|
| Back | Bloodmoon Cloak |
| Back | Frostweaver Cape |
LBRS Rewards
Accessories
| Slot | Item |
|---|---|
| Finger | Magus Ring |
| Finger | Mark of the Dragon Lord |
| Neck | Talisman of Evasion |
| Trinket | Heart of the Scale |
| Trinket | Smolderweb’s Eye |
Cloth Armor
| Slot | Item |
|---|---|
| Feet | Kayser’s Boots of Precision |
| Feet | Ogreseer Tower Boots |
| Hands | Demonskin Gloves |
| Shoulder | Sunderseer Mantle |
| Waist | Ironweave Belt |
| Wrist | Funeral Cuffs |
| Wrist | Ironweave Bracers |
Leather Armor
| Slot | Item |
|---|---|
| Shoulder | Demonic Runed Spaulders |
Mail Armor
| Slot | Item |
|---|---|
| Feet | Swiftdart Battleboots |
| Hands | Gilded Gauntlets |
| Hands | Trueaim Gauntlets |
| Waist | Chiselbrand Girdle |
| Waist | Marksman’s Girdle |
| Wrist | Brazecore Armguards |
| Wrist | Slashclaw Bracers |
Plate Armor
| Slot | Item |
|---|---|
| Chest | Plate of the Shaman King |
| Hands | Backusarian Gauntlets |
| Hands | Reiver Claws |
Weapons
| Slot | Item |
|---|---|
| Held In Off-hand | Globe of D’sak |
| Off-Hand | Rhombeard Protector |
| One-Hand | Fang of the Crystal Spider |
| One-Hand | Phase Blade |
| One-Hand | The Jaw Breaker |
| One-Hand | Venomspitter |
| Ranged | Blackcrow |
| Two-Hand | Chillpike |
| Two-Hand | Fist of Omokk |
| Two-Hand | Relentless Scythe |
| Two-Hand | Trindlehaven Staff |
Cloak
| Slot | Item |
|---|---|
| Back | Butcher’s Apron |
Blackrock Depths Rewards
Accessories
| Slot | Item |
|---|---|
| Neck | Imperial Jewel |
| Trinket | Burst of Knowledge |
| Trinket | Hand of Justice |
| Trinket | Second Wind |
Cloth Armor
| Slot | Item |
|---|---|
| Chest | Robes of the Royal Crown |
| Feet | Omnicast Boots |
| Head | Circle of Flame |
| Shoulder | Ironweave Mantle |
Leather Armor
| Slot | Item |
|---|---|
| Head | Ghostshroud |
| Legs | Luminary Kilt |
| Wrist | Wristguards of Renown |
Mail Armor
| Slot | Item |
|---|---|
| Chest | Deathdealer Breastplate |
| Hands | Molten Fists |
| Waist | Sash of the Grand Hunt |
Plate Armor
| Slot | Item |
|---|---|
| Legs | Legplates of the Eternal Guardian |
Weapons
| Slot | Item |
|---|---|
| Held In Off-hand | Magmus Stone |
| Held In Off-hand | Thaurissan’s Royal Scepter |
| Main Hand | Blood-etched Blade |
| Main Hand | Ironfoe |
| Main Hand | Lord General’s Sword |
| Main Hand | Wraith Scythe |
| Two Hand | Dreadforge Retaliator |
| Two Hand | Guiding Stave of Wisdom |
| Two-Hand | Angerforge’s Battle Axe |
| Two-Hand | Flame Wrath |
| Two-Hand | Impervious Giant |
| Two-Hand | Lavastone Hammer |
Cloak
| Slot | Item |
|---|---|
| Back | Cape of the Fire Salamander |
| Back | The Emperor’s New Cape |
Dire Maul Rewards
Accessories
| Slot | Item |
|---|---|
| Finger | Ring of Demonic Guile |
| Finger | Ring of Demonic Potency |
| Finger | Tarnished Elven Ring |
| Neck | Elder Magus Pendant |
| Neck | Tempest Talisman |
Cloth Armor
| Slot | Item |
|---|---|
| Chest | Mindsurge Robe |
| Hands | Brightspark Gloves |
| Hands | Ironweave Gloves |
| Head | Crown of the Ogre King |
| Shoulder | Diabolic Mantle |
Leather Armor
| Slot | Item |
|---|---|
| Head | Insightful Hood |
| Legs | Tanglemoss Leggings |
| Shoulder | Cyclone Spaulders |
| Waist | Mugger’s Belt |
Mail Armor
| Slot | Item |
|---|---|
| Chest | Ogre Forged Hauberk |
| Head | Fervent Helm |
| Legs | Silvermoon Leggings |
| Legs | Leggings of Destruction |
| Shoulder | Denwatcher’s Shoulders |
| Waist | Warpwood Binding |
Plate Armor
| Slot | Item |
|---|---|
| Chest | Energized Chestplate |
| Legs | Eldritch Reinforced Legplates |
| Shoulder | Bulky Iron Spaulders |
Weapons
| Slot | Item |
|---|---|
| Off-Hand | Distracting Dagger |
| Off-Hand | Observer’s Shield |
| One-Hand | Fiendish Machete |
| Ranged | Stoneshatter |
| Ranged | Satyr’s Bow |
| Two-Hand | Quel’dorai Channeling Rod |
| Two-Hand | Waveslicer |
| Two-Hand | Barbarous Blade |
| Two-Hand | Rod of the Ogre Magi |
| Two-Hand | Treant’s Bane |
| Two-Hand | Unyielding Maul |
Cloak
| Slot | Item |
|---|---|
| Back | Heliotrope Cloak |
Class Items
| Class | Item |
|---|---|
| Paladin | Royal Seal of Eldre’Thalas |
| Mage | Royal Seal of Eldre’Thalas |
| Warrior | Royal Seal of Eldre’Thalas |
| Rogue | Royal Seal of Eldre’Thalas |
Scholomance Rewards
Accessories
| Slot | Item |
|---|---|
| Finger | Amalgam’s Band |
| Finger | Dimly Opalescent Ring |
| Finger | Don Mauricio’s Band of Domination |
| Neck | Heart of the Fiend |
| Finger | Necromantic Band |
Cloth Armor
| Slot | Item |
|---|---|
| Chest | Alanna’s Embrace |
| Feet | Coldstone Slippers |
| Hands | Darkshade Gloves |
| Hands | Shivery Handwraps |
| Legs | Ironweave Pants |
| Legs | Skullsmoke Pants |
| Waist | Clutch of Andros |
Leather Armor
| Slot | Item |
|---|---|
| Chest | Tombstone Breastplate |
| Hands | Gargoyle Slashers |
| Head | Bone Ring Helm |
| Head | Tattered Leather Hood |
| Legs | Ghostloom Leggings |
| Shoulder | Death’s Clutch |
Mail Armor
| Slot | Item |
|---|---|
| Feet | Windreaver Greaves |
| Legs | Maelstrom Leggings |
| Waist | Detention Strap |
Plate Armor
| Slot | Item |
|---|---|
| Feet | Death Knight Sabatons |
| Legs | Wraithplate Leggings |
| Shoulder | Stoneform Shoulders |
Weapons
| Slot | Item |
|---|---|
| Held In Off-hand | Spellbound Tome |
| Main Hand | Ebon Hilt of Marduk |
| Main-Hand | Blade of Necromancy |
| Main-Hand | Iceblade Hacker |
| Main-Hand | Witchblade |
| Off-Hand | Rattlecage Buckler |
| One Hand | Frightalon |
| One-Hand | Blade of Blackwood |
| Ranged | Ancient Bone Bow |
| Two-Hand | Barovian Family Sword |
| Two-Hand | Frightskull Shaft |
| Two-Hand | Gravestone War Axe |
| Two-Hand | Hammer of Divine Might |
| Two-Hand | Headmaster’s Charge |
| Two-Hand | Malicious Axe |
Item Sets
| Set Name | Set Bonus | Slot | Item |
|---|---|---|---|
| Bloodmail Regalia | 2 pieces: Increased Defense +3. 3 pieces: +10 Attack Power. 4 pieces: +15 All Resistances. 5 pieces: Increases your chance to parry an attack by 1%. | Waist | Bloodmail Belt |
| Feet | Bloodmail Boots | ||
| Hands | Bloodmail Gauntlets | ||
| Chest | Bloodmail Hauberk | ||
| Legs | Bloodmail Legguards | ||
| Deathbone Guardian | 2 pieces: Increased Defense +3. 3 pieces: +50 Armor. 4 pieces: +15 All Resistances. 5 pieces: Increases your chance to parry an attack by 1%. | Waist | Deathbone Girdle |
| Feet | Deathbone Sabatons | ||
| Hands | Deathbone Gauntlets | ||
| Chest | Deathbone Chestplate | ||
| Legs | Deathbone Legguards | ||
| Necropile Raiment | 2 pieces: +5 Stamina. 3 pieces: +5 Intellect. 4 pieces: +15 All Resistances. 5 pieces: Increases damage and healing done by magical spells and effects by up to 23. | Shoulder | Necropile Mantle |
| Feet | Necropile Boots | ||
| Wrist | Necropile Cuffs | ||
| Chest | Necropile Robe | ||
| Legs | Necropile Leggings |
Stratholme Rewards
Accessories
| Slot | Item |
|---|---|
| Finger | Seal of Rivendare |
| Finger | The Postmaster’s Seal |
| Neck | Nacreous Shell Necklace |
| Neck | Star of Mystaria |
| Trinket | Cannonball Runner |
Cloth Armor
| Slot | Item |
|---|---|
| Chest | Ironweave Robe |
| Chest | The Postmaster’s Tunic |
| Feet | The Postmaster’s Treads |
| Hands | Shadowy Laced Handwraps |
| Head | The Postmaster’s Band |
| Legs | The Postmaster’s Trousers |
| Shoulder | Shroud of the Nathrezim |
| Shoulder | Soulstealer Mantle |
| Waist | Grimgore Noose |
| Waist | Thuzadin Sash |
Leather Armor
| Slot | Item |
|---|---|
| Chest | Songbird Blouse |
| Chest | Tunic of the Crescent Moon |
| Head | Mask of the Unforgiven |
| Legs | Plaguehound Leggings |
| Wrist | Magistrate’s Cuffs |
Mail Armor
| Slot | Item |
|---|---|
| Feet | Timmy’s Galoshes |
| Hands | Dracorian Gauntlets |
| Hands | Gauntlets of Deftness |
| Head | Crown of Tyranny |
| Legs | Woollies of the Prancing Minstrel |
Plate Armor
| Slot | Item |
|---|---|
| Head | Grand Crusader’s Helm |
| Head | Helm of the Executioner |
| Legs | Chitinous Plate Legguards |
| Waist | Rainbow Girdle |
| Wrist | Morlune’s Bracer |
| Wrist | Vambraces of the Sadist |
Weapons
| Slot | Item |
|---|---|
| Held In Off-Hand | Book of the Dead |
| Held In Off-Hand | Scepter of Interminable Focus |
| One-Hand | Bone Slicing Hatchet |
| One-Hand | Gift of the Elven Magi |
| One-Hand | Skullforge Reaver |
| Ranged | Willey’s Portable Howitzer |
| Two-Hand | Hammer of the Grand Crusader |
| Two-Hand | Peacemaker |
| Two-Hand | Runeblade of Baron Rivendare |
Cloak
| Slot | Item |
|---|---|
| Back | Royal Tribunal Cloak |
Season of Discovery Phase 4 Dungeons Tactics
WoW Classic Season of Discovery dungeons presents unique challenges and opportunities for players. Here are detailed SoD Phase 4 dungeons strategies to help you navigate through the challenges effectively.
Upper Blackrock Spire
Upper Blackrock Spire is a Season of Discovery WoW dungeon found within the entrance to Lower Blackrock Spire, which is in Blackrock Mountain. To get to UBRS, you have to go through LBRS and take the first door on your left; however, the door is initially locked. Our team is ready to go through Blackrock Spire for you and overcome all the difficulties that this dungeon contains.
To open the door to UBRS at least one member of your group must have the Seal of Ascension. This can be obtained by gathering the Unadorned Seal of Ascension from trash mobs in LBRS, and then collecting three gemstones dropped by bosses:
| Boss | Gemstone Dropped |
|---|---|
| Highlord Omokk | Gemstone of Spirestone |
| War Master Voone | Gemstone of Smolderthorn |
| Overlord Wyrmthalak | Gemstone of Bloodaxe |
Once you have got the gemstones, go to Vaelan in LBRS to continue the quest. The last part is a fight in Dustwallow Marsh with Emberstrife, during which the seal is created with the help of his Flames of the Black Flight spell.
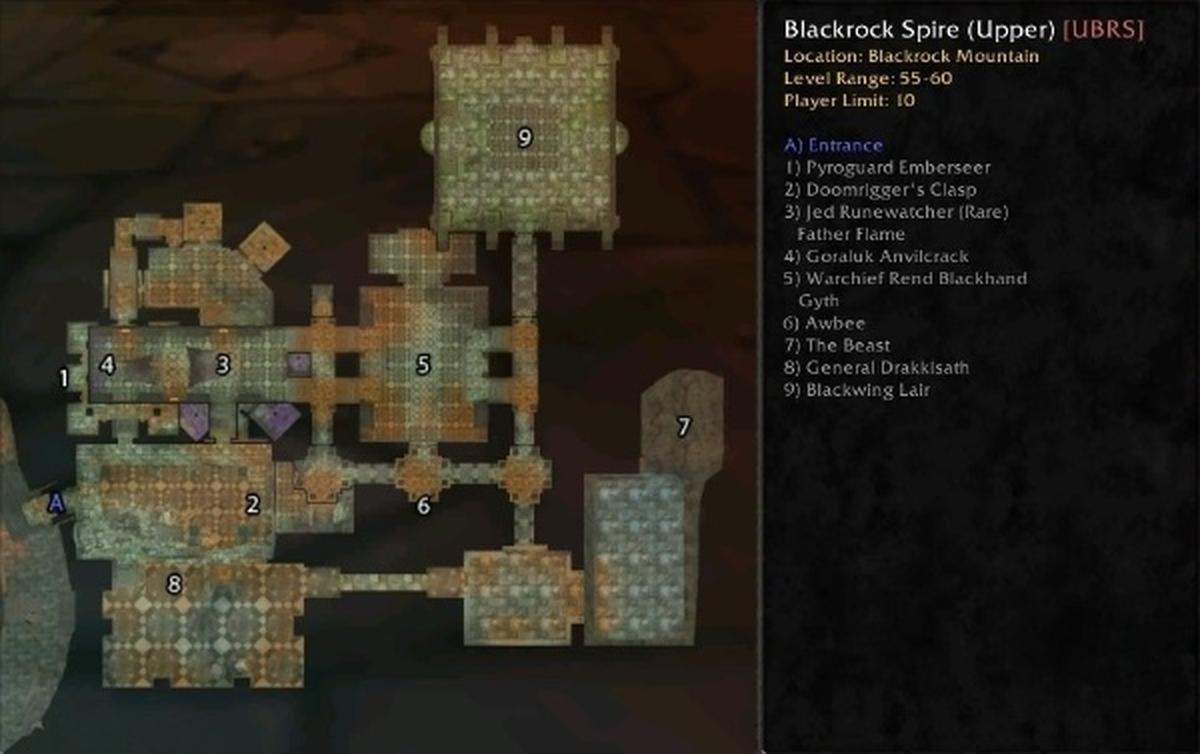
Upper Blackrock Spire Layout
UBRS has a simple linear design but at the same time, it is quite intricate. At the beginning of the dungeon, killing all the mobs is crucial to unlock the next doors in the dungeon. Specifically, the hatchery area entails running to the back right to climb debris to the second floor.
Upper Blackrock Spire Strategy
Trash in UBRS can be somewhat difficult because of the numerous packs of orcs. Use crowd control spells such as Sap and Polymorph on the groups to control them easily. Watch out for pulls, especially the melee orcs which can charge and create a lot of trouble.
Here is the strategy how to defeat UBRS bosses:
- Pyroguard Emberseer: Start the fight by having several players channel the Altar to initiate the fight and bring in several adds. Clear the adds quickly as they are quite simple to AoE down. Pyroguard Emberseer will spawn thereafter; tank him where he spawns, facing away from the group to avoid his attacks.
- Solakar Flamewreath: Do not crack any eggs in the hatchery. Clear all dragons before starting the event by talking to Father Flame. Deal with the multiple waves of adds efficiently, and prioritize killing Rookery Hatchers so that they do not break eggs. Last, tank Solakar out of the group to reduce the effect of his War Stomp.
- Goraluk Anvilcrack: Located at the western part of the room beyond the hatchery. Before engaging in combat, clear all trash mobs in the surrounding area. Tank Goraluk should turn his back to the group and concentrate on DPS to defeat him as soon as possible.
- Jed Runewatcher (Rare Spawn): Jed is located at the east end of the same room as Goraluk Anvilcrack but only spawns occasionally. Make sure the area around is clean before you start the engagement. Jed is simple; just concentrate on DPS as he is not dangerous if controlled.
- Warchief Rend Blackhand & Gyth: Jump down into the pit to initiate the event. Pay attention to waves of enemies and when Rend joins Gyth, move Gyth away from the raid to avoid his breath attacks. Keep DPS on Gyth until Rend dismounts, then switch to Rend, be careful of his Whirlwind.
- The Beast: Position the tank with their back against a wall to prevent knockback from the Beast’s charge. Ranged and healers should spread out to reduce the impact of his fear and AoE fire abilities. Watch for his Flamebreak and charge to manage positioning effectively.
- General Drakkisath: Get a Hunter to pull Drakkisath with Aspect of the Cheetah and Arcane Shot to maintain aggro while kiting him through the instance. The group is concerned with the elimination of the two adds separately. Once adds are down, Hunter uses Feign Death, and Drakkisath comes back to the field for a one-on-one fight.
Lower Blackrock Spire
LBRS is WoW SoD dungeon situated within Blackrock Mountain. To get to Blackrock Mountain you can either go through southern Searing Gorge or north-western Burning Steppes. After you get in, swing from the ropes from the middle platform to the second floor ledge, then walk along the ledge and jump to the balcony to get to the entrance of LBRS.
LBRS can be done with different group compositions, the optimal number of players in the group is up to 10, but if the group consists of more than 5 people, then experience gain will be less efficient if you are not yet level 60.
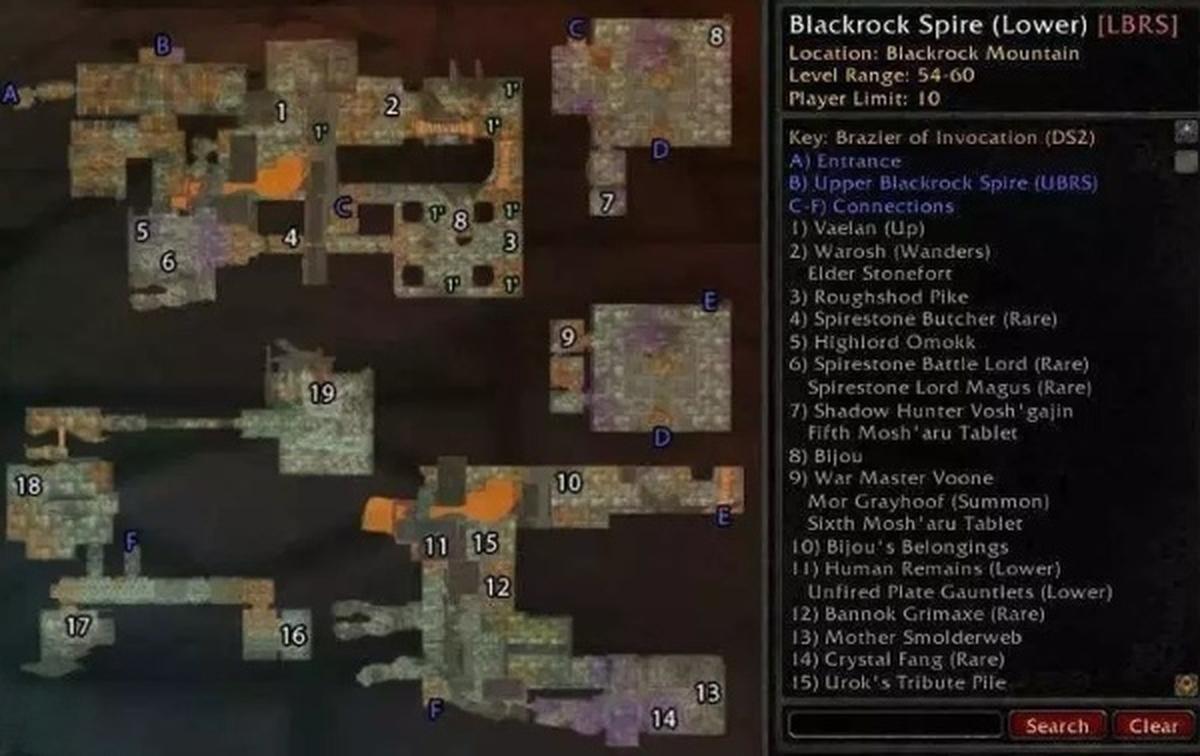
Lower Blackrock Spire Layout
Lower Blackrock Spire features numerous bosses and intricate paths, which can be quite confusing for first-time adventurers. The best advice is to include someone in your group who has previously completed the instance and can guide you.
Lower Blackrock Spire Strategy
The first trash packs are especially difficult because of the density of mobs. Focus on:
- Pulling groups one at a time.
- Prioritizing caster mobs to be killed first.
- Using crowd control abilities (Sap and Polymorph) to deal with the difficult pulls efficiently.
Here’s a detailed LBRS bosses strategy, which will help you maximize your efficiency and success in this complex dungeon:
- Highlord Omokk: Use crowd control on the two ogre guards while focusing on Omokk. Ensure that Omokk is placed in a way that his cleave and knock-back attacks will not harm the group. Perhaps, it would be better to defeat one of the guards instantly before turning all of the attention to Omokk.
- Shadow Hunter Vosh’gajin: Control or kill the Smolderthorn Shadow Priests
immediately. Vosh’gajin’s Hex and Curse of Blood are manageable but should be cleansed quickly to maintain group efficiency. - War Master Voone: No adds to deal with, but his melee abilities are quite strong. Let the tank build up a good amount of aggro. Move Voone to the side so his cleave does not strike other group members.
- Mother Smolderweb: Tank her facing away due to her frontal cone stun, Crystallize. Handle the poison effect from Mother’s Milk promptly to avoid incapacitation.
- Urok Doomhowl (Summoned): Prepare for multiple ogre waves by using area control spells effectively. When Urok shows up, isolate him from the rest of the group to avoid his fear of power. If the situation gets out of hand, use the pike to disperse the crowd.
- Overlord Wyrmthalak: Tank against a wall to avoid knock-back. Use CC to bring out the elite adds at 50% health and then focus on the boss while the adds are still coming out, then kill them.
- Quartermaster Zigris: Found in a hall dense with orc packs. It is advisable to clear the area before you start the fight. His Hooked Net and Stun Bomb can interrupt healers, so be prepared.
- Halycon: The worg boss without any complications. Deal with the smaller worg adds swiftly since they are not very hard to defeat and this will enable the group to concentrate on Halycon.
- Gizrul the Slavener: Similar to Halycon in difficulty, Gizrul hits hard but straightforwardly. Maintain the health of the tank and take down Gizrul before he can deal too much damage.
- Spirestone Butcher (Rare): If present, he is located on the bridge to Highlord Omokk. A rather simple fight, but do not lose concentration as he can hit quite hard.
- Spirestone Battle Lord (Rare): Located in the same room with Highlord Omokk. Like other ogres but with more attack power. Crowd control should be used properly to deal with multiple mobs in the room.
- Bannok Grimaxe (Rare): Found in Firebrand Legion camp. It is better to clear the surroundings of orcs before starting the fight to avoid getting adds during the fight. Bannok can pack a punch and has a stun, so make sure your tank is protected.
- Crystal Fang (Rare): Appears around the Mother Smolderweb’s location. Not very difficult but calling spiders can make the battle a bit more challenging. Clear adds quickly.
Blackrock Depths Upper City
Blackrock Depths is nestled in Blackrock Mountain, accessible via Searing Gorge or Burning Steppes. Once you get to the mountain, go down two chains that will lead you to a quarry mine which will give you access to this dungeon in WoW Season of Discovery. Move through the quarry to find the BRD dungeon entrance. You don’t have to understand the mechanics of Blackrock Depths on your own; you can simply trust our boosters to complete the dungeon.
Within BRD, go through two Shadowforge Gates and exit through the Eastern Garrison gate. Open the Shadowforge Lock to get to the Upper City across a bridge.
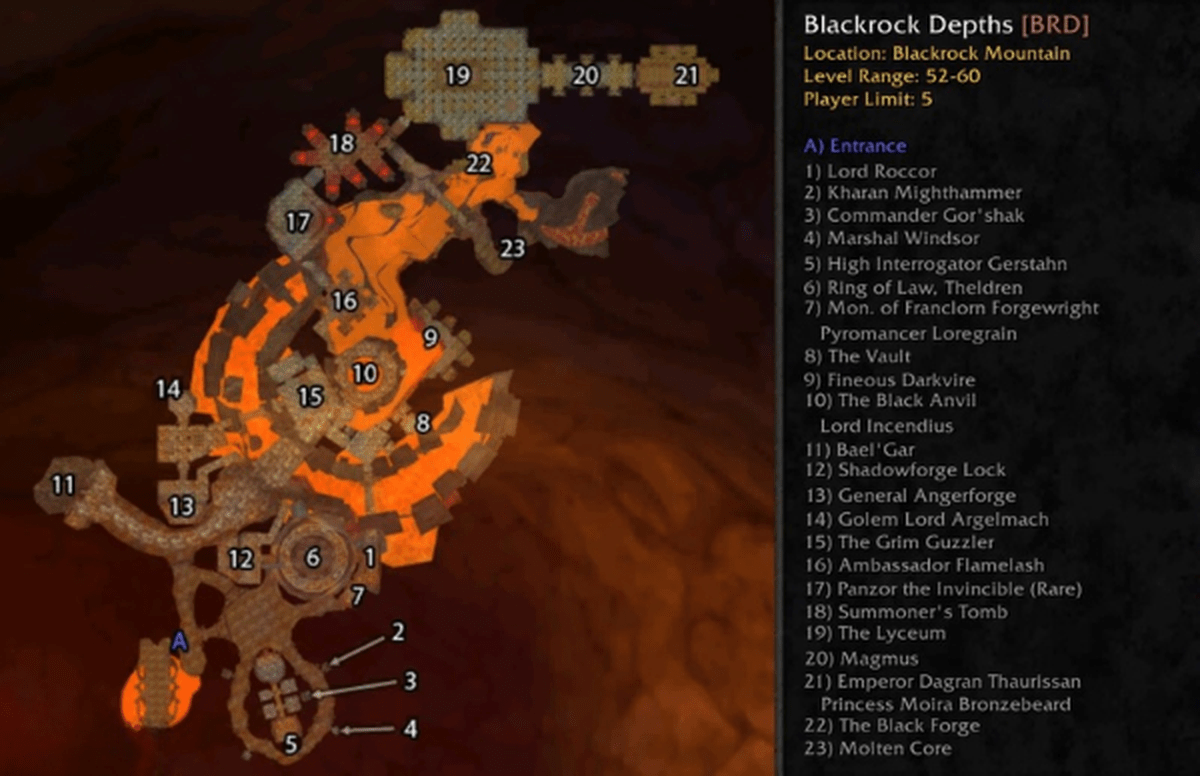
Blackrock Depths Upper City Strategy
Let’s take a closer look at how to defeat bosses in Blackrock Depths 2nd half:
- General Angerforge: Prioritize killing the adds quickly as they spawn with low health but can overwhelm if not managed.
- Golem Lord Argelmach: Spread out to minimize damage from Chain Lightning and focus down the Golems first.
- Phalanx: Keep health high to survive Fireball Volley and position the tank against a wall to prevent knockbacks from Mighty Blow.
- Ribbly Screwspigot: Eliminate his defenders quickly to make this fight straightforward.
- Hurley Blackbreath: Destroy storage rooms to summon him and then focus on the adds first.
- Ambassador Flamelash: Kill the elementals before they reach him to prevent stacking damage increases.
- Magmus: Avoid fire blasts on the ground and be wary of his stuns and heavy hits.
- Emperor Dagran Thaurissan and Princess Moira Bronzebeard: Choose between killing Princess Moira first or keeping her alive for quest completion, managing the Emperor’s buffs and the Princess’s healing.
There are also several additional BRD dungeon encounters awaiting you:
- The Grim Guzzler: Engage carefully; attacking one patron can cause others to defend them.
- Chest of the Seven: Defeat each spirit quickly before the next spawns.
- The Lyceum Gauntlet: Navigate a large area under constant attack to extinguish braziers with torches dropped by Shadowforge Flame Keepers.
Dire Maul
Dire Maul is an ancient Night Elf city in Feralas that was destroyed and is now inhabited by ogres, demons, and undead Highborne. It is a huge, final stage that is split into three wings, that have different experiences and difficulties. Our team is also ready to take on the passage of the Dire Maul dungeon, providing you with all the rewards received.
Dire Maul is WoW Classic dungeon in Season of Discovery located in Feralas, in the middle between the main Alliance and Horde cities. To get there, go to the middle of Feralas and go north until you find Dire Maul. The access points to the instances are located in the periphery of the central area.
Similar to Scarlet Monastery, Dire Maul has two wings that are locked. These can be opened with a key or by a Rogue with a high enough Lockpicking skill.
Dire Maul North
Dire Maul North is in Feralas at (43, 63. 4, 66. 5), to the west of Camp Mojache and north of The High Wilderness. The instance entrance is located on the southern part of the compound at coordinates (59, 45). To get to Dire Maul North, you require the Crescent Key, which is gotten from Dire Maul East.
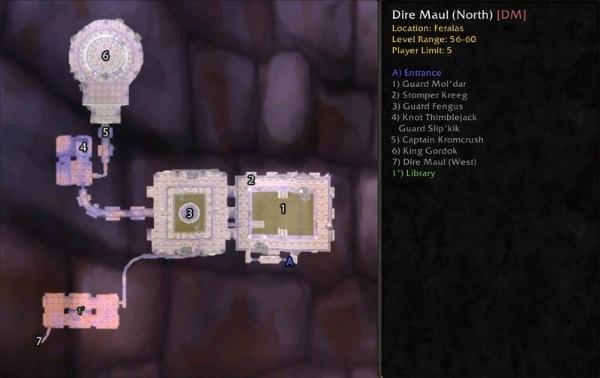
Dire Maul North Layout
This is a mostly linear instance with a large open space at the start of the instance. Due to the low enemy density, it is a favorite among groups that want to speed through the instance for a Tribute Run or to farm pre-raid BiS gear.
First of all, take the first boss from the middle of the first room to the entrance. Then, go left to face the next two bosses in the next room. Proceed left along the corridor until the end of the instance.
Dire Maul North Strategy
When pulling enemies in the first large rooms, be careful not to pull more than one group at a time. If you are cautious enough, they should not be a problem at all. After the first three bosses, there are Gordok Reavers and Gordok Warlocks in the hallway. Reavers strike with power and Warlocks arrive with summoned demons. Also, it is necessary to kill Wandering Eye of Kilrogg as soon as possible to avoid their summoning more Ogres; they have about 260 HP. Make sure you are prepared to kill them on sight, preferably from a distance. Just a reminder, trash mobs can come back, so you should not pull too many at once.
Now let’s take a closer look at how to defeat Dire Maul North bosses:
- Guard Mol’dar: Lead him back to the entrance to prevent him from getting exposed to other groups. Watch out for his knockback and summon help at 40%.
- Stomper Kreeg: Maintain your tank healthy as he is a powerful hitter. Expect his knockbacks and stuns.
- Guard Fengus: Isolate him from other groups so that he does not get more enemies. Manage his knockback and his ability to charge randomly.
- Guard Slip’kik: It is better to pull him slowly so that he does not attract other enemies. Handle his knockback ability.
- Captain Kromcrush: Subdue the crowd or focus on the Gordok Reavers or kill them as soon as possible. Expect fear and high damage. It is advisable to clear all the enemies around before engaging in the fight to prevent pulling the wrong enemies.
- King Gordok and Cho’Rush the Observer: Concentrate on King Gordok, engage Cho’Rush only if needed. If doing a Tribute Run, do not engage Cho’Rush and instead kill King Gordok.
Tribute Runs are a specific tactic for Dire Maul North, where the intention is to only defeat the last boss, King Gordok. Successfully doing this will cause the other Ogres to crown you as the new king and give you a tribute chest with better loot than what is found in a chest in a full clear. Here are the steps for a Tribute Run:
- Entering and Avoiding Initial Bosses: Do not go to the first few bosses and go to the second courtyard to take the Gordok Courtyard Key from the middle chest.
Navigating the Hallway: Take the Gordok Courtyard Key and unlock the door, then go through the hallway. - Freezing Guard Slip’kik: Use Frost Oil on the Broken Ice Trap on the ground near the bugs and then wait for Guard Slip’kik to walk over the trap to freeze him.
- Knot Thimblejack’s Quest: Go to the fire and talk to Knot Thimblejack and take the quest for the Gordok Ogre Suit. To finish the quest, get the Ogre Tannin from the platform above the character.
- Clearing to Captain Kromcrush: Proceed through the instance until you get to Captain Kromcrush. Use the Gordok Ogre Suit to talk to him, making him move aside.
- Defeating King Gordok: In the last room, defeat King Gordok. Do not kill Cho’Rush the Observer to get more tribute loot.
Tribute specific items are very strong, sometimes even stronger than other dungeon loot, and can be BiS with raid gear. Also, completing a Tribute Run grants access to buffs from several Ogres, lasting 2 hours:
- Mol’dar’s Moxie: +15% Stamina
- Fengus’ Ferocity: +200 AP
- Slip’kik’s Savvy: +3% Spell Crit
Dire Maul East
You can enter Dire Maul East through the main Dire Maul entrance around (59, 45) in Feralas. Dire Maul East is non-linear with multiple paths depending on your goal.
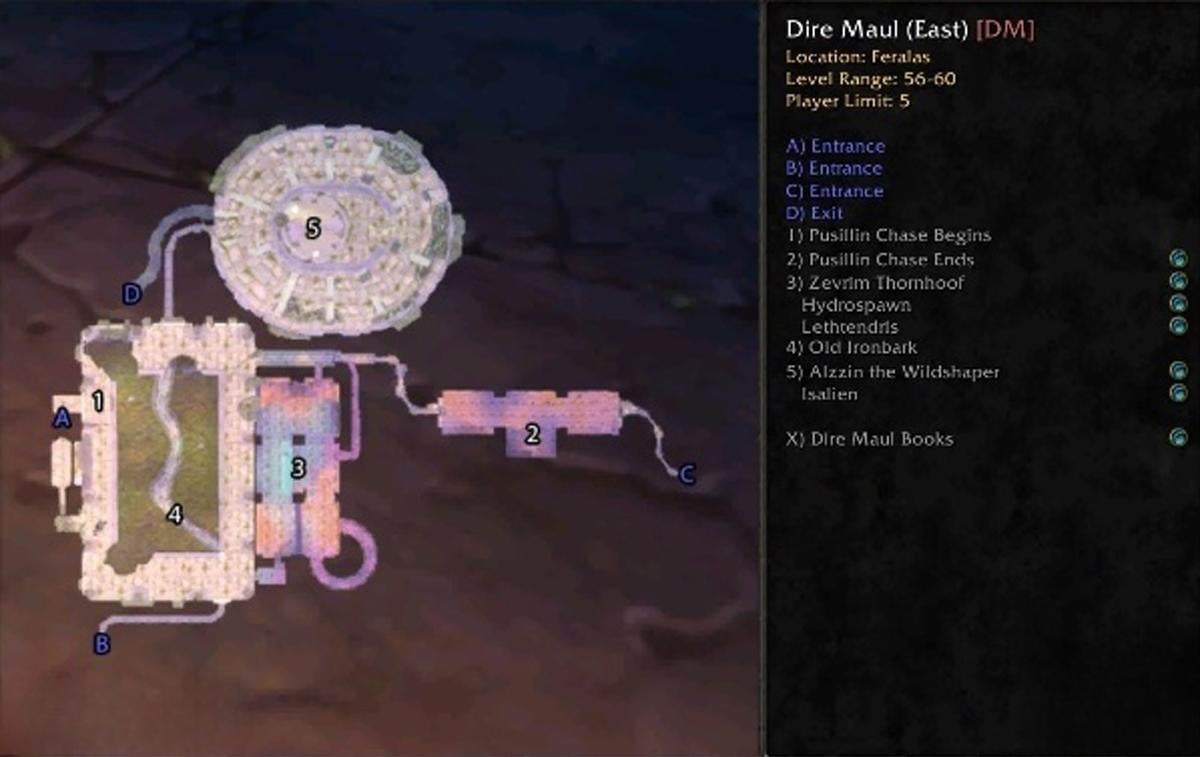
Dire Maul East Layout
To get the Crescent Key from Pusillin, turn left immediately at the beginning of the level and speak to him. He will run and you have to be very precise with how you drag enemies as you follow him. After a small ramp, you can fight him, and then you can go out of the dungeon to turn in quests if necessary.
Go back up the ramp and into the room you bypassed to find another ramp that leads to Lethtendris. Defeat her and go through a door to the left to find Hydrospawn in a pool and Zevrim Thornhoof a little further on. Kill both, fall into the pool area, and get out through a tunnel to a big area with Ironbark the Redeemed.
If Zevrim is defeated, Ironbark will open the door to the final boss. Sneak through the ledge to avoid more enemies, clear the small plant packs, and defeat the boss. He opens a tunnel through which he exits and there are essential mining resources.
Dire Maul East Strategy
In this dungeon, there are Wildspawn Satyrs that can easily sneak attack your group. Pull carefully. Whip Lashers are fairly simple to kill and can yield good gold and experience if farmed for, even for those who are solo or not adequately leveled. Tree enemies later in the dungeon can heal themselves and others, so be prepared with interrupts and crowd control. Trash mobs can also respawn, so the pulling should be constant to ensure the ground is covered properly.
Here’s a strategy on how to kill Dire Maul East bosses:
- Pusillin: Accompanied by four Wildspawn Imp bodyguards. Use area-of-effect attacks to deal with the imps and keep Pusillin interrupted.
- Lethtendris: Has an imp companion, Pimgib. Crowd control or kill Pimgib first, keep Lethtendris interrupted and remove Curse of Tongues.
- Hydrospawn: Patrols the water pool and spawns Hydroling adds once engaged. Deal with the adds swiftly or burn down Hydrospawn quickly.
- Zevrim Thornhoof: Zevrim’s Sacrifice ability deals heavy damage over time and takes a party member out of the fight. Keep your healer ready for intense healing and stand at maximum range to dodge damage over time effects.
- Alzzin the Wildshaper: Can heal himself in Tree form and deal massive damage to the tank through damage over time and bleed effects. Be ready with heals and area-of-effect attacks to deal with waves of imps that come once he is low on health.
- Isalien: Summoned using the Brazier of Beckoning. Take down her summoned add and interrupt her casts, especially her heals.
Jump Runs are great for quickly killing Dire Maul bosses and farming librams, books, and Rich Thorium Veins. Go down to the open space with Old Ironbark, go back to the water pool with Hydrospawn and Zevrim Thornhoof, and kill them both. Go back to Old Ironbark and he will lead you to the final boss of the game. Defeat Alzzin and collect all the ores in the cave. Start over and continue again if necessary.
Dire Maul West
Dire Maul West is in the middle of Feralas, between Feathermoon Stronghold and Camp Mojache. Take the road that links these two points and turn north when you are in the middle.

Dire Maul West Layout
To get to the last part of Dire Maul West, you will require the Crescent Key which is found in the East wing, or a Rogue to unlock the door. In Dire Maul West, the main goal is to destroy five pylons located in different parts of the instance. These pylons have to be cleared of surrounding enemies to make Immol’thar become a target that can be killed. There are three pylons in the regions before Immol’thar and two more in his chamber. To advance, shoot the first pylon in the starting zone, and go to the side buildings near Tendris Warpwood to locate two more pylons and three bosses.
Once you clear these, go through the tunnel behind Tendris to get to Immol’tahr’s room, destroy the last of the pylons, and kill Immol’tahr. A Warlock with the right items can summon Lord Hel’nurath here. Go back to the room entrance and move north through the other tunnel to reach the last boss, Prince Tortheldrin.
Dire Maul West Strategy
Dire Maul’s West Wing has patrols that are not visible and can easily ambush your group. Pull back and make room to fight instead of charging. Crowd control should be used as much as possible.
Here are the tactics for completing the Dire Maul West dungeon:
- Tendris Warpwood: Clear the surrounding area before engaging to avoid additional Treant mobs joining the fight.
- Magister Kalendris: Dispel Shadow Word: Pain and save interrupts for Dominate Mind. Burn him down quickly.
- Tsu’zee (Rare): Be cautious if the healer is targeted by Blind.
- Illyanna Ravenoak and Ferra: Kill Illyanna quickly, then focus on Ferra.
- Immol’thar: Focus on killing Eyes of Immol’thar to prevent stacking debuffs. Deal with teleport and falling damage carefully.
- Lord Hel’nurath (Warlock Summon): Clear waves of demon trash before summoning the boss. Use Banish on elites. Focus down the boss once spawned.
- Prince Tortheldrin: Stop DPS during Arcane Blast to let the tank regain aggro. Tank him against a wall to avoid knockback.
Scholomance
The entrance to Scholomance is located in the Southeast of the Western Plaguelands, on a small island. At the top of this island is a large structure with the entrance behind a locked gate. To open the gate to this WoW Classic Season of Discovery dungeon, you need one of the following:
- Skeleton Key, obtained from The Key to Scholomance/The Key to Scholomance quest chain, which starts with A Call to Arms: The Plaguelands! in any capital city.
- Rogue with high lockpicking.
- Powerful Seaforium Charge.
- A party member dying and resurrecting on the other side of the gate.
Trust Overgear to complete the Scholomance, so as not to waste your time and energy and completely devote yourself to your favorite gaming activities.

Scholomance Layout
The Scholomance dungeon run is not very branchy with little to no backtracking. There are optional and quest bosses that are slightly off the main path.
Cross the bridge in front of you, go down the stairs on your left, and into a large room. There is an optional boss, Kirtonos the Herald, who appears on the balcony to the right if you have the Blood of Innocents. This item is dropped by some bosses after the quest Kirtonos the Herald has been finished. Proceed through the room to another large space.
This room has three ways out. The right exit leads to Jandice Barov, who is usually passed over unless necessary. Straight ahead is a door that leads to Rattlegore, who has to be slain to get the Viewing Room Key. The left exit takes the subject to the last part of the instance.
Once you get the Viewing Room Key from Rattlegore, go back upstairs, unlock the gate, and get into the Viewing Room. The elite mobs here need a long series of quests to reduce their quality to normal and are generally ignored unless the quest, beginning with Broodling Essence, is done. On the far end is the room of Ras Frostwhisper. There is a stairway to the left that descends to Darkmaster Gandling.
Kill Ras Frostwhisper and go to the Darkmaster Gandling’s area. Clear all six rooms and minibosses, three on the upper floor and three on the lower floor to call Gandling. It is advisable to clear the bottom rooms first so as not to encounter Gandling before the desired time.
Scholomance Strategy
In the first room, pull individual packs towards the entrance to avoid accidentally pulling other packs with casters, which could cause a wipe. In Rattlegore’s room, trash mobs hit hard and stun the tank. Pulling multiple packs or packs with the boss can be deadly, especially for undergeared groups. In the viewing room with elite students, only engage if someone has completed the Dawn’s Gambit questline to start the event with Vectus.
Let’s break down Scholomance bosses strategies:
- Kirtonos the Herald: Tank should position with their back to the wall to avoid being knocked out of the window. Dominate Mind and Curse of Tongues should be interrupted or dispelled. Avoid Wing Flap knockback by staying spread out.
- Jandice Barov: Focus on damaging the copies to reveal the real Jandice. Once the real Jandice is found, prioritize her to minimize damage from the illusions. Be prepared to move quickly to avoid damage from multiple illusions.
- Rattlegore: Tank should build a threat before DPS starts to avoid aggro loss. Be aware of the tank stun and be ready to pick up aggro if the tank is stunned. DPS should focus fire to burn him down quickly.
- Marduk Blackpool: Melee should stay behind Marduk to avoid Cleave. Monitor HP during Shadow Shield as it reflects damage. Interrupt Shadow Bolt Volley when possible.
- Vectus: Avoid standing in Flamestrike zones on the ground. Manage skeleton adds if they spawn. Burn Vectus down quickly to minimize damage.
- Ras Frostwhisper: Clear surrounding trash to avoid being feared into additional packs. Interrupt Frostbolt Volley and Fear. Tank should face Ras away from the group.
- Instructor Malicia: Interrupt Heal and Renew. Dispel Call of the Grave. Target Malicia first to minimize healing done.
- Doctor Theolen Krastinov: Save cooldowns for when Krastinov enrages at 50% health. Tank should be aware of Knock Away and position accordingly. Burn him down quickly during his enrage phase.
- Lorekeeper Polkelt: Dispel Volatile Infection if DPS is low. Avoid standing in Noxious Catalyst zones. Burn Polkelt quickly to reduce overall damage taken.
- The Ravenian: Melee should stay behind The Ravenian. Be ready to taunt after Knock Away. Burn him down quickly to minimize tank threat issues.
- Lord Alexei Barov: CC or quickly kill his bodyguards. Ranged and Healers should stay at max range to avoid Unholy Aura. Remove Veil of Shadow debuff from party members.
- Lady Illucia Barov: Clear surrounding trash to avoid Fear causing additional pulls. Dispel Dominate Mind and Curse of Agony. Use CC on dominated targets to prevent them from taking damage.
- Darkmaster Gandling: Be prepared for players to be teleported and clear mobs quickly. Decurse Curse of the Darkmaster and spread out to minimize damage from Shadow Portal.
Stratholme
Stratholme is a large, end-game WoW SoD dungeon divided into two unique wings: Live Wing and Undead Wing. Stratholme is situated in the northwest of the Eastern Plaguelands and has two entrances. The side door is located to the east of the main door and to enter the Undead wing, one needs the Key to the City.
This key is obtained from Magistrate Barthilas’ loot. If someone in your party already has the key, Barthilas will be one of the last bosses in the Undead wing, running away as you approach his normal spawn point. If you do not have the key, you will have to take out all the enemies in the Live Wing to get to the Undead Wing and face Barthilas at his usual spot. To open the Scarlet Bastion area in the Live Wing, players require The Scarlet Key. You can always entrust the Stratholme dungeon run to our professional gamers and not waste your time.

Stratholme Live
To get to the Live Wing of Stratholme, go through the main gate which is in the northwest of the Eastern Plaguelands. When you get into the dungeon, there are two sides. The eastern part is the main city area where ghosts and undead mobs can be found. The western section is the Scarlet side, which is controlled by the Scarlet Crusade faction.
Stratholme Live Layout
Starting from the entrance, go down the main road and turn left into a small side street with a mailbox to find the quest target Ezra Grimm. If he is not required, then go north instead. After the gate, there is the eastern path with The Unforgiven (optional boss and rare spawns) or the western path to the rest of the dungeon.
Ignore The Unforgiven and go west to meet Timmy the Cruel. Proceed further into the Scarlet Crusade’s area, killing Malor the Zealous on the way, and get into the hall with two doors. The first one leads to Cannon Master Willey and the Crimson Hammersmith and the second one leads to Archivist Galford and the final boss.
Stratholme Live Strategy
In the Live wing of Stratholme, you can encounter two rare mobs:
Skul is a Level 58 Undead rare elite with several possible spawn locations within the main city area. Despite its elite status, Skul has no noteworthy mechanics.
Let’s look at tactics on how to defeat Stratholme Live bosses:
- Jarien and Sothos: Use the Brazier of Beckoning to summon them in Balnazzar’s room. The fight is straightforward, so focus on one boss at a time to minimize incoming damage. Be aware of their shared loot table for desired items.
- Ezra Grimm: Clear the area before summoning him. Spread out to avoid potential AoE abilities. Focus fire to take him down quickly and collect Siabi’s Premium Tobacco for the related quest.
- Malor the Zealous: Be prepared to interrupt or out-damage his heal ability. Have a plan to deal with the chest behind him for the quest item. A standard tank and spank strategy should suffice.
- Crimson Hammersmith: Clear the area before summoning him. No special mechanics are there, so employ a straightforward fight strategy. Blacksmiths should be prepared to roll on the recipe drop.
- The Unforgiven: Be ready for immediate combat upon entering the northern gateway. Clear the minor adds first, then switch to the boss. Treat it as a standard tank and spank fight.
- Postmaster Malown: Kill Stratholme Couriers for postbox keys and open 3 postboxes to summon Malown. Be prepared for Fear, Curse of Tongues, and Curse of Weakness. Break Fears or use Fear Immunity if available and dispel Curses as needed.
- Timmy the Cruel: Clear the courtyard up to the Scarlet building door without opening it. Wait for Timmy to approach from behind. Be prepared for his Enrage and Ravenous Claw abilities. Use cooldowns to mitigate increased damage during Enrage.
- Cannon Master Willey: Prepare for Crimson Riflemen add spawns. Use AoE abilities or cannons to deal with adds. Watch out for Knock Away ability and reposition if needed. Coordinate add control while maintaining damage on the boss.
- Archivist Galford: Focus on avoiding or mitigating the Burning Winds ability. Have healers ready to provide extra healing on the Burning Winds target. Be prepared to deal with Fire Nova, potentially spreading out to minimize damage.
- Grand Crusader Dathrohan/Balnazzar: For Dathrohan, tank and spank until 50% HP, being aware of Paladin-like abilities. When he transforms into Balnazzar, keep ranged DPS and healers at maximum range to avoid Psychic Scream. CC players affected by Domination, interrupt Mind Blast, and wake up players affected by Sleep. Maintain steady DPS while handling mechanics.
Stratholme Undead
To get into the Undead wing of Stratholme, you should get the Key to the City from Magistrate Barthilas. This key allows the holder to unlock the service door located southeast of the main entrance, which does not lead to the Live Wing.
Stratholme Undead Layout
If you don’t have the key, you have to clear the Live Wing to get to the Undead wing which takes longer if you’re doing multiple runs. The Undead Wing is relatively straightforward, although there is some necessary backtracking to blow up crystals and get to the last bosses.
Through the service gate entrance, there is a short hall with a gate at the end, and after that, the area is cleared to fight the first boss, Magistrate Barthilas, who flees and is fought before Ramstein the Gorger. If you came from the main entrance and defeated all the enemies in the Live Wing, Barthilas will not escape and can be fought in the courtyard.
When this area is cleared, move to the gauntlet area. There are three buildings, each guarded by a boss and containing Thuzadin Acolytes that must be killed to access the final bosses: Baroness Anastari to the east, Maleki the Pallid to the northeast, and Nerub’enkan to the west.
After all of the Acolytes are defeated, go north to defeat Barthilas. A gate to the west will be opened and there will be a group of Abominations. Slay them to call forth Ramstein the Gorger. Once Ramstein is defeated, clear the rest of the trash and go down to the main crypt to face Baron Rivendare, the last boss.
Stratholme Undead Strategy
Stratholme’s Undead Wing features a rare spawn, Stonespine, and a mini-boss, Black Guard Swordsmith, who drops an item for Blacksmithing:
- Stonespine: A rare elite Undead at Level 60 that wanders around the area close to the passage to the ziggurat gauntlet. It does not have any special mechanics but it drops good loot. Pay attention to the surrounding trash mobs as they can pull themselves into the fight with Stonespine.
- Black Guard Swordsmith: Appears after you interact with the Blacksmithing Plans in the vicinity of the Baroness Anastari’s ziggurat. This mob is similar to any other trash mob and does not have any special abilities that one has to look out for.
Let’s figure out how to kill Stratholme Undead bosses:
- Magistrate Barthilas: Fight him as the first boss if you cleared through the Live Wing, or after the ziggurat event if you entered through the service gate. No special mechanics to watch for, so employ a standard tank and spank strategy.
- Nerub’enkan: Focus on quickly killing the small adds he summons. Otherwise, treat as a standard tank and spank fight. Remember to clear the ziggurat behind the boss and kill the Acolytes to access the final bosses.
- Baroness Anastari: Be aware of her Banshee Curse reducing hit chance. When she uses Possess, have DPS quickly bring the affected player to 50% health to break the effect. If the healer is Silenced, have hybrid classes assist with healing. Clear the ziggurat and Acolytes after defeating her.
- Maleki the Pallid: Watch for Ice Tomb, which stuns the current target for 10 seconds. DPS should be cautious with threat during this time as the tank can’t generate aggro. Clear the ziggurat and Acolytes after the fight.
- Ramstein the Gorger: Clear all roaming abominations to spawn him. Tank should quickly regain aggro after Knockout resets it. Otherwise, a straightforward fight with no special mechanics.
- Baron Rivendare: Tank him on one side of the room, facing away from the party. Ranged DPS and healers stay on the opposite side to avoid Unholy Aura damage. When adds spawn, melee DPS should help tank and kill them while ranged DPS focus them down. Healers need to keep melee topped up due to the Aura damage.
4.9With the release of Season of Discovery Phase 4, World of Warcraft Classic players can look forward to an exciting array of dungeons filled with new challenges and rewards. With the help of the strategies and information given in this guide, you will be ready to face WoW Classic SoD dungeons and get the updated treasures that are there for you. Regardless of whether you are a veteran player or a beginner, these updated dungeons provide a great experience that enriches your exploration of Azeroth. Prepare your equipment, assemble your friends, and embark on this journey to explore these old dungeons to reveal the mysteries and treasures of SoD latest update.