Bang a Gong! Scepter of the Shifting Sands Quest Chain is one of the most iconic and challenging storylines in WoW SoD. In this Scepter of the Shifting Sands Guide, we will provide a step-by-step walkthrough on how to complete the questline for prestigious rewards, including the coveted Scarab mount. Scepter of the Shifting Sands Guide Completing this questline will require overcoming complex stages and objectives, demanding dedication, skill, and, most importantly, strong allies — but the rewards will be well worth the effort.
✅ This Scepter of the Shifting Sands Guide is relevant for both SoD and WoW Classic Fresh.
 4.9
4.9The Scepter of the Shifting Sands Questline Overview
Very few have succeeded, and very few ever will become a Scarab Lord — the title you get for completing the achievement many players can only dream about. You can obtain the Black Qiraji Resonating Crystal by being the first on your server to complete the quest Bang a Gong! which is the tail-end of the very long questline called The Scepter of the Shifting Sands.
Also, during the Ten Hour War in WoW SoD, while Bang a Gong! is completed by the first person on a server, other players that have also completed The Scepter of the Shifting Sands questline can get the mount too.
Note that it’s not an exclusively first-player reward. Whoever does it within the Ten Hour War will obtain the mount.
As soon as this Ten Hour War concludes, exactly ten hours since the first player turned in Bang a Gong! – the mount is forever unobtainable on that server. You can still do the entire questline after the Ten Hour War has concluded, you simply will not be able to get the Black Qiraji Resonating Crystal mount anymore.
You can skip this entire list of tasks, simplify your journey, save time, and obtain the SoD Black Qiraji Battle Tank with the help of our professional team. This offer is available for a limited time!
Preparing for The Scepter of the Shifting Sands Questline
To start The Scepter of the Shifting Sands Questline you should be at least at level 60, is no small task, and success requires thorough preparation. Make sure to gather all necessary consumables, enlist reliable allies, and plan a solid strategy well in advance before beginning this challenging journey. Be prepared for Scepter of the Shifting Sands questchain with high-level character with our Power Leveling service!
Time Commitment for Scarab Lord
The Scepter of the Shifting Sands Questline contains 32 quests in total, this is one of the longest questlines in WoW. Any potential Scarab Lords will need to complete the questline within a specific timer to participate in Bang a Gong! during the ten-hour window.
However, if your goal is simply to experience the questline rather than earn the Scarab mount, you can certainly proceed at your own pace. You can still complete the questline after the Ten Hour War has ended, but keep in mind that you will no longer be able to obtain the Black Qiraji Resonating Crystal mount at that point.
Friends and Guilds
A significant portion of The Scepter of the Shifting Sands questline cannot be completed solo. Some quests require a group of 5 players, while others demand a full 40-man raid in locations like Blackwing Lair and Molten Core.
Guilds must also decide in advance who will pursue the quest, as it is often not feasible for a guild to support multiple members aiming for the Scarab Lord title. Given the length of the questline and the limited time the event remains active, most guilds can only support one candidate. This is particularly important for certain raid quests, such as Only One May Rise, where drops are limited to one per boss. As a result, guilds must plan who will receive the items. Splitting these essential drops among different guild members essentially guarantees that none of them will complete the questline in time.
Furthermore, guilds need to carefully manage raid lockouts and schedule their raids based on the progress of the chosen Scarab Lord candidate. Depending on when The Scepter of the Shifting Sands questline becomes available, both in terms of the day and week, it may be possible to clear Blackwing Lair during the same raid lockout period as the questline’s start.
The guild should also plan a Blackwing Lair re-run once the Scarab Lord candidate has completed the Brood of Nozdormu reputation grind. If the candidate is still working towards achieving a Neutral reputation with the Brood of Nozdormu, raid schedules should be adjusted to accommodate his progress, ensuring he can complete portions of the questline that require raid participation. Our professional team also can complete Blackwing Lair for you, to help you with your long journey!
Scepter of the Shifting Sands Quest Shopping List
There are some turn-ins throughout this Scepter of the Shifting Sands quest series. Below is a complete shopping and farming list you can prepare in advance. You should work on this part as soon as you can. Most of these items are not easy or cheap to get, and the prices are only going to go up once the quest launches, so here we have a list of materials:
- 20x Arcanite Bar;
- 10x Elementium Ore;
- 10x Azerothian Diamond;
- 10x Blue Sapphire;
- 20x Goblin Rocket Fuel;
- 20x Deeprock Salt.
You’ll be able to stockpile 20x Chimaerok Tenderloin. You need all of this later on in the Blue Scepter Shard questline. You might be well-geared to solo an elite Chimaerok.
Stage 1: First Three Quests
The initial quests in The Scepter of the Shifting Sands Questline serve as preparation for the larger challenges ahead. Each quest requires coordination, determination, and a tactful approach to overcome the obstacles you will face.
What Tomorrow Brings
What Tomorrow Brings Quest: Baristolth of the Shifting Sands, /
Fly to Tanaris and make your way to the Caverns of Time, where you’ll find Anachronos chillin’ right out front of the Caverns of Time entrance. When you approach Anachronos, the quest will Auto-Complete itself. Get back to Baristolth of the Shifting Sands and complete the quest.
Note: Anachronos will never attack you solo unless you attack him first. But some of the surrounding dragonkin might be hostile towards you depending on your level. So you should try to make sure you don’t pull any on your way to him.
Only One May Rise
Only One May Rise Quest: Baristolth of the Shifting Sands, /
Kill Broodlord Lashlayer, and loot the Head of Broodlord Lashlayer.
When you have your epic head, go back to Baristolth of the Shifting Sands and turn in the quest to breathe a sigh of relief.
The Path of the Righteous
The Path of the Righteous Quest: Baristolth of the Shifting Sands, /
Speak with Baristolth of the Shifting Sands to receive the Agent of Nozdormu badge.
Next, you need to farm 200 Silithid Carapace Fragments. These fragments drop from almost any Silithid in Silithus. They aren’t Bind on Pickup, meaning they can be traded, mailed to alts, or sold at the Auction House. However, be warned — this farm will be highly competitive. Almost everyone will be hunting Silithid, making it a chaotic endeavor.
Hive Regal seems to be the best spot to farm these fragments, but if you’re on a crowded server, consider yourself lucky if you can even find Silithid left to kill.
On PvP servers, this is likely to become a bloodbath. It’s highly advisable to have guildmates accompany and protect you, or, if you can afford it, hire player bodyguards for protection as you farm.
Once you’ve gathered the fragments and turned in the quest to Baristolth of the Shifting Sands, you will receive the Proxy of Nozdormu. We will explain that item in the section below.
You can ask our professional players to farm Silithid Carapace Fragments for you using our Hourly Driving service.
Stage 2: The Reputation Grind
The next step is to gain favor with the key faction. Grinding reputation with the Brood of Nozdormu is crucial for advancing the questline and unlocking its main objectives.
The Hand of the Righteous
The Hand of the Righteous Quest: Baristolth of the Shifting Sands, /
Collect 200 Silithid Carapace Fragments from the same locations as before to complete The Hand of the Righteous repeatable quest.
You will need to complete this quest several times before reaching Neutral status with the Brood of Nozdormu, at which point the questline will progress further. You can repeat this quest until you reach 2999/3000 Neutral, but avoid turning the quest to Anachronos. To safely grind to 2999/3000 Neutral, we recommend you not visit Anachronos in Tanaris until you have reached the cap.
If your goal is to become a Scarab Lord, or if you are not particularly concerned about reputation gains in Ahn’Qiraj, you can proceed with the questline as soon as you reach Neutral 1/3000. Each completion of this quest awards 200 reputations with the Brood of Nozdormu.
How many turn-ins do you need to do?
You start this section at 0/36000 Hated with the Brood of Nozdormu, but from the quests done previously, you should be starting at 700/36000 Hated (770/36000 Hated if you are a Human).
You will need 41,300 reputations, in total to reach Neutral status. That is 207 times The Hand of the Righteous turned in (188 times if you are a Human), each time needing 200 Silithid Carapace Fragments, making it a total of 41,400 Silithid Carapace Fragments that you will need to collect.
This number does not include the very original non-repetitive quest, The Path of the Righteous. To get a proper sum of fragments needed, add another 200 to a total of 41,600 Silithid Carapace Fragments.
Stage 3: Finally Continuing
During this stage, you build on the momentum from your earlier efforts and move toward achieving key objectives. Now, it’s time to let all your preparation pay off as you face even more challenging obstacles ahead.
Anachronos
Anachronos Quest: Baristolth of the Shifting Sands, /
You can obtain this quest by speaking to Baristolth of the Shifting Sands, and then traveling to the Caverns of Time in Tanaris. Once there, speak with Anachronos to turn in the quest.
While in the Caverns of Time, you can also speak with Anachronos to choose one of the following Signet Rings of the Bronze Dragonflight:
- Signet Ring of the Bronze Dragonflight (DPS)
- Signet Ring of the Bronze Dragonflight (Caster/Healer)
- Seal of the Bronze Dragonflight (Tank)
Choose carefully, as you cannot change this ring until you reach Exalted status, and Ahn’Qiraj has opened.
Long Forgotten Memories
Long Forgotten Memories Quest: Anachronos, /
Head to Silithus, towards the southern part of the zone near the entrance to Ahn’Qiraj and the Scarab Wall. There, you will find a small red crystal called the Crystalline Tear at coordinates /way 28, 89. Right-click on the crystal to complete the quest.
A Pawn on the Eternal Board
A Pawn on the Eternal Board Quest: Crystalline Tear, /
End Quest: Anachronos, /
After accepting this quest, a small event will unfold, providing some background on why you’re embarking on this journey. Be sure to stay for the entire event to complete the quest. If you leave, get attacked, or otherwise fail, you will need to abandon it and click the Crystalline Tear again to re-accept it.
Make sure that the quest has been completed before leaving the area to turn it in!
Once completed, return to Anachronos at the Caverns of Time in Tanaris to turn in the quest.
The Charge of the Dragonflights
The Charge of the Dragonflights Quest: Anachronos, /
Speak with Anachronos again, and this quest will auto-complete without yielding any readable quest text. If you wish to read the quest text, you may need to disable your auto turn-in add-on beforehand, as it could cause you to skip past the text too quickly.
Currently, there is no direct follow-up quest.
To continue the questline, you will need to acquire three items: the Red Scepter Shard, the Green Scepter Shard, and the Blue Scepter Shard. Instructions on how to retrieve each of these Scepter Shards are provided in the subsections below.
4.9Stage 4: The Three Scepter Shard Questlines
This part of the questline is not strictly linear, as the quests for the three colored shards that complete the Scepter can be undertaken in any order. You may work on all three questlines simultaneously if you wish. However, for reasons that will soon become clear, we advise to start with the Blue Scepter Shard quests first. The Blue Scepter Shard requires multiple raids and shares an objective with the Red Scepter Shard‘s questline.
For convenience, these shards are listed in order of difficulty — from the easiest, the Red Scepter Shard, to the hardest, the Blue Scepter Shard. You are, of course, free to choose your order based on your needs, your guild’s schedule, and raid lockouts.
Stage 4a: Red Scepter Shard
This will be the easiest of the three shards. You need to complete Blackwing Lair again.
Nefarius’s Corruption
Nefarius’s Corruption Quest: Vaelastrasz the Corrupt, Blackwing Lair.
Quest Ends: Anachronos, /
Speak to Vaelastrasz the Corrupt in Blackwing Lair before engaging him in combat. By accepting this quest, you will activate a 5-hour timer. You must kill Nefarian within this timeframe for the Red Scepter Shard to drop. If you successfully loot the shard, the timer will stop immediately.
Keep in mind that Nefarian will only drop one shard per raid, so careful planning is essential.
This quest acts as a failsafe, meaning if you fail it, you will be set back one week. This may impact your ability to acquire the Scarab mount if that is your ultimate goal, if the timer expires and you fail, you will receive From the Desk of Lord Victor Nefarius in the mail — a mocking note taunting you for your failure. If you succeed, turn in the quest to Anachronos at the Caverns of Time in Tanaris.
This requirement is why players cannot complete the Scepter of the Shifting Sands questline in under a week, as Blackwing Lair needs to be cleared earlier in the questline. Success demands careful coordination and thorough planning.
Stage 4b: Green Scepter Shard
To get help with some of the parts in the questline. For instance, you could need some help with elite enemies you encounter. want a few people around to take them down.
This is the final objective for the quest The Nightmare’s Corruption, and requires an entire raid group. In fact, the whole quest The Nightmare Manifests requires a raid group. Organize your team to handle the challenges efficiently.
Eranikus, Tyrant of the Dream
Eranikus, Tyrant of the Dream Quest: Malfurion Stormrage, near Shade of Eranikus.
Quest Ends: Forest Wisp, /
Head to The Temple of Atal’Hakkar and in the last room, you can find Shade of Eranikus boss. You do not need to fully clear this instance. You cannot directly fight Shade of Eranikus if Jammal’an the Prophet is still alive, but you will be able to continue with the quest as long as you get into the same room as Shade of Eranikus and approach him. Malfurion Stormrage will show up, and you can accept the quest from him. Head to Teldrassil and speak with the Forest Wisp located north of the road from Darnassus at /way 37, 47.
The easiest way for Horde players to reach the Forest Wisp is to take the trip from Zoram Strand, Ashenvale to Auberdine, Darkshore. Avoid killing any Alliance NPCs or you will initiate the text-to-speech “Darkshore is Under Attack!” in the Local Defense and World Defense channels.
Take the North-Eastern boat — it’ll be on the right-hand side as you get to the dock. When you’re in Teldrassil, you’ll want to buff up and head up the road into the purple portal tree in a hurry. Most likely you will be attacked by guards. Do your best not to strike back so things don’t escalate.
Continue east out of town. If Alliance is trying to gank you, you may want to stick to the edges of town where the guards won’t bother you. Remember that Wisps in Darnassus are Civilians — killing them will give you Dishonorable Kills, so steer clear of them at all costs.
Tyrande and Remulos
Tyrande and Remulos Quest: Forest Wisp, /
Quest Ends: Keeper Remulos, /
Head to Moonglade and find Keeper Remulos. You can found him west of the lake at the Shrine of Remulos. You will easily be able to see the shrine on your map once you have uncovered the area around the lake.
The Nightmare’s Corruption
The Nightmare’s Corruption Quest Starts/
This part of the questline involves visiting the four Emerald Dream portals located in Ashenvale, Feralas, The Hinterlands, and Duskwood to acquire Fragments of the Nightmare’s Corruption from each location. You will need a group of players for the first three portals, as they are guarded by elite packs that are quite challenging. The Duskwood portal, however, will require a raid-sized group.
Locations and Details:
- Ashenvale – Fragment of the Nightmare’s Corruption. This fragment drops at a low rate from any of the dragonkin around Bough Shadow in northeastern Ashenvale (/way 93.3, 38.5). Note: The few dragonkin packs in this zone have a 40-minute respawn timer, which can create a bottleneck for completing the questline in Classic.
- Feralas – Fragment of the Nightmare’s Corruption. You can find this in Feralas from any dragonkin (/way 51.5, 11.3).
- The Hinterlands – Fragment of the Nightmare’s Corruption. This fragment also drops at a low rate from any of the dragonkin around Seradane in northeastern The Hinterlands (/way 63.1, 24.5).
- Duskwood – Fragment of the Nightmare’s Corruption. Head to Twilight Grove in Duskwood (/way 46, 38).
Note: Upon arrival, the Twilight Corrupter will spawn near the moonwell on the northeastern side of the grove. This boss requires a raid-sized group to defeat.
Once you have gathered all four fragments, return to Keeper Remulos in Moonglade to complete the quest.
The Nightmare Manifests
The Nightmare Manifests Quest: Keeper Remulos, /
Quest Ends Keeper Remulos, /
You can get the following rewards:
Accepting this quest from Keeper Remulos will trigger an event, so make sure your raid is fully prepared beforehand. Your raid must defend Nighthaven until Tyrande arrives. Once you accept the quest, Keeper Remulos will have a few things to say before heading towards Nighthaven. Shortly after he reaches the wooden platform overlooking Lake Elun’ara, the event will begin.
The quest will fail under the following conditions:
- If one of these characters dies: Keeper Remulos, Eranikus, Tyrant of the Dream, or Tyrande.
- The quest holder runs too far away from Keeper Remulos.
Completing this event rewards you with the Green Scepter Shard. Since everyone present during the event gets credit for the shard, it is the only Scepter Shard that shares credit among participants.
The Champion Returns
The Champion Returns Quest: Keeper Remulos, /
Quest Ends: Anachronos, /
Return to Anachronos at the entrance to the Caverns of Time in Tanaris. With this step, you have officially completed the Green Scepter Shard questline.
Stage 4c: Blue Scepter Shard
Obtaining this shard of the scepter is a significant time investment and is one of the main reasons for the extensive shopping list, as mentioned earlier in the guide.
Azuregos’s Magical Ledger
Azuregos’s Magical Ledger Quest: Spirit of Azuregos, near /
Quest Ends: Narain Soothfancy, near /
To start this quest, head to Azshara and speak with the Spirit of Azuregos. He is located in the area where Azuregos can spawn. When you speak with the spirit, you will get a Magical Ledger, to begin the quest.
Note: You can talk to the Spirit of Azuregos as a ghost, but this is not required.
To fulfill the quest, proceed to Tanaris and speak with Narain Soothfancy, who can be found just north of Steamwheedle Port.
Translating the Ledger
Translating the Ledger Quest Starts/
This quest serves as an introduction. Upon completion, you will get three the following quests:
All three must be completed to advance the Blue Scepter Shard questline.
Stewvul Fork 1: Stewvul, Ex-B.F.F.
Stewvul, Ex-B.F.F. Quest: Narain Soothfancy, near /
Quest Ends: Inconspicuous Crate.
Head to the wall in Silverpine Forest that marks the Greymane Wall. Near the gate to Gilneas, at /way 46, 86, you’ll find the Inconspicuous Crate. Look for breathing holes (designed for the gnome inside to breathe), but the easiest approach is to hover your cursor over all the crates in the area that match this description.
Stewvul Fork 2: Scrying Goggles? No Problem!
Scrying Goggles? No Problem! Quest: Inconspicuous Crate.
Quest Ends: Narain Soothfancy, near /
The next item you need is Narain’s Scrying Goggles, which you can find in Molten Core. They can drop from any trash mob, boss, or even from Majordomo’s chest. The Scrying Goggles are one of the rarest drops, so if you want to complete this quest as quickly as possible, it is generally more efficient to focus on clearing trash mobs rather than the entire instance.
Our team can assist you with completing this quest and finishing Molten Core quickly and easily.
Loot Mechanics:
- Only one quest bearer can loot Narain’s Scrying Goggles at a time, regardless of the loot settings.
- If using Master Loot, remember that all gray and white items are still subject to Group Loot rules. If the goggles drop from a trash mob and aren’t picked up by the next person in the Group Loot order, the quest bearer won’t be able to see it, and the item will be lost.
- If you are in a trusted guild run, set the loot to Free For All to ensure no lootable corpses are overlooked.
Once you have obtained Narain’s Scrying Goggles, return to Narain Soothfancy to complete this section of the questline.
Business Fork 1: Never Ask Me About My Business
Never Ask Me About My Business Quest: Narain Soothfancy, near /
Quest Ends: Dirge Quikcleave, /
After accepting the quest from Narain Soothfancy, head to Gadgetzan, where you will find Dirge Quikcleave at the inn. It’s a straightforward, short journey.
Business Fork 2: The Isle of Dread!
The Isle of Dread! Quest: Dirge Quikcleave, /
This is one of those quests that requires a well-geared group, and it also calls for collecting 20 Chimaerok Tenderloin. You can do this in advance at any time, as noted in the Scepter of the Shifting Sands Shopping List. Thankfully, the Chimaerok Tenderloin does not Bind on Pickup, so you can trade or sell it. However, you cannot collect the 500 Pound Chicken ahead of time, it only drops from Lord Lakmaeran.
Fly to the Isle of Dread in Feralas, the large rectangular island south of Feathermoon Stronghold. You should have no problem gathering 20 Chimaerok Tenderloin if you have a group to assist in killing Lord Lakmaeran, though keep in mind that the drop rate is not particularly high.
Lord Lakmaeran has 323,700 health, 3,677 armor, and hits tanks quite hard. He can be defeated with a decently geared group of 5 players. Lord Lakmaeran has an approximate respawn timer of 20-30 minutes. Make sure your healer is stocked with mana consumables, as the fight can be demanding when tackled with just 5 people. Once you have completed these tasks, return to Dirge Quikcleave to continue the quest.
Business Fork 3: Dirge’s Kickin’ Chimaerok Chops
Dirge’s Kickin’ Chimaerok Chops Quest: Dirge Quikcleave, /
Give Dirge Quikcleave 20 Goblin Rocket Fuel and 20 Deeprock Salt in exchange for the special food and the recipe. The recipe is not Bind on Pickup, so it can be traded or sold if needed.
Note: that the recipe is unique, meaning you can only carry one copy of it in your inventory at a time
Business Fork 4: Return to Narain
Return to Narain Quest: Dirge Quikcleave, /
Quest Ends: Narain Soothfancy, near /
Accept this quest from Dirge Quikcleave, and he will provide you with the 500 Pound Chicken. After that, simply return to Narain Soothfancy with the jumbo-sized poultry to turn in the quest. Once completed, this part of the questline will be finished.
Draconic Fork 1: Draconic for Dummies
Draconic for Dummies Quest: Narain Soothfancy, near /
Quest Ends: Freshly Dug Dirt.
After you accept this quest from Narain Soothfancy you need to go south to south of Tanaris to click on the Freshly Dug Dirt and complete this quest. When you’re on the southernmost beach you should see an island in the distance. Freshly Dug Dirt is located on this island, you need to get it and achieve the quest.
Optional Quest: Love Song for Narain
Love Song for Narain Quest: Meridith the Mermaiden, around /
Quest Ends: Narain Soothfancy, near /
You need a letter from Meridith the Mermaiden, talk to this NPC and get letter to deliver to Narain Soothfancy.
After delivering the letter, return to Meridith the Mermaiden to receive Siren’s Song, which grants a 150% swim speed increased for 3 minutes. This buff will allow you to reach the island south of Tanaris without incurring any fatigue.
Draconic Fork 2: rAnS0m
rAnS0m Quest: Freshly Dug Dirt.
Quest Ends: Narain Soothfancy, near /
Accept the quest from the Freshly Dug Dirt found on the island south of Tanaris. You will receive a Ransom Letter. Bring this letter back to Narain Soothfancy to continue the questline.
Draconic Fork 3: Decoy!
Decoy! Quest Starts/
Narain Soothfancy will give you Narain’s Special Kit. It contains four items:
Now, head to Winterspring and proceed to the location indicated on the map. When you reach the marked location, place the Bag of Gold at the end of the path facing the cliff.
This action will initiate combat with Number Two, a resistant gorilla with no special mechanics. He has approximately 77,000 health and can be kited indefinitely, though he cannot be slowed, making him soloable for hunters with companion pets.
If you aren’t playing a class capable of kiting, bring a small group with one tank, one healer, and at least one damage dealer to handle the fight comfortably. After you defeat Number Two, return to Narain Soothfancy to continue the questline.
Draconic Fork 4: The Only Prescription
The Only Prescription Quest Starts/
To complete this quest, you will need to retrieve all 8 pages and bind them using the Magical Book Binding provided. Upon completion, you will receive Draconic For Dummies: Volume II and finish the quest. To accomplish this, you must travel to eight different locations: three outdoor zones, two faction cities, and three raid instances.
Locations and Details
Chapter I:
You can get it from Doctor Weavil, which is located on Alcaz Island in Dustwallow Marsh. Doctor Weavil is a tough opponent. You can try to kill him with a very well-geared and skilled group of 5 players. But it is recommended to bring 15-20 players to defeat him. Sometimes it is simply impossible to gather a full party with good gear. Therefore we can help you with Tier 2 Set obtaining, as our team is always prepared for such tasks.
Chapter II:
You can loot this item from any demon in Blasted Lands. This page has a low drop rate, so consider bringing a few players to speed up the farming process.
Chapter III:
You also can get it from any demon in Winterspring. Like Chapter II, this page also has a low drop rate, so bringing extra players will help expedite farming.
Chapter IV:
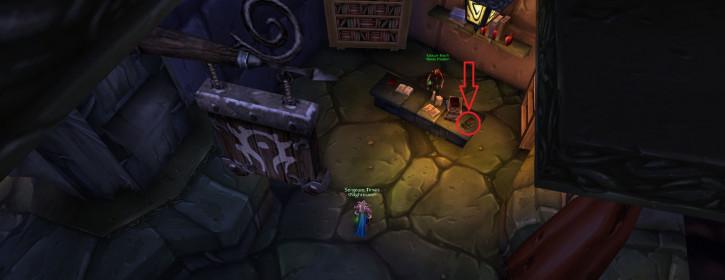
Located in Undercity, inside the Magic Quarter on a table. You can complete this objective even while in combat. Simply interact with the book and select the dialogue option to pick it up. For Alliance players, you can do this with a 1-2 player group, the safest way to enter Undercity is through the Sewers to maximize stealth.
Chapter V:
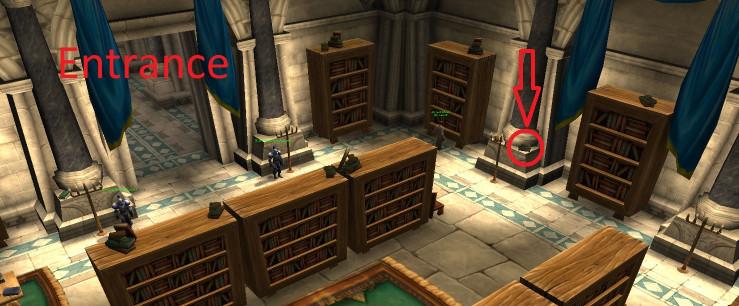
Located in Stormwind City in the Library of Stormwind Keep, on a table. Similar to Chapter IV, you can collect this book even while in combat by clicking on it and selecting the dialogue option.
Chapter VI:
Drops from Onyxia in Onyxia’s Lair. Only one page will drop per kill. Our professional team can help you save your time and complete Onyxia’s Lair for you!
Chapter VII:
Found on a table in Blackwing Lair, in the room beyond Broodlord Lashlayer, next to the Alchemy Lab.
Chapter VIII:
Drops from Ragnaros in Molten Core. Only one page will drop per kill.
Completing the Quest:
Once you have gathered all of the pages, right-click on the Magical Book Binding to bind the pages together into Draconic For Dummies: Volume II, completing the quest.
The Good News and The Bad News
The Good News and The Bad News Quest Starts/
Hand Narain Soothfancy the items:
- 20 Arcanite Bar;
- 10 Elementium Ore;
- 10 Azerothian Diamond;
- 10 Blue Sapphire.
These items are required for further advancement in the Blue Scepter Shard quest chain.
The Wrath of Neptulon
The Wrath of Neptulon Quest: Narain Soothfancy, near /
Quest Ends: Anachronos, Tanaris, /
Take the Arcanite Buoy to the specified location in Azshara. You will need to be in a raid group of at least 20 players — the larger the group, the better your chances of completing this encounter.
Use the Arcanite Buoy in the large fishing pool to summon the boss — Maws.
The Fight:
The fight itself is relatively straightforward, but avoid staying underwater to prevent drowning. Maws will cast Frenzy, every 25 seconds, which increases his attack speed. A hunter must use a Tranquilizing Shot to dispel this effect.
Congratulations! You’ve completed the quest to obtain the Blue Scepter Shard.
Final Stage: Open The Gates!
Your efforts culminate in the opening of the Gates of Ahn’Qiraj, triggering an epic server-wide battle. Marshal your comrades and prepare for the Ten Hour War as the gates open, unleashing the dangers and rewards that lie beyond.
The Might of Kalimdor
The Might of Kalimdor Quest Starts/
This quest from Anachronos does not require any objectives. It simply rewards you with what you’ve been working towards all this time: The Scepter of the Shifting Sands.
You have now officially completed the questline. The remaining quests will reward you with epic prizes for your hard-earned efforts.
Bang a Gong!
Bang a Gong! Quest Starts/
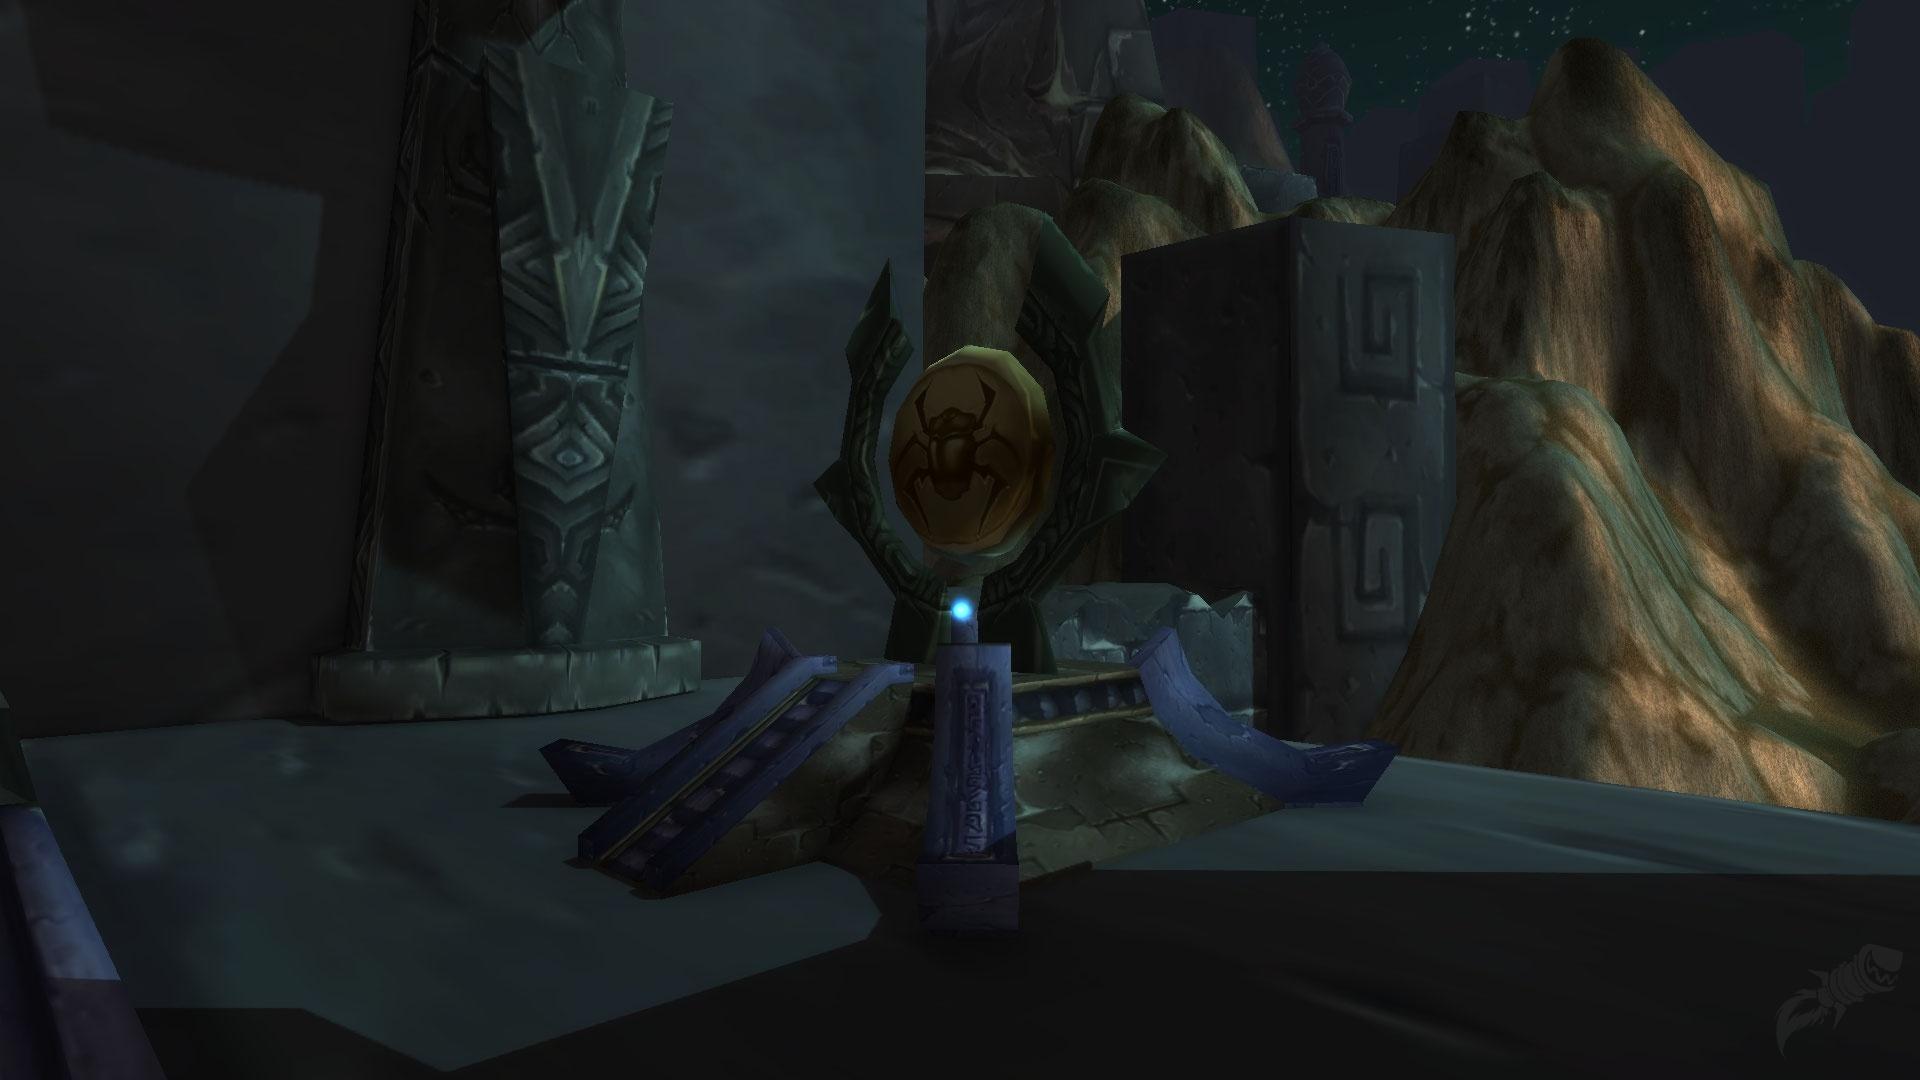
You obtain this quest directly from The Scarab Gong. You can only accept it if the Scarab Gate remains unopened and your server still lacks access to the Ahn’Qiraj raid instances.
The quest is severely limited in time, and you need to know one important thing. When the first player turns in the quest, it starts the 10 Hour Timer for the entire server. From now on, players will have only 10 Hours to complete the quest before it is closed forever. Many old school players know this time as “The Ten Hour War”.
When the wielder finally strikes the Scarab Gong with The Scepter of the Shifting Sands, the Gates of Ahn’Qiraj will open, unleashing chaos and destruction across the land. At the end of this quest chain, you will finally receive your well-deserved iconic rewards and Black Qiraji Resonating Crystal.
Treasure of the Timeless One
Treasure of the Timeless One Quest Starts/
Upon completing this quest, you will receive prestigious rewards for your efforts. You can choose one of the following items as your reward:
When you ring the Scarab Gong for the first time, Jonathan the Revelator will appear. His purpose is solely to present the Scarab Lord with these powerful armaments, courtesy of the Bronze Dragonflight. Choose wisely, as each of these items symbolizes part of your hard-won journey and stands as a testament to your achievements.
4.9Completing The Scepter of the Shifting Sands questline and obtaining The Scepter of the Shifting Sands is a testament to your willpower and will forever engrave your name in your server’s history in WoW Season of Discovery. This journey is about more than just earning a Scarab Lord title or Qiraji Battle Tank Mount. It’s about being part of a momentous event that requires the effort and coordination of the entire community. Now, good luck, adventurer, and may the road through the sands bring you fortune and unforgettable moments!