This Arc Raiders overview is your complete guide to everything we know so far about Embark Studios’ ambitious PvPvE extraction shooter. In this guide, you’ll learn about Arc Raiders gameplay, game modes, enemies, weapons, missions, locations, dynamic events, and system requirements.
Arc Raiders Release Date
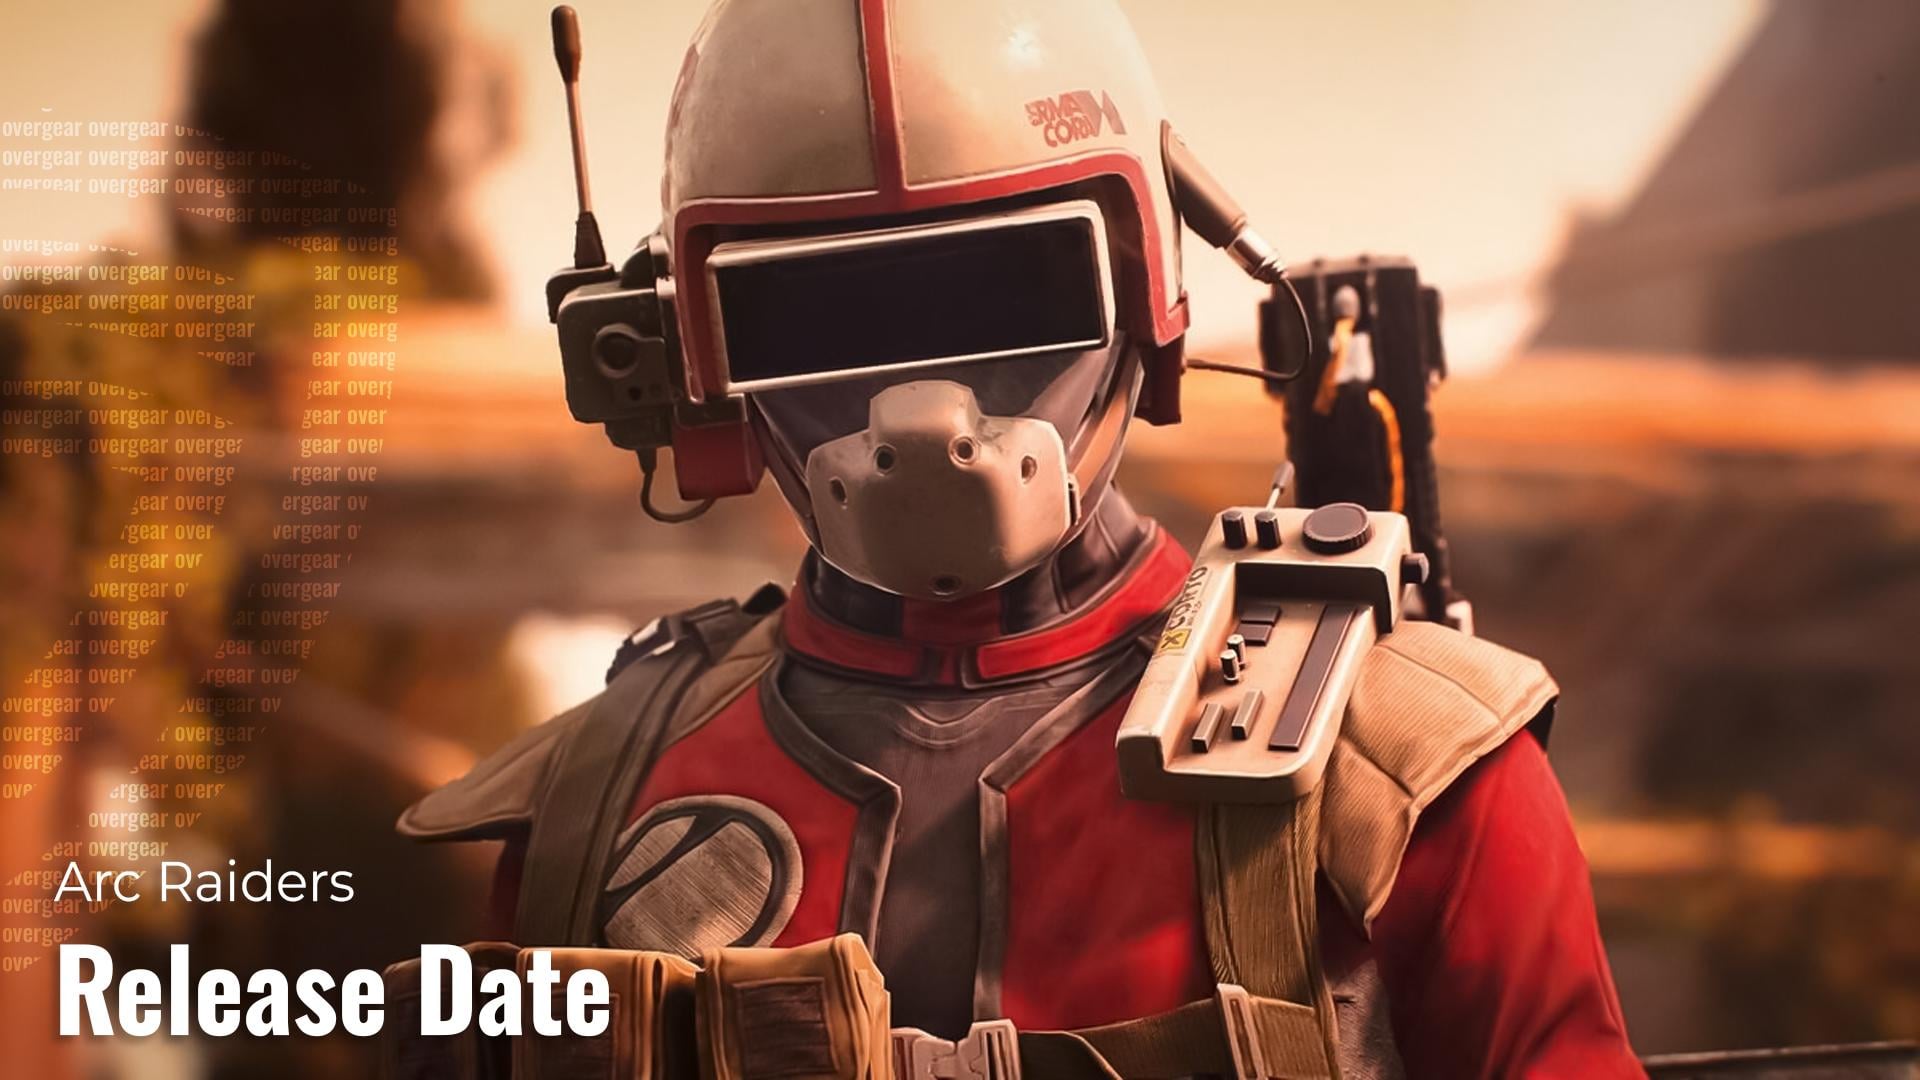
Arc Raiders is a much-anticipated multiplayer extraction shooter. Embark Studios has officially confirmed that Arc Raiders is coming on October 30, 2025. In practice, this means that the Arc Raiders release is very close to the Marathon launch (September 23, 2025).
During the Summer Game Fest on June 6, we saw a colorful and promising trailer with confirmation of the Arc Raiders launch date. This information only sparks speculation of a reveal or surprise release around that date.
📌 Note: Arc Raiders had public tech tests (Tech Test 2 in April–May 2025) on PC and consoles. On May 5, 2025, Tech Test 2 has been officially ended, servers have gone offline, and you will no longer be able to connect to the game.
Arc Raiders Game Modes
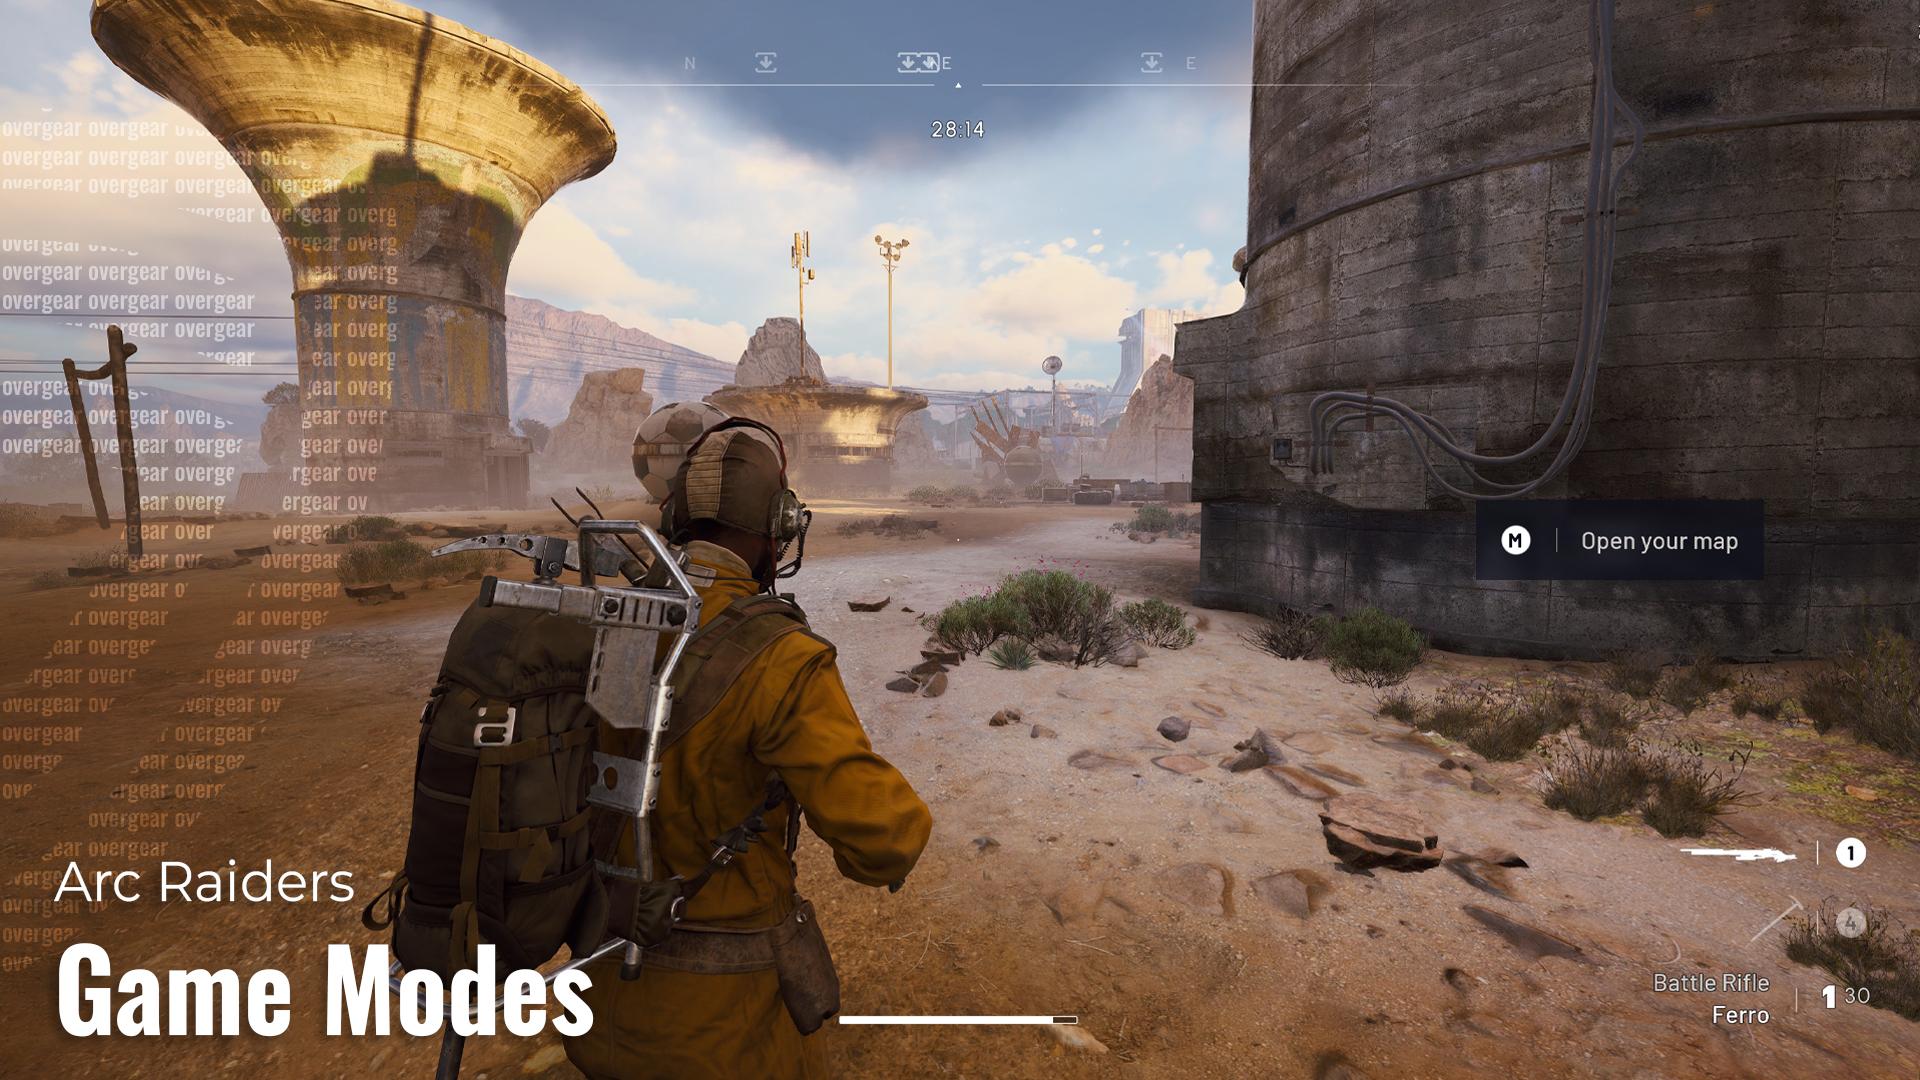
The Arc Raiders modes include:
- PvPvE Extraction Runs: The main mode. Teams of Raiders (up to 3 players) venture out, complete objectives, and try to extract safely. You’ll fight robot enemies and may encounter other players — you can cooperate with your team or even turn on them to steal their haul.
- Cooperative Missions: In practice, runs are mostly cooperative. The emphasis is on teamwork, though the PvP element means trust is scarce.
Each of these modes is woven into the game’s loop — you hunt ARC machines and loot on the surface (PvPvE), then return to base to upgrade your gear and character. The PvPvE blend means Arc Raiders has no traditional deathmatch or campaign mode at launch. The single core mode is the extraction loop described further.
Arc Raiders Locations
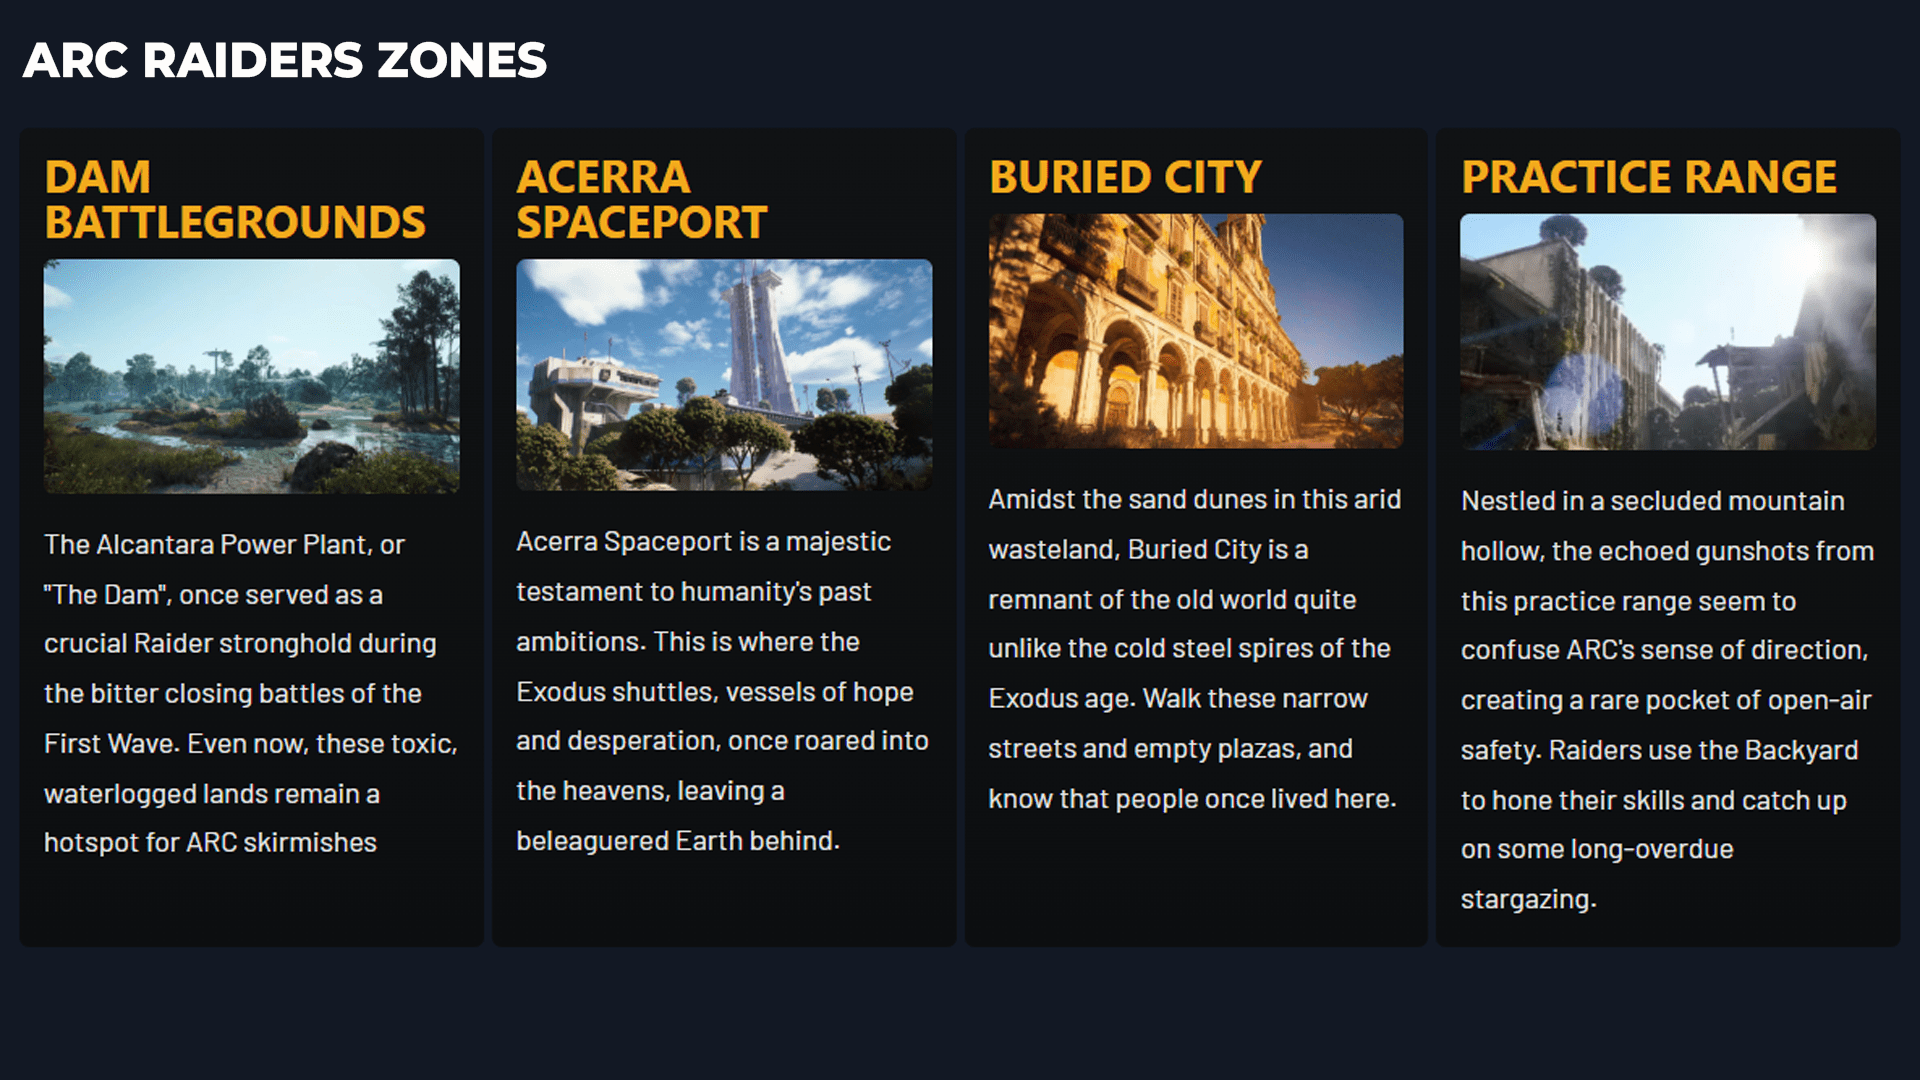
Arc Raiders drops you into richly detailed zones where history, decay, and machine warfare collide. Each map is basically a unique terrain layout where you can find dynamic events and environmental hazards. There are 4 main Arc Raiders locations:
- Dam Battlegrounds
- Acerra Spaceport
- Buried City
- Practice Range
Arc Raiders Dam Battlegrounds
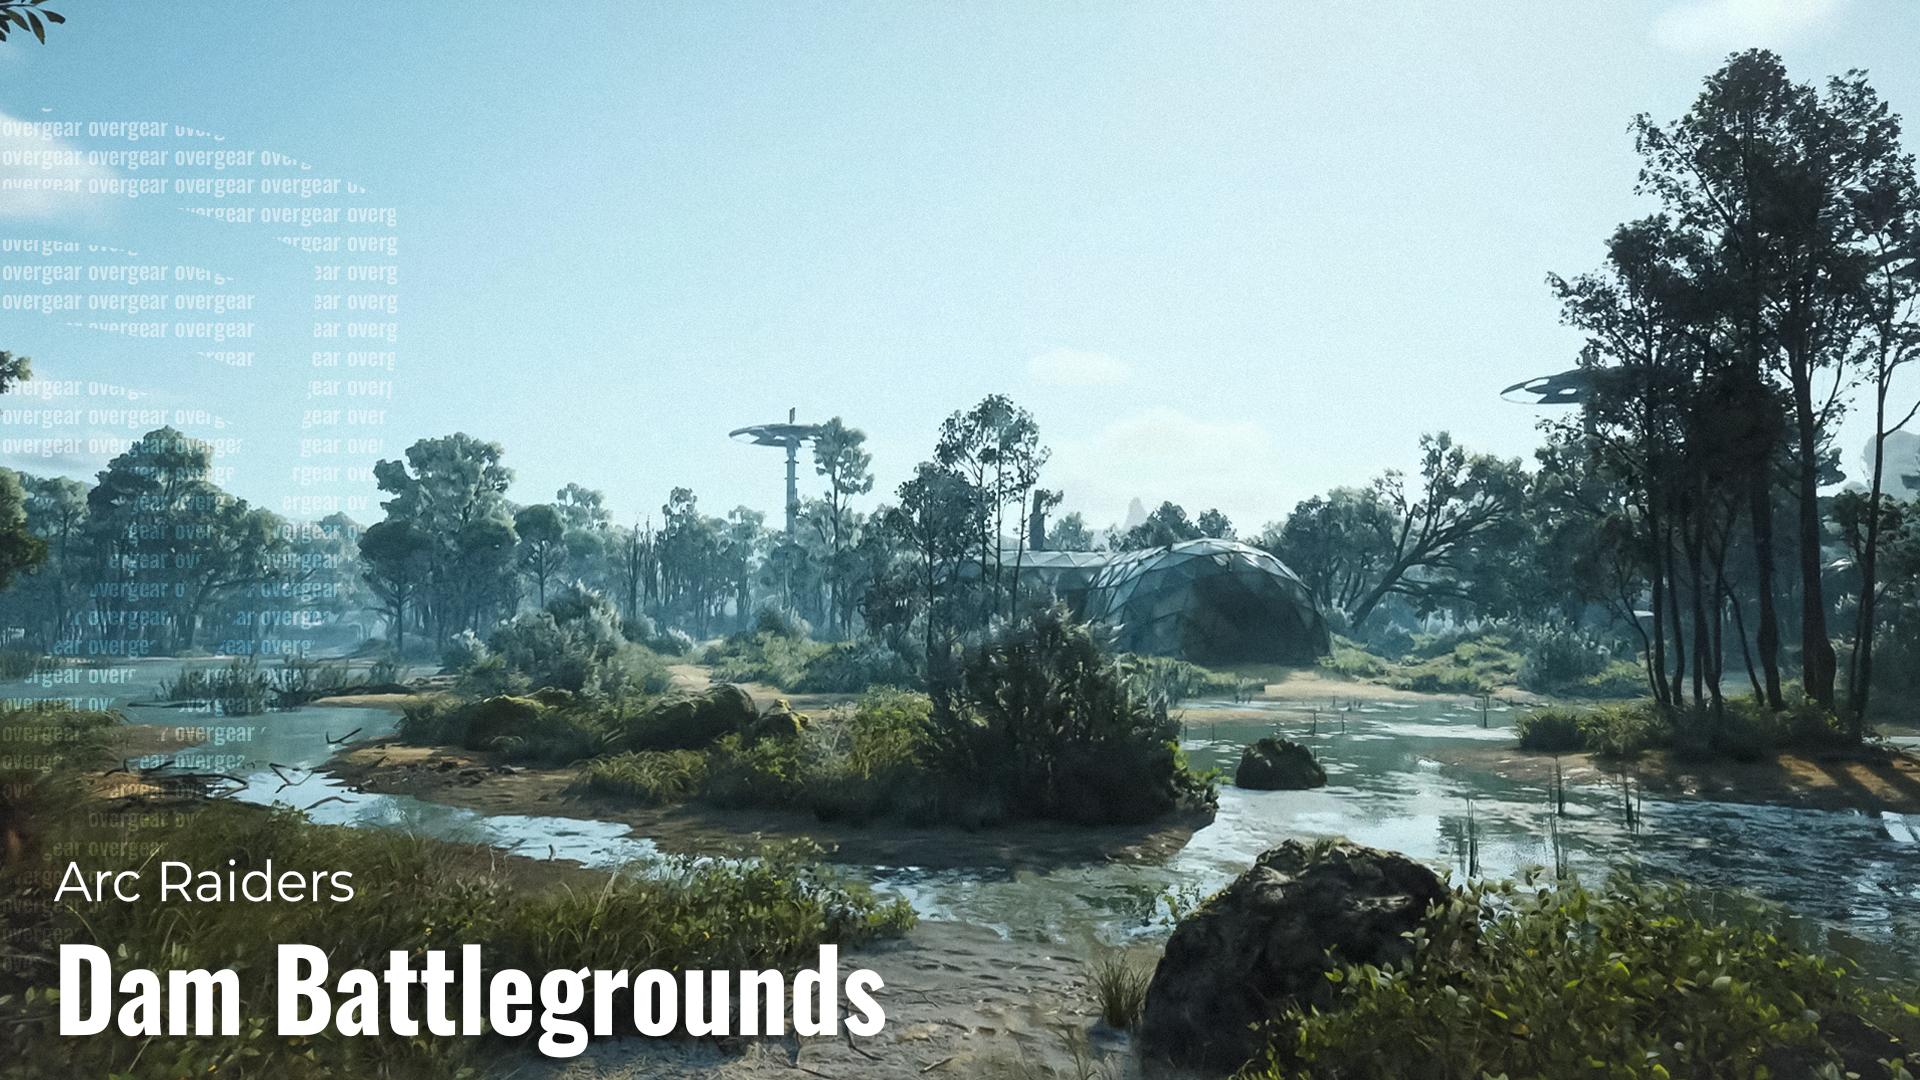
The Alcantara Power Plant in Arc Raiders, known as “The Dam”, is partially submerged and scarred by toxic runoff. This zone is a hotspot for skirmishes and ambushes. Expect close-quarter encounters and limited sightlines in the waterlogged terrain.
Arc Raiders Acerra Spaceport
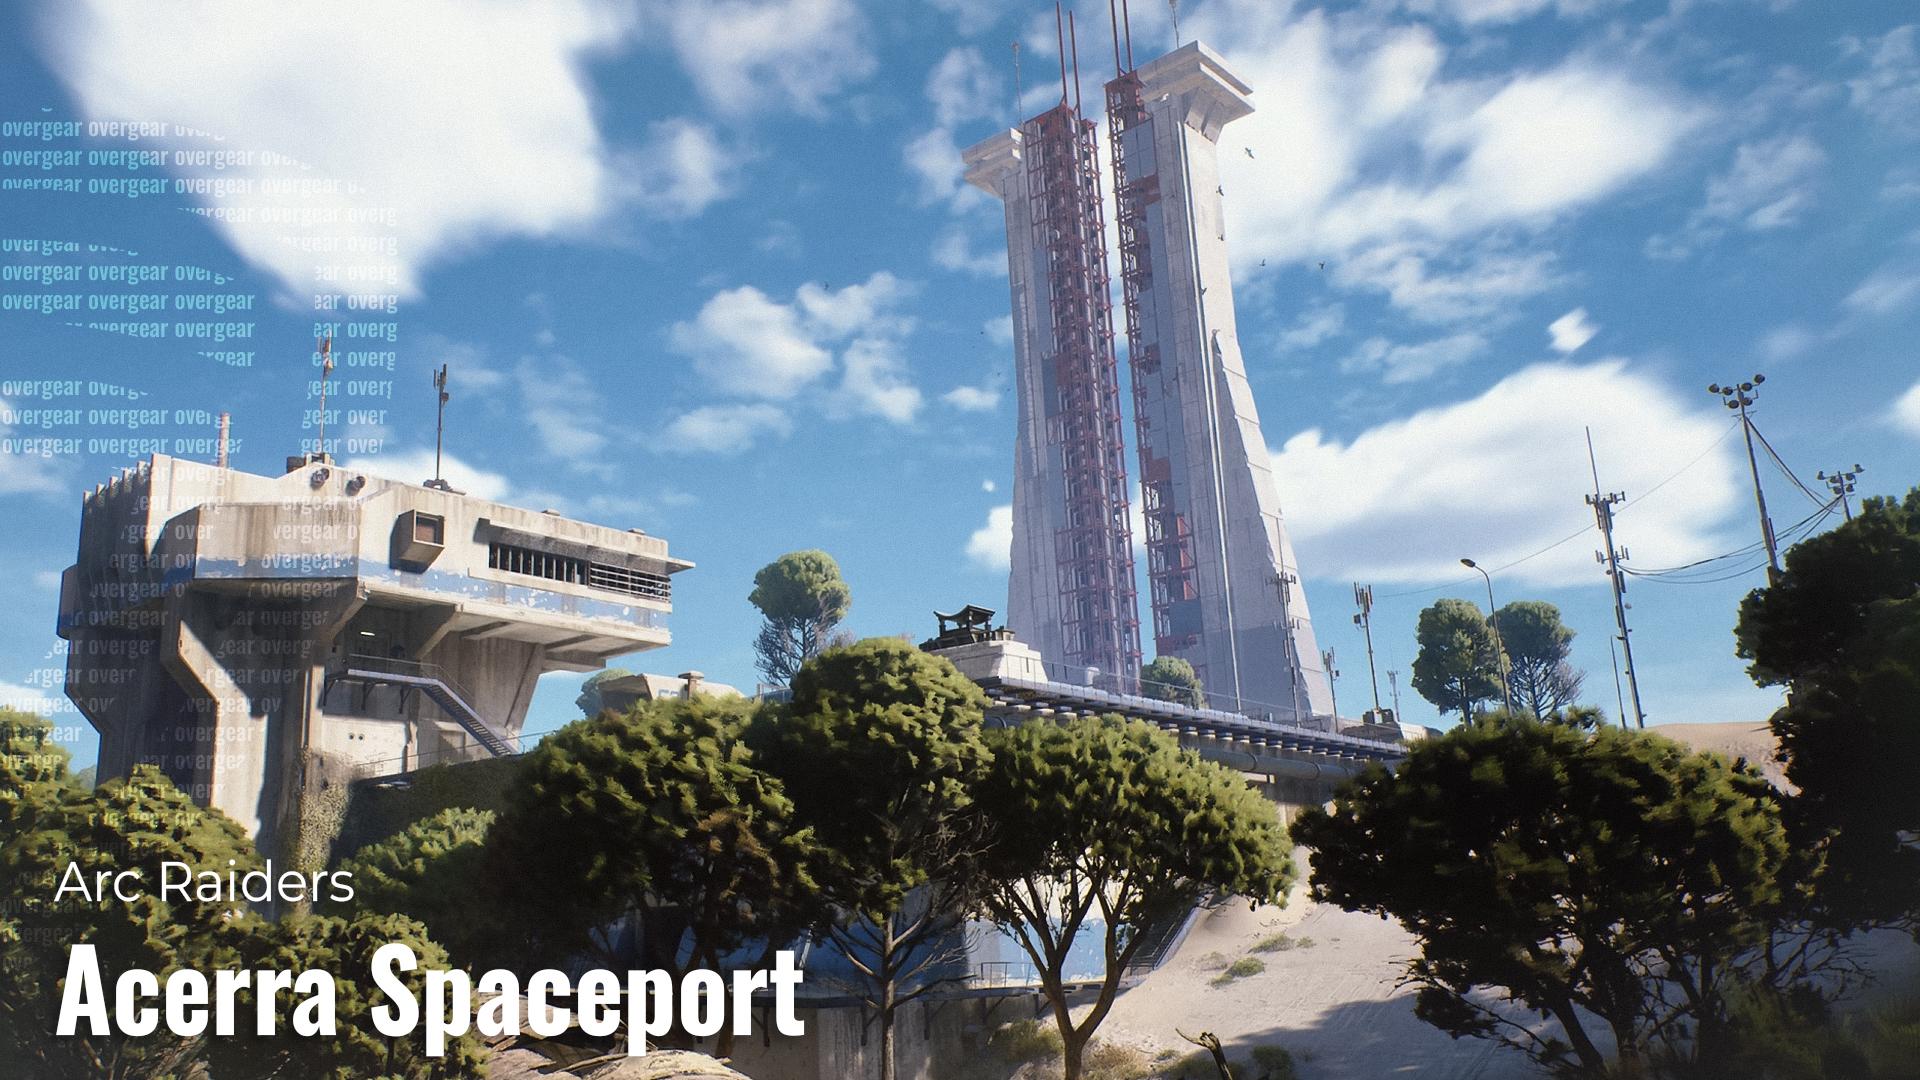
Acerra Spaceport in Arc Raiders is a towering monument to humanity’s spacefaring past. Here you can find a blend of wide-open landing pads and tight maintenance corridors. Once the launch point for the Exodus shuttles, it’s now a high-ground-heavy map perfect for snipers and aerial drone threats.
Arc Raiders Buried City

Arc Raiders Buried City is all that remains of a forgotten civilization. It is a sun-blasted desert ruinscape: warm but not welcoming. Narrow alleys, sand-choked courtyards, and collapsing architecture make this map ideal for flanking and traps. The desolation hides both danger and valuable relics.
Arc Raiders Practice Range
There’s not much to be said about the Arc Raiders Practice Range. This map is a safe zone, to some extent, where you can train your skills, learn to aim, or simply test controls.
Arc Raiders Dynamic Events
Dynamic events in Arc Raiders add a fresh layer of unpredictability to every mission. These limited-time encounters offer high rewards, but also draw in tougher ARC defenses.
- Prospecting Probes. ARC machines deploy guarded probes in waves. Raiders can intercept these to harvest tech or disrupt ARC data collection.
- Harvester. A massive ARC unit known only as the Queen protects a high-value Harvester machine. This is a high-risk event, but the loot inside is worth the firefight.
- Uncovered Caches. Shifting storms unearth old Raider stashes. You’ll need to reach them before they explode or get looted. These caches are rigged, so time is tight.
- Husk Graveyard. ARC bots collapse across the Topside, leaving their remains in clusters. It’s a rare chance to gather advanced components without a fight — unless someone else gets there first.
- Launch Tower Loot. Raiders have stashed supplies atop the Launch Tower. Getting there means fighting through heavily fortified ARC lines, but the payoff is massive.
- Lush Blooms. A rare peaceful event. With weather systems stabilizing briefly, edible plants and resources bloom across the map. It’s a golden opportunity for crafting materials, but the window won’t last.
Arc Raiders Night Raids
Night Raids change the rhythm of Arc Raiders entirely. When the sun sets, danger escalates. ARC patrols shift tactics, visibility drops, and Raider activity increases. However, darkness also hides opportunity: rare loot spawns and high-tier caches are more frequent if you survive long enough to claim them.
✏️ Tip: Always bring a light source or visual aid during Night Raids. And remember, ARC bots aren’t the only ones hunting in the dark.
Arc Raiders Gameplay Overview
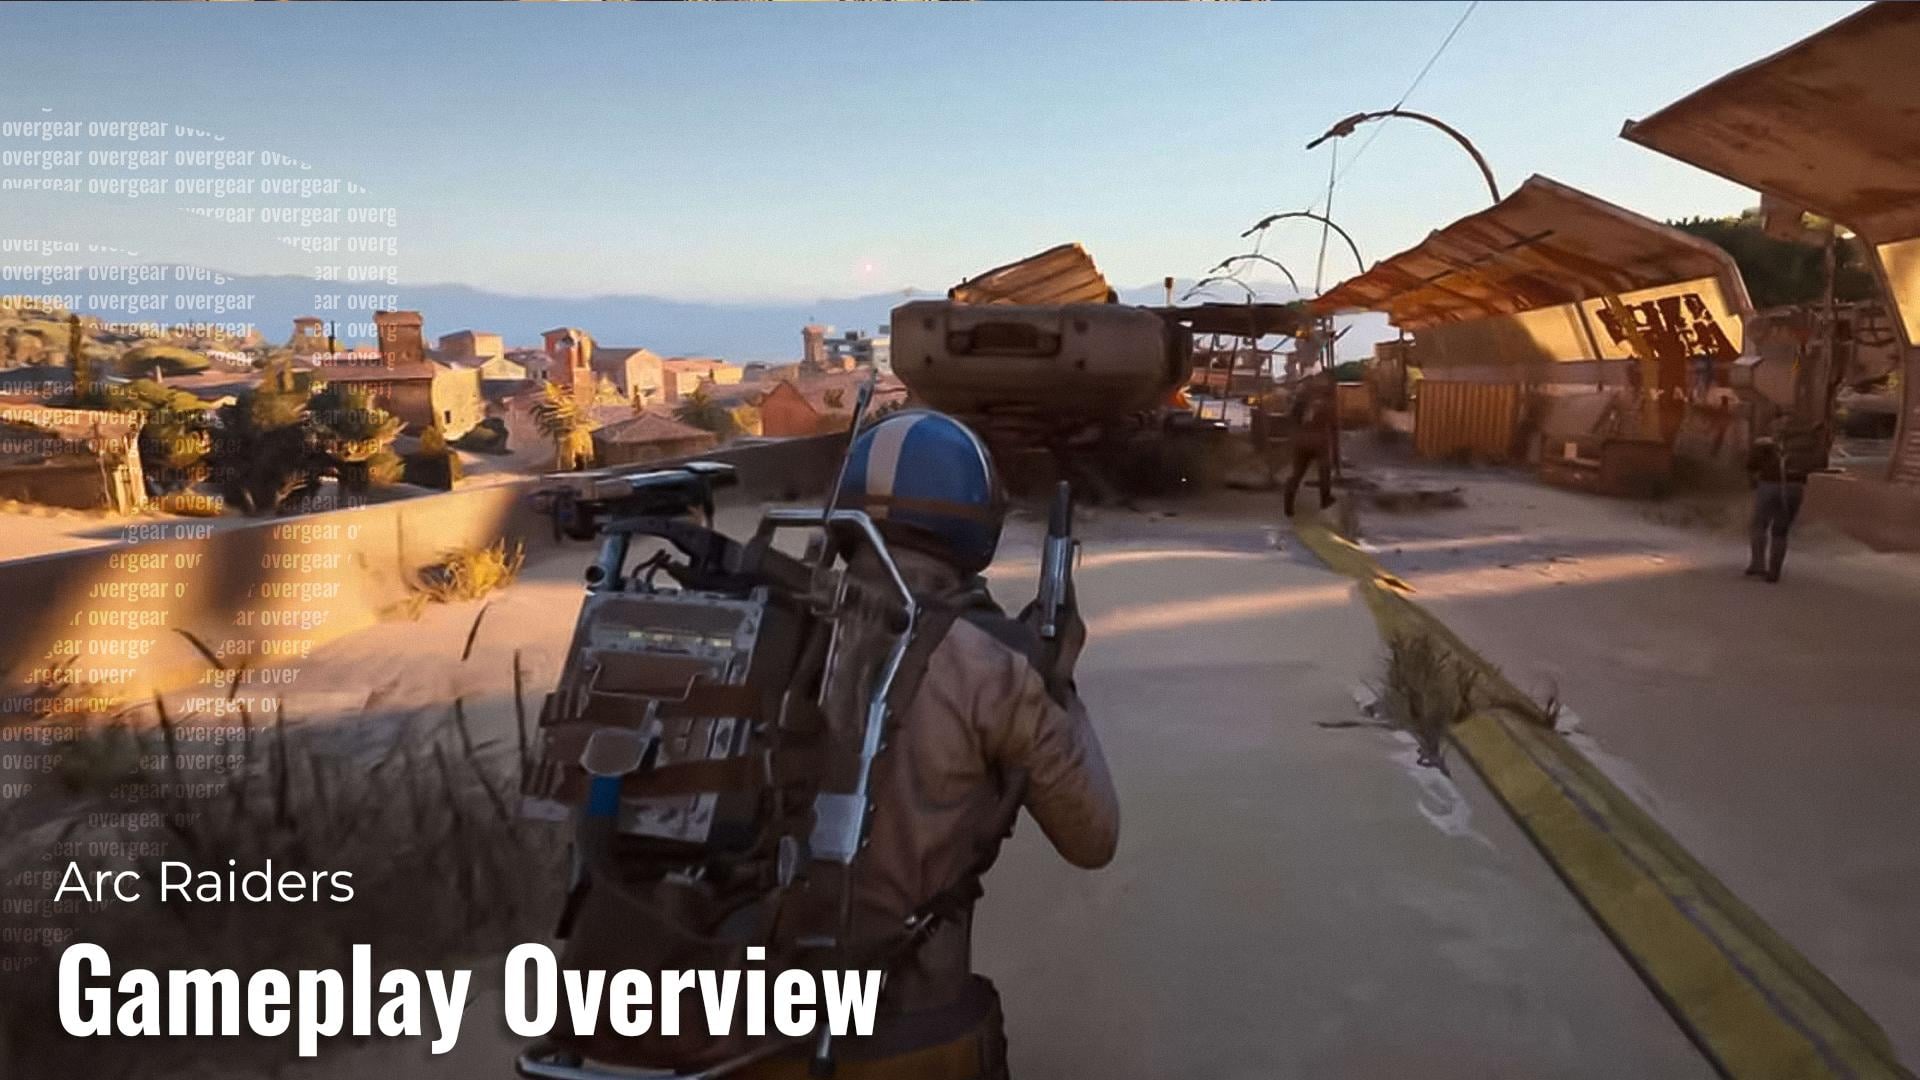
Arc Raiders is an extraction shooter that mixes co-op and PvP. Essentially, every session is a high-risk raid on the surface to grab loot. You and your squad of three gear up and deploy into a dangerous zone full of AI machines and other Raiders.
In gameplay terms, each Arc Raiders session is a 30-minute extraction mission. You will often gear up with guns and gadgets and deploy into one of several zones of your choice to combat other players and robots while trying to loot.
The game offers various quests, e.g., “find a rare component” or “kill 3 ARC machines”. However, you can also set your own goals, like hunting rarer loot or chasing down enemy players. After each successful mission, you return to Speranza to spend your rewards. Traders in the hub will buy your salvage and offer new gear. You also earn experience for every run, which goes into a persistent skill tree.
Arc Raiders Enemies
Arc Raiders offers a diverse range of mechanical foes. In total, there are 10 distinct enemy types in the game. Early tests show everything from small drones to massive war machines:
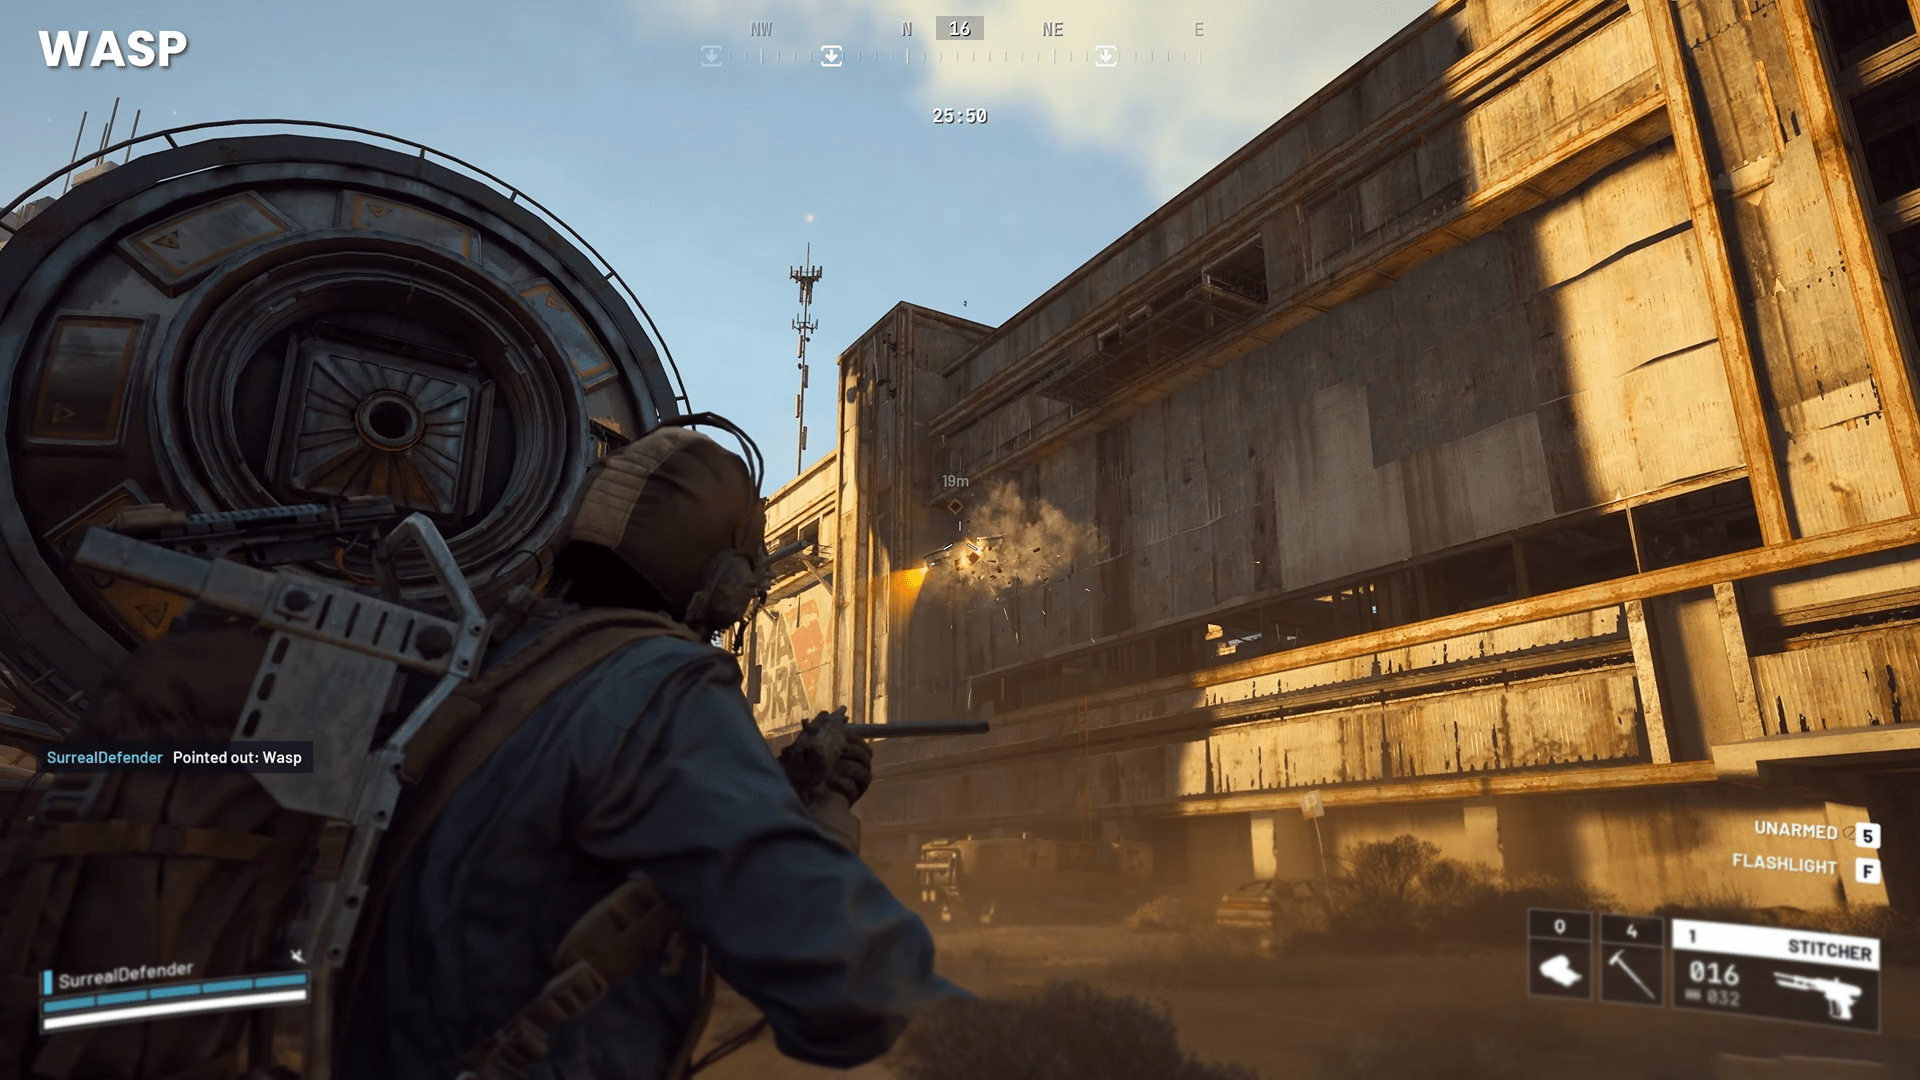
- Wasp: A flying scout drone. It flies overhead, scanning for Raiders, and shoots once it locks on. Wasps are relatively easy to take down, but can quickly alert bigger threats.
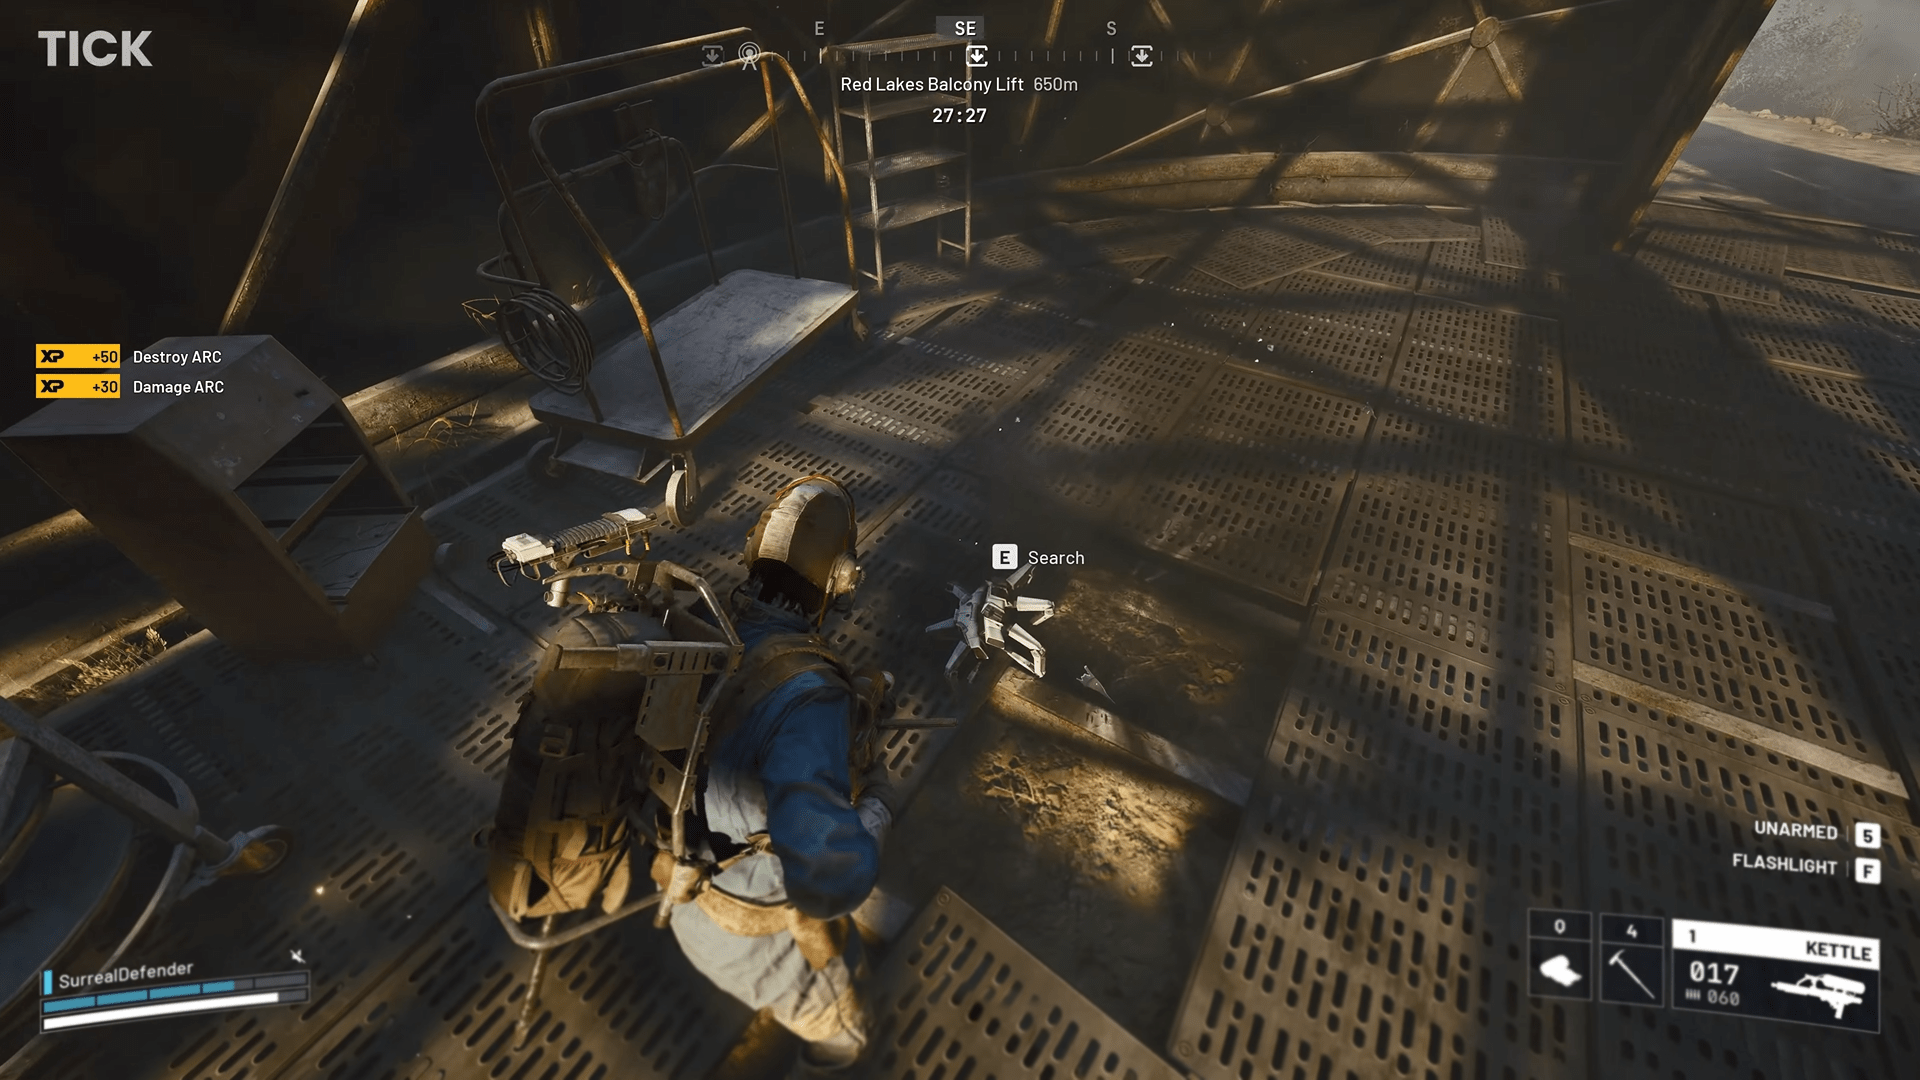
- Tick: A turret-like spider-bot. Ticks crawl on walls/ceilings and automatically fire at intruders. They’re also low-level enemies that spew poison.
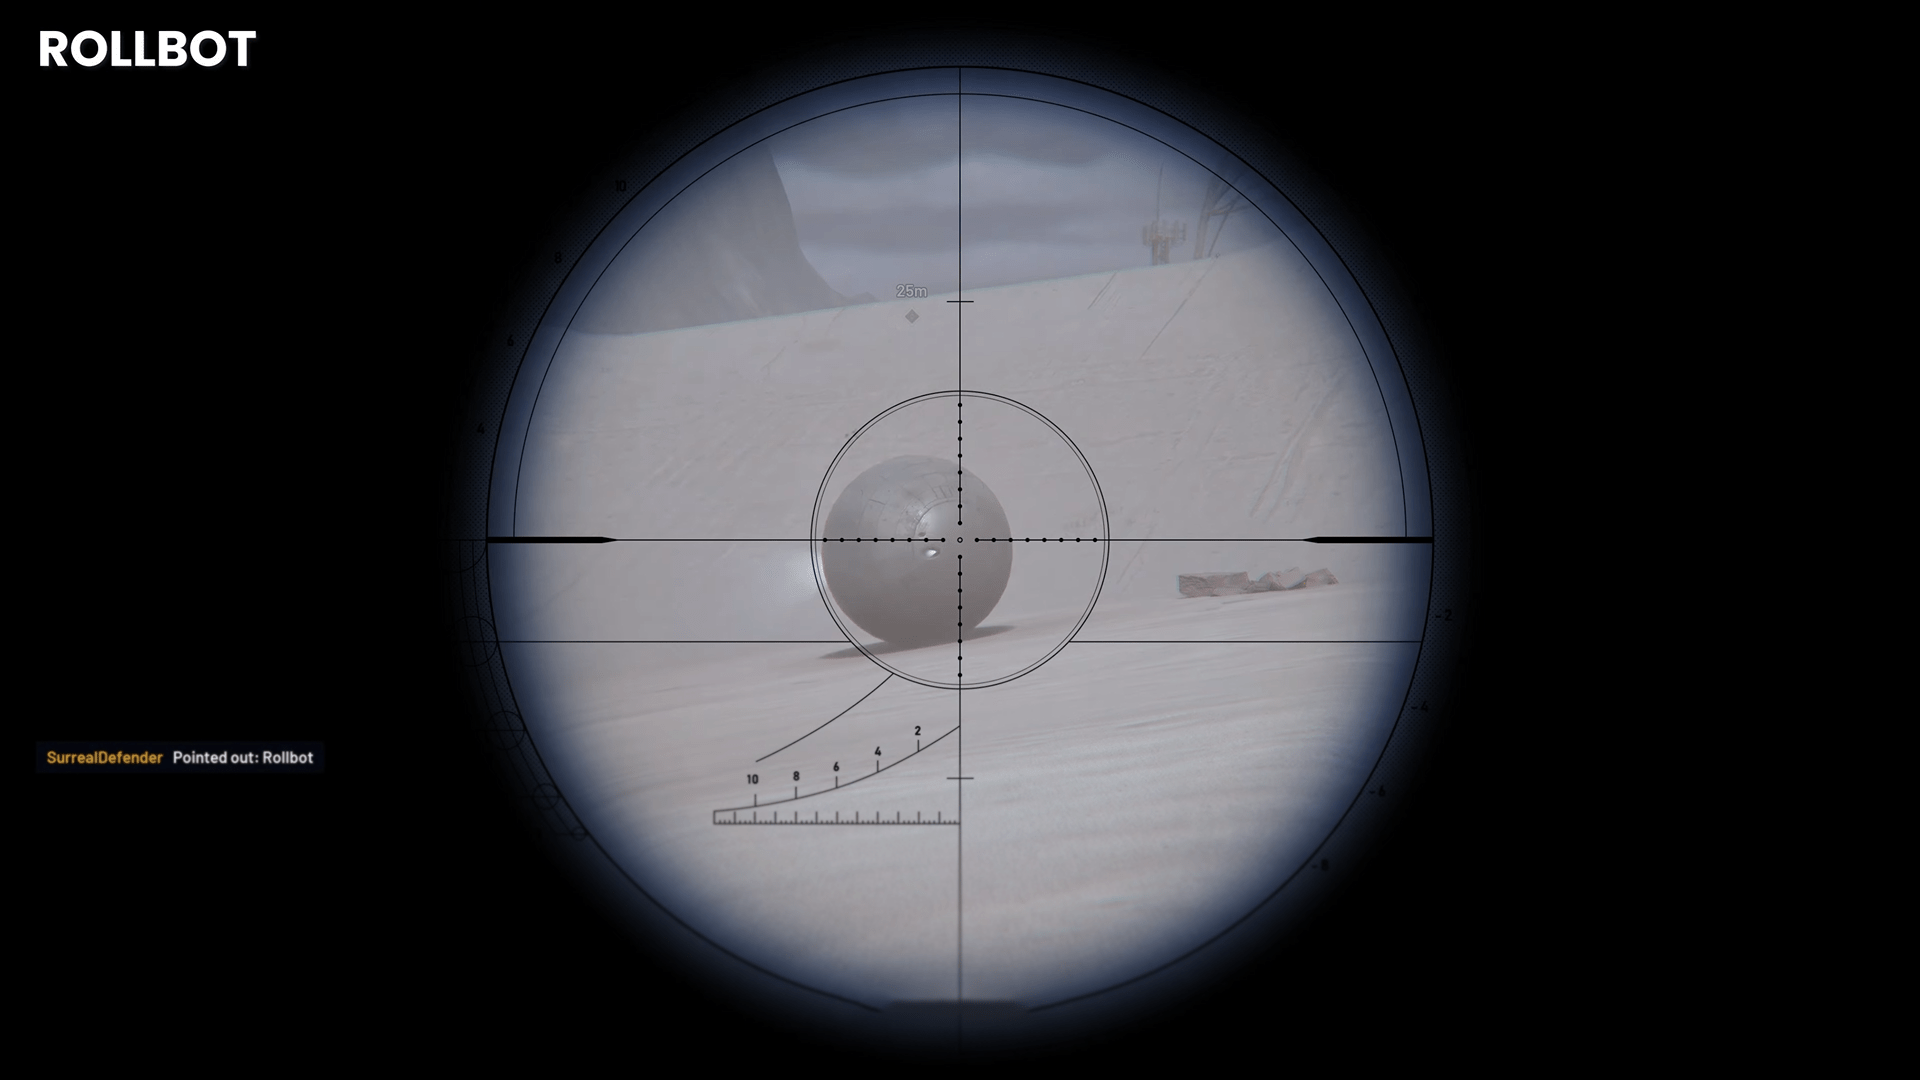
- Rollbot: A fast, spherical robot that rolls around shooting lasers. It’s agile and can surprise unprepared Raiders.
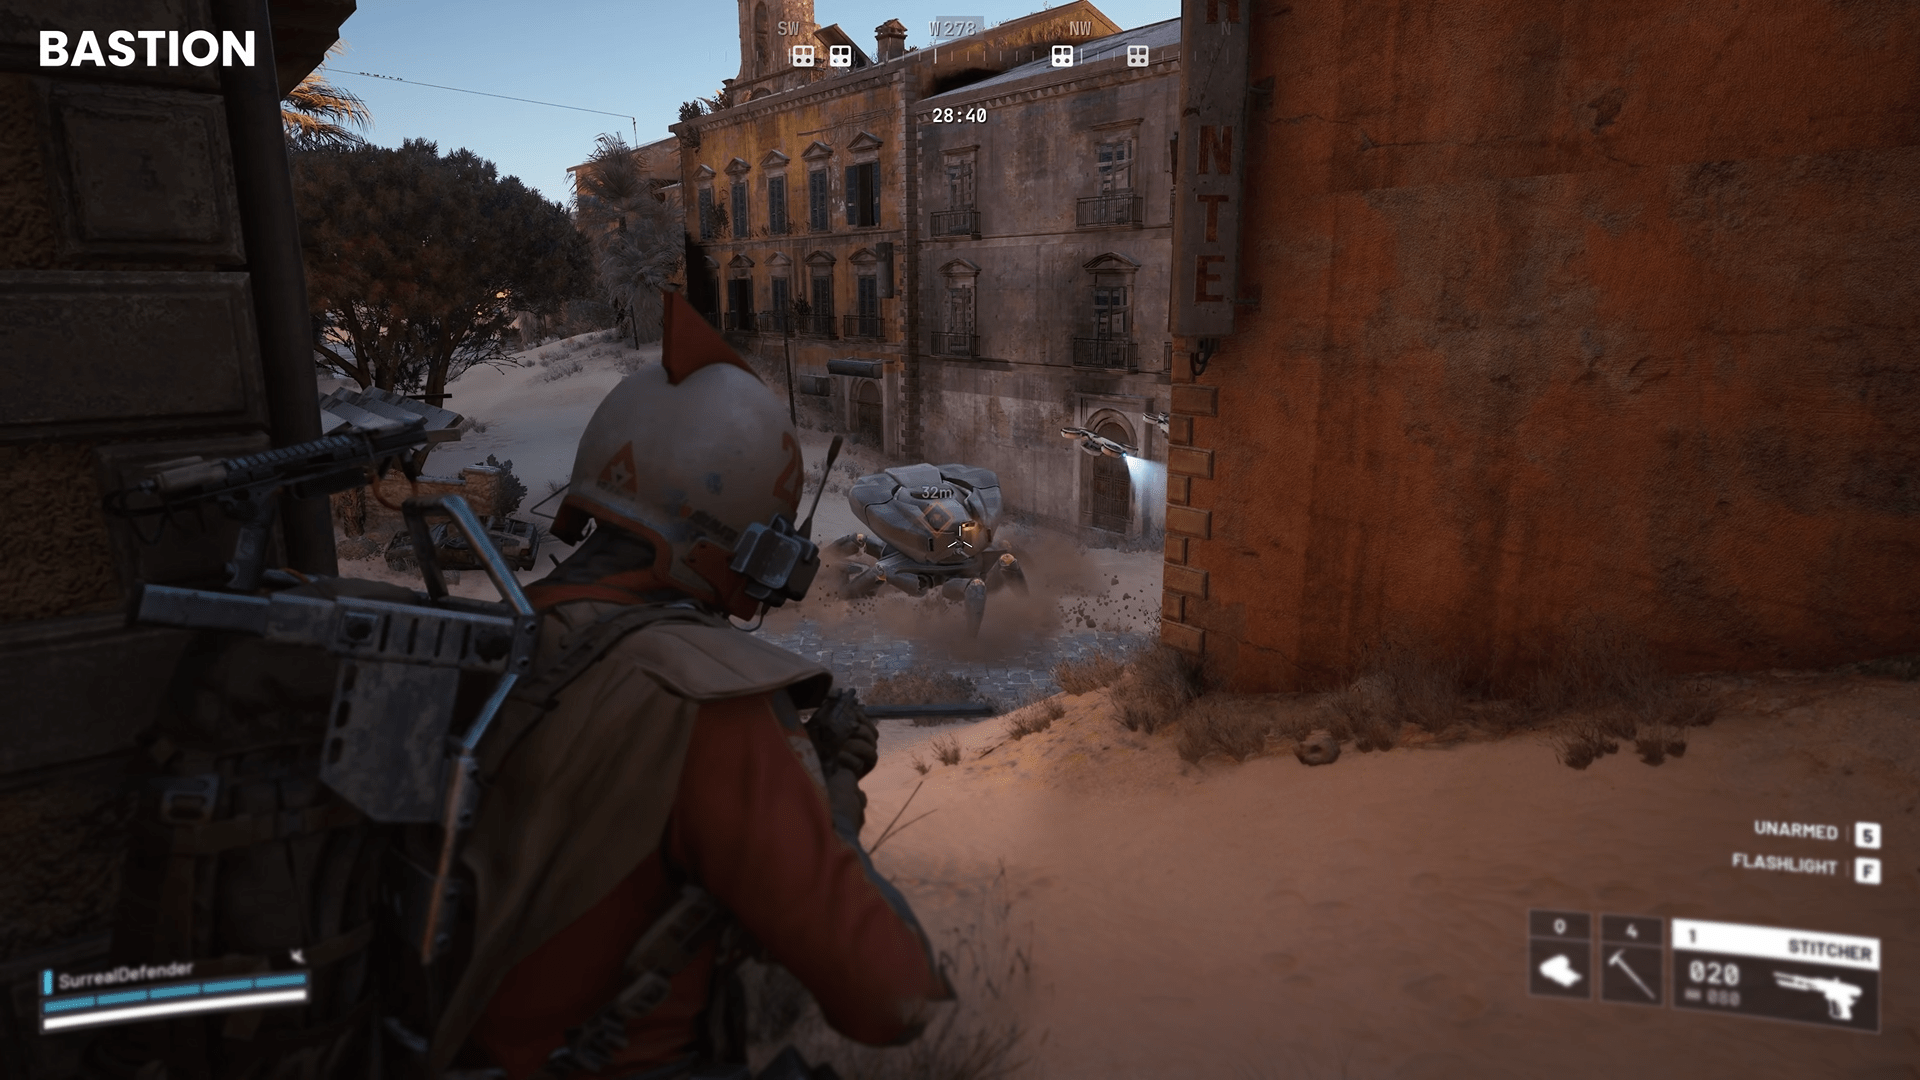
- Bastion: A large, slow-moving, heavy walker. Bastions carry heavy guns and are very dangerous at close range. They’re one of the toughest standard bots.
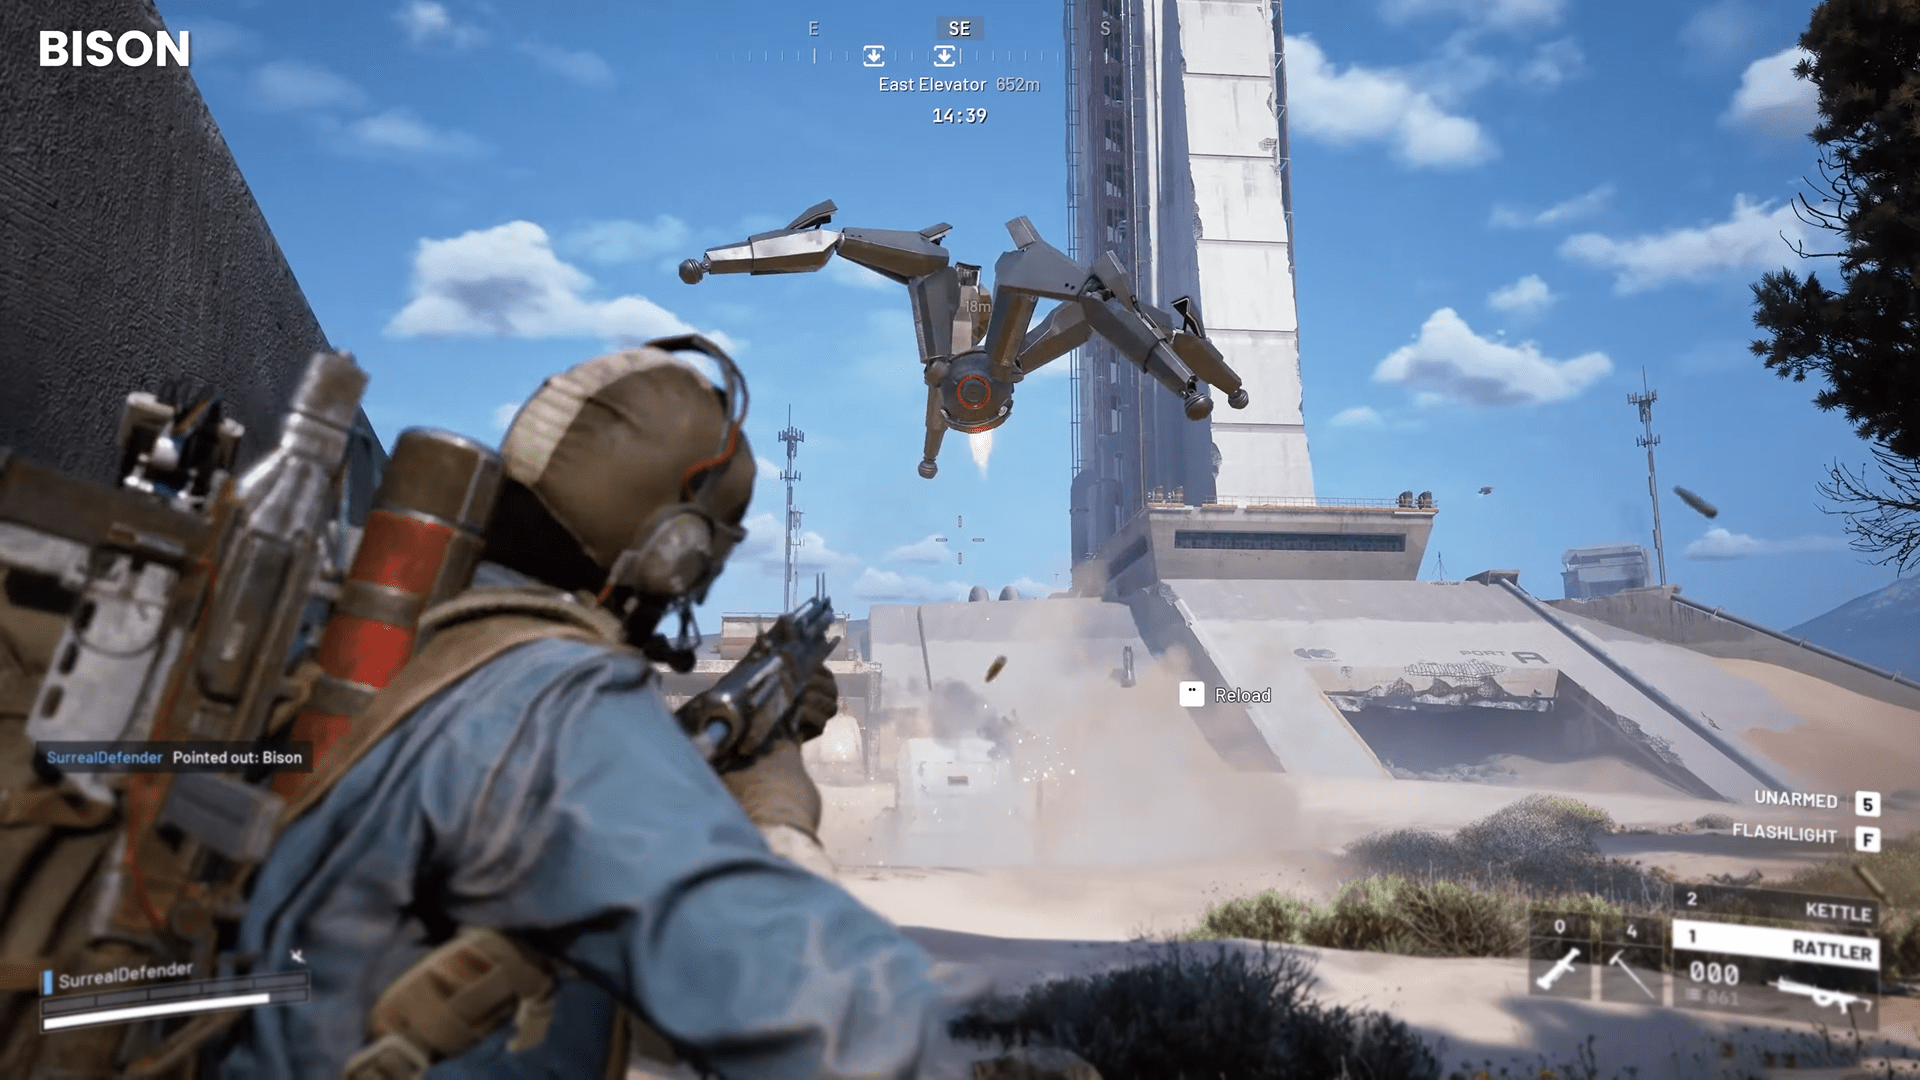
- Bison: A leaping tank bot with high HP. It can spit acid or explosives and jump over obstacles
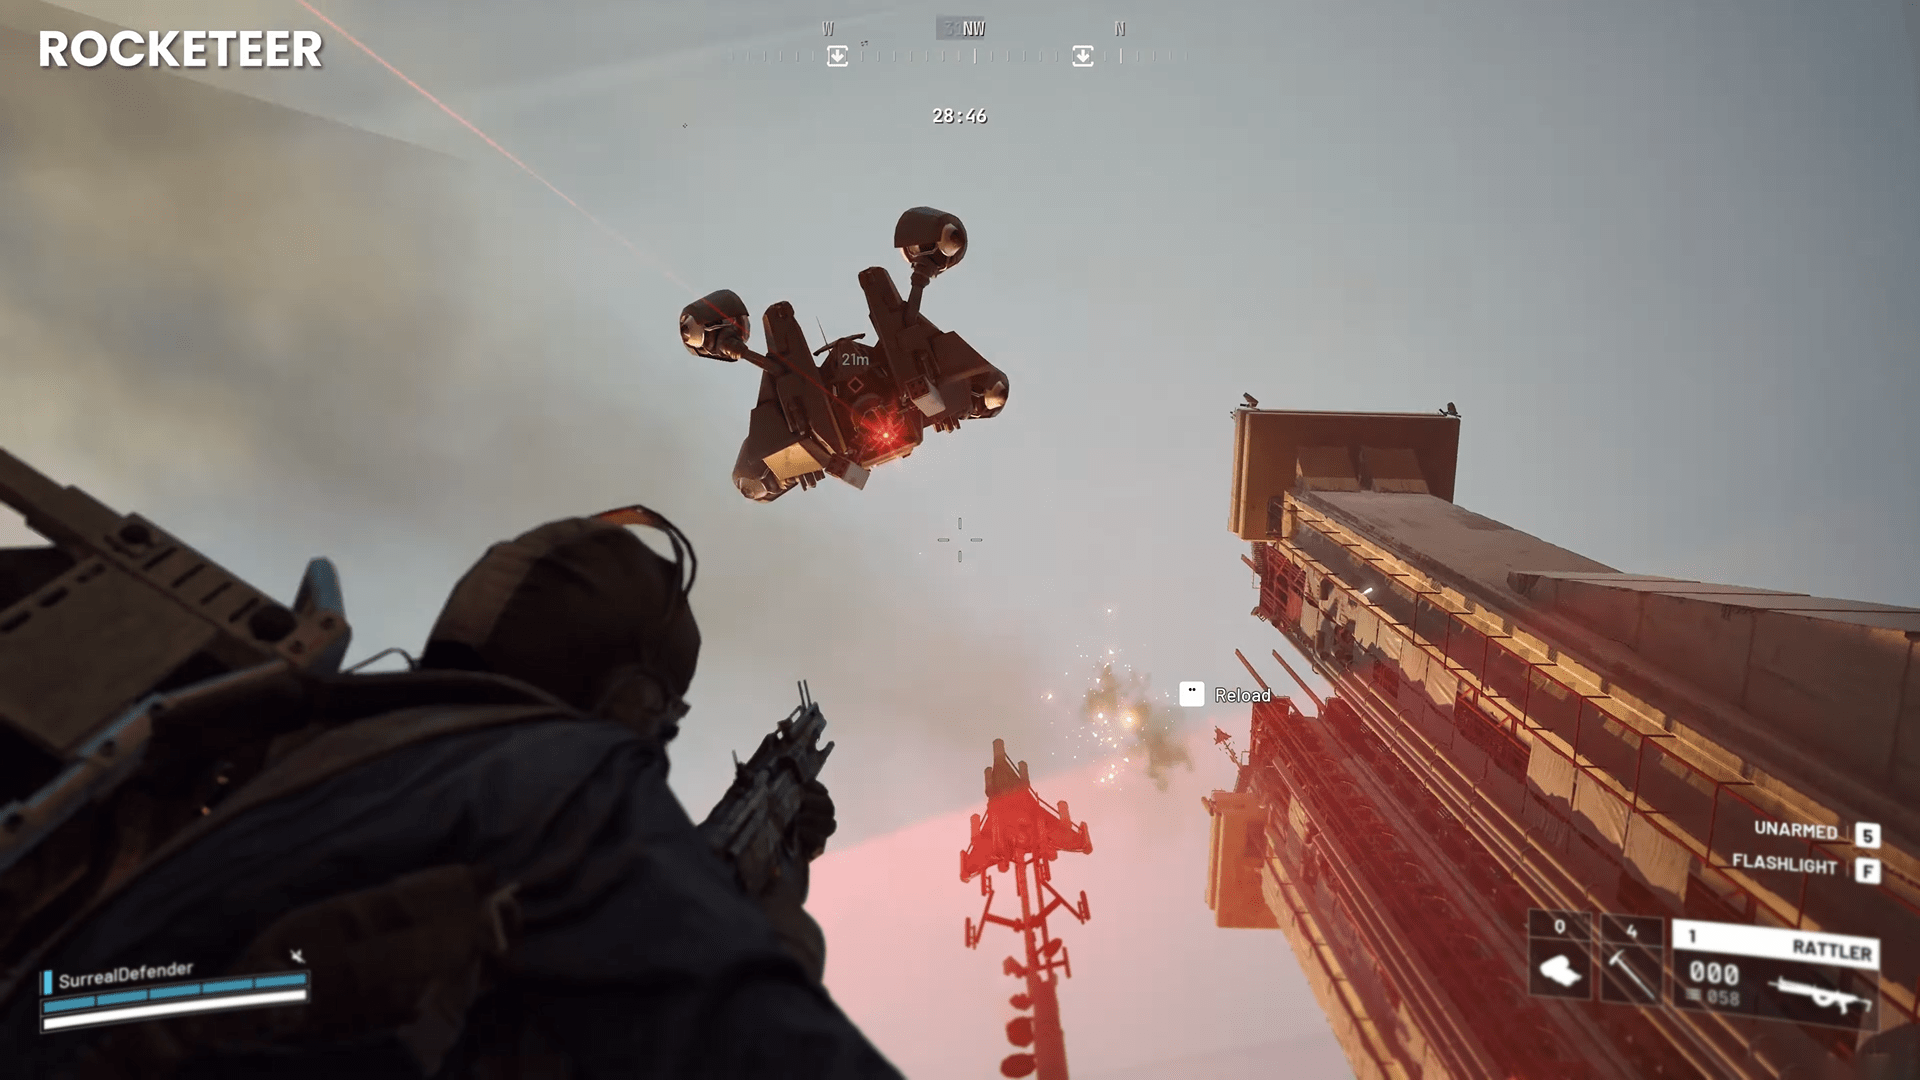
- Rocketeer: A medium bot that fires explosive rockets from a distance. Its projectiles can one-shot if you’re caught off-guard.
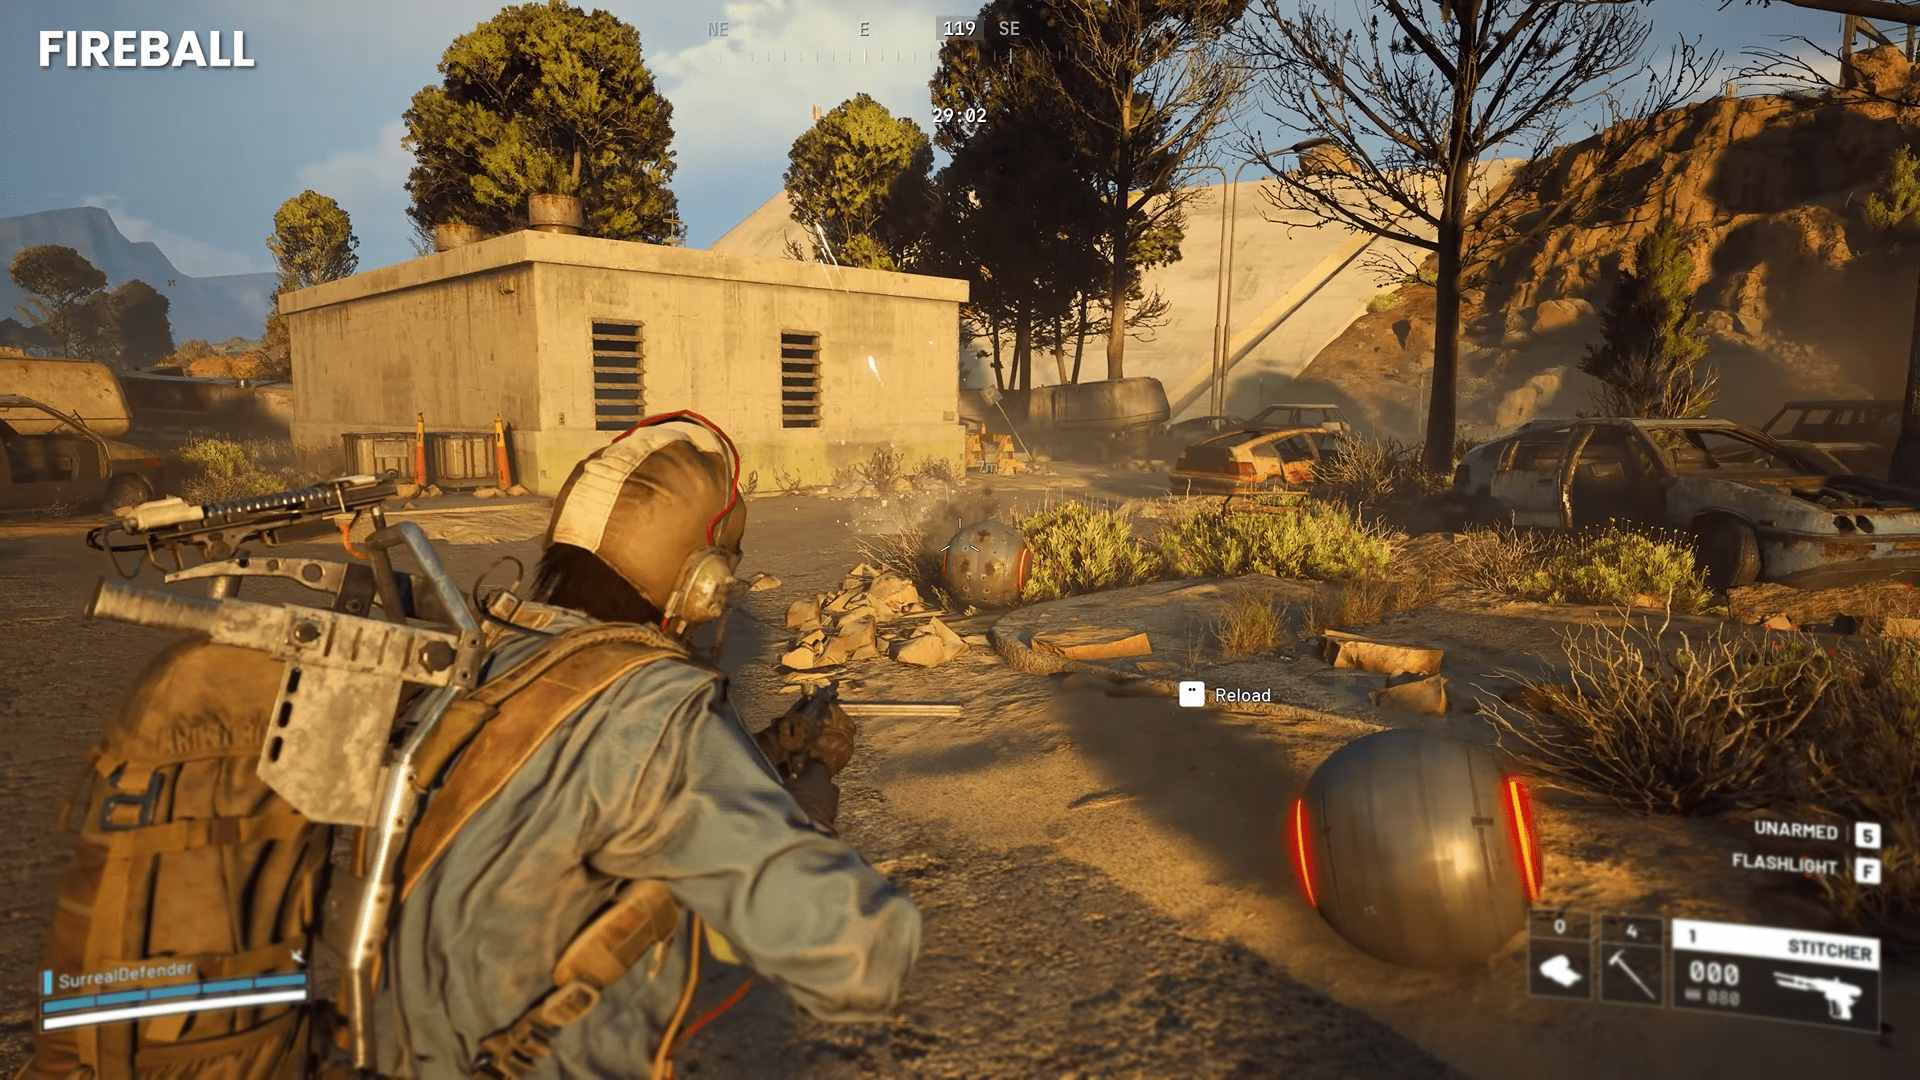
- Fireball: A small rolling bot with a flamethrower. It spews fire in a frontal cone and is deadly at short range
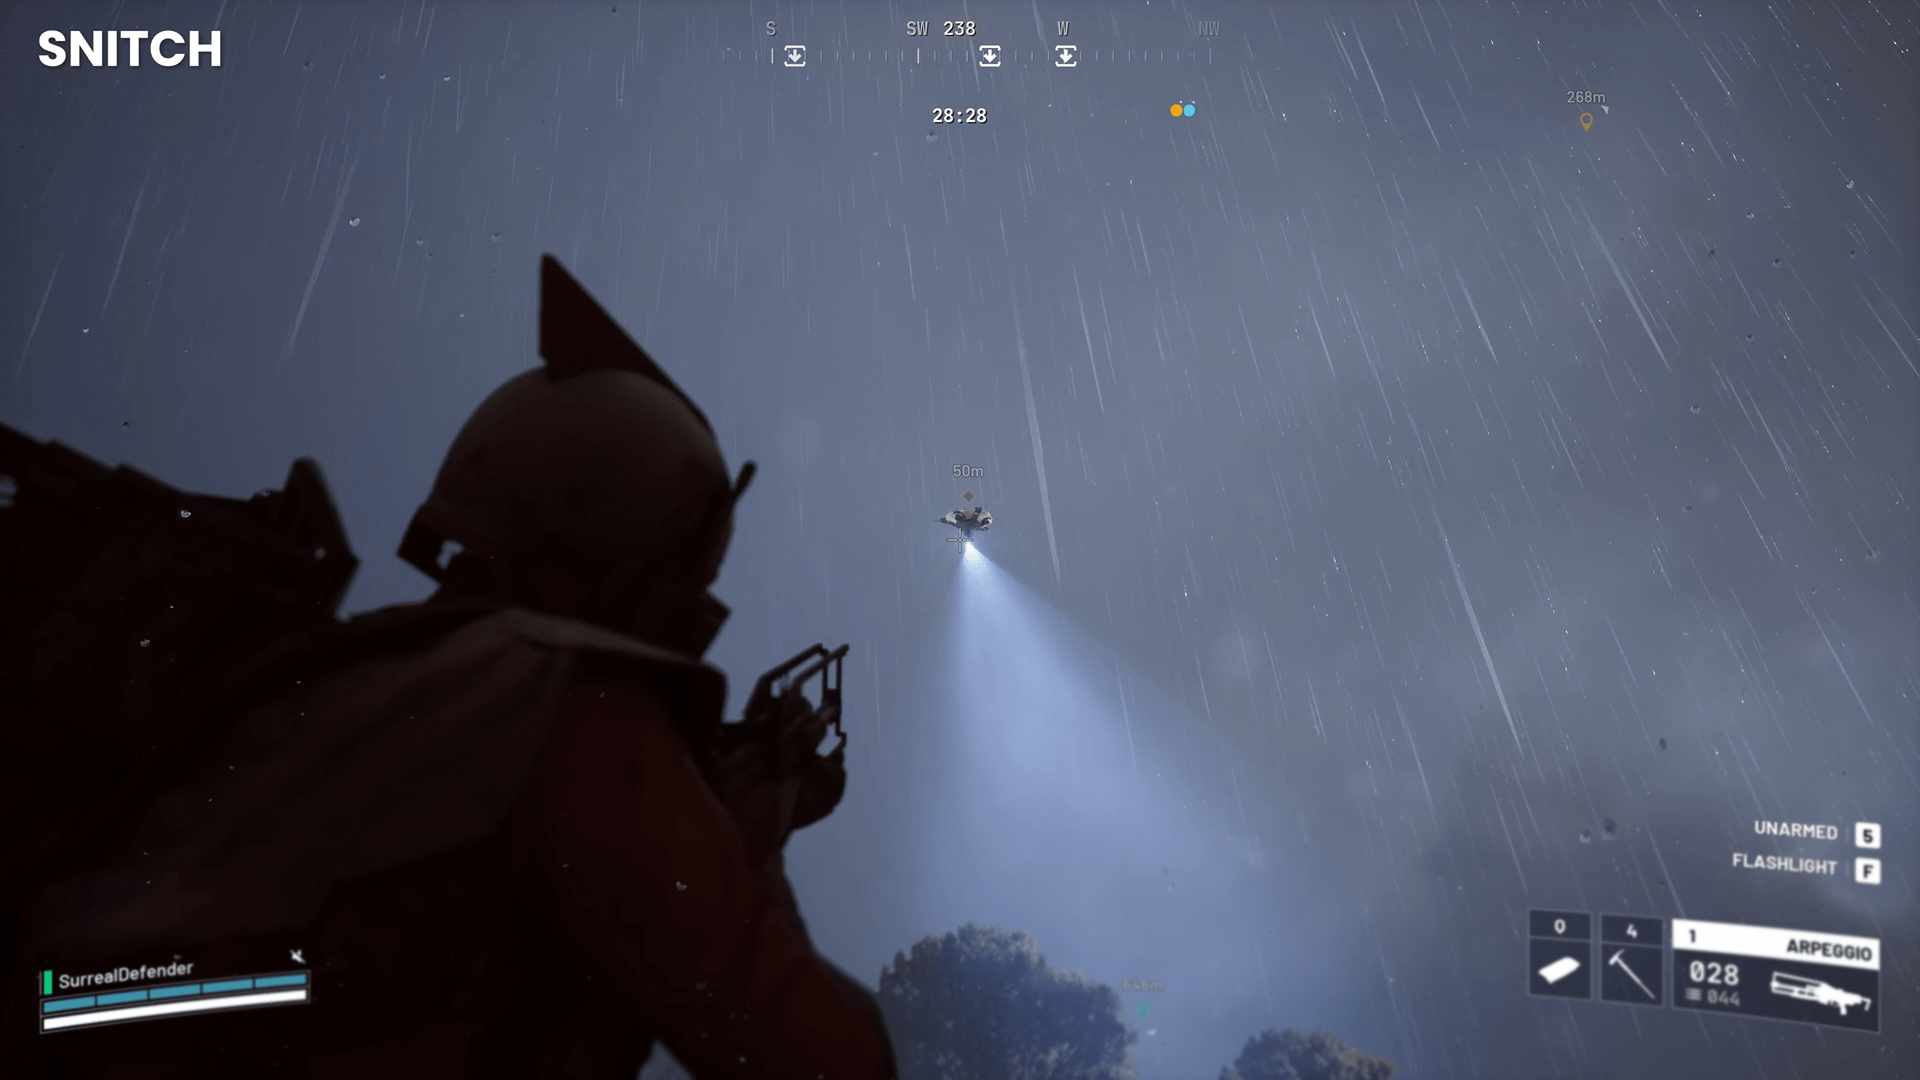
- Snitch: A stealthy drone that tries to flank you. It will flee if spotted, requiring surprise attacks to deal with.
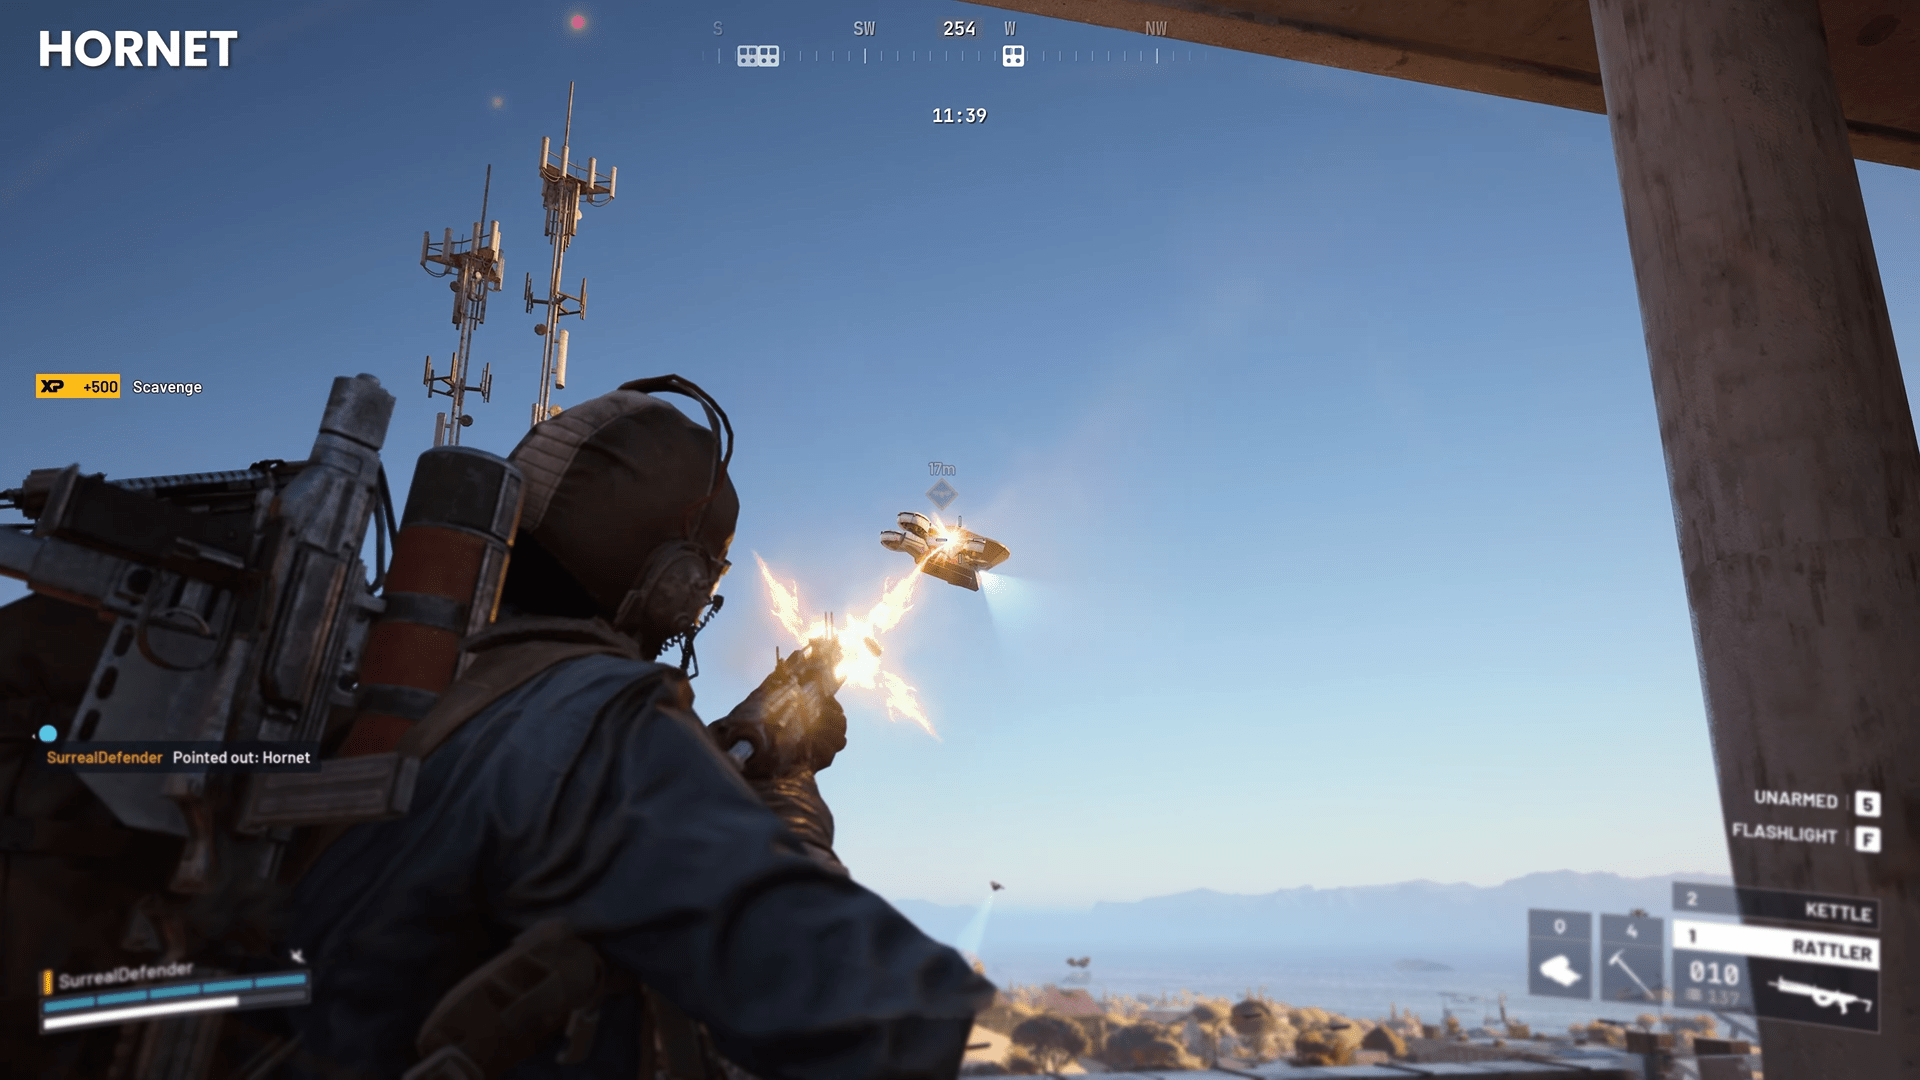
- Hornet: A flying robot that can stun players with an electric charge
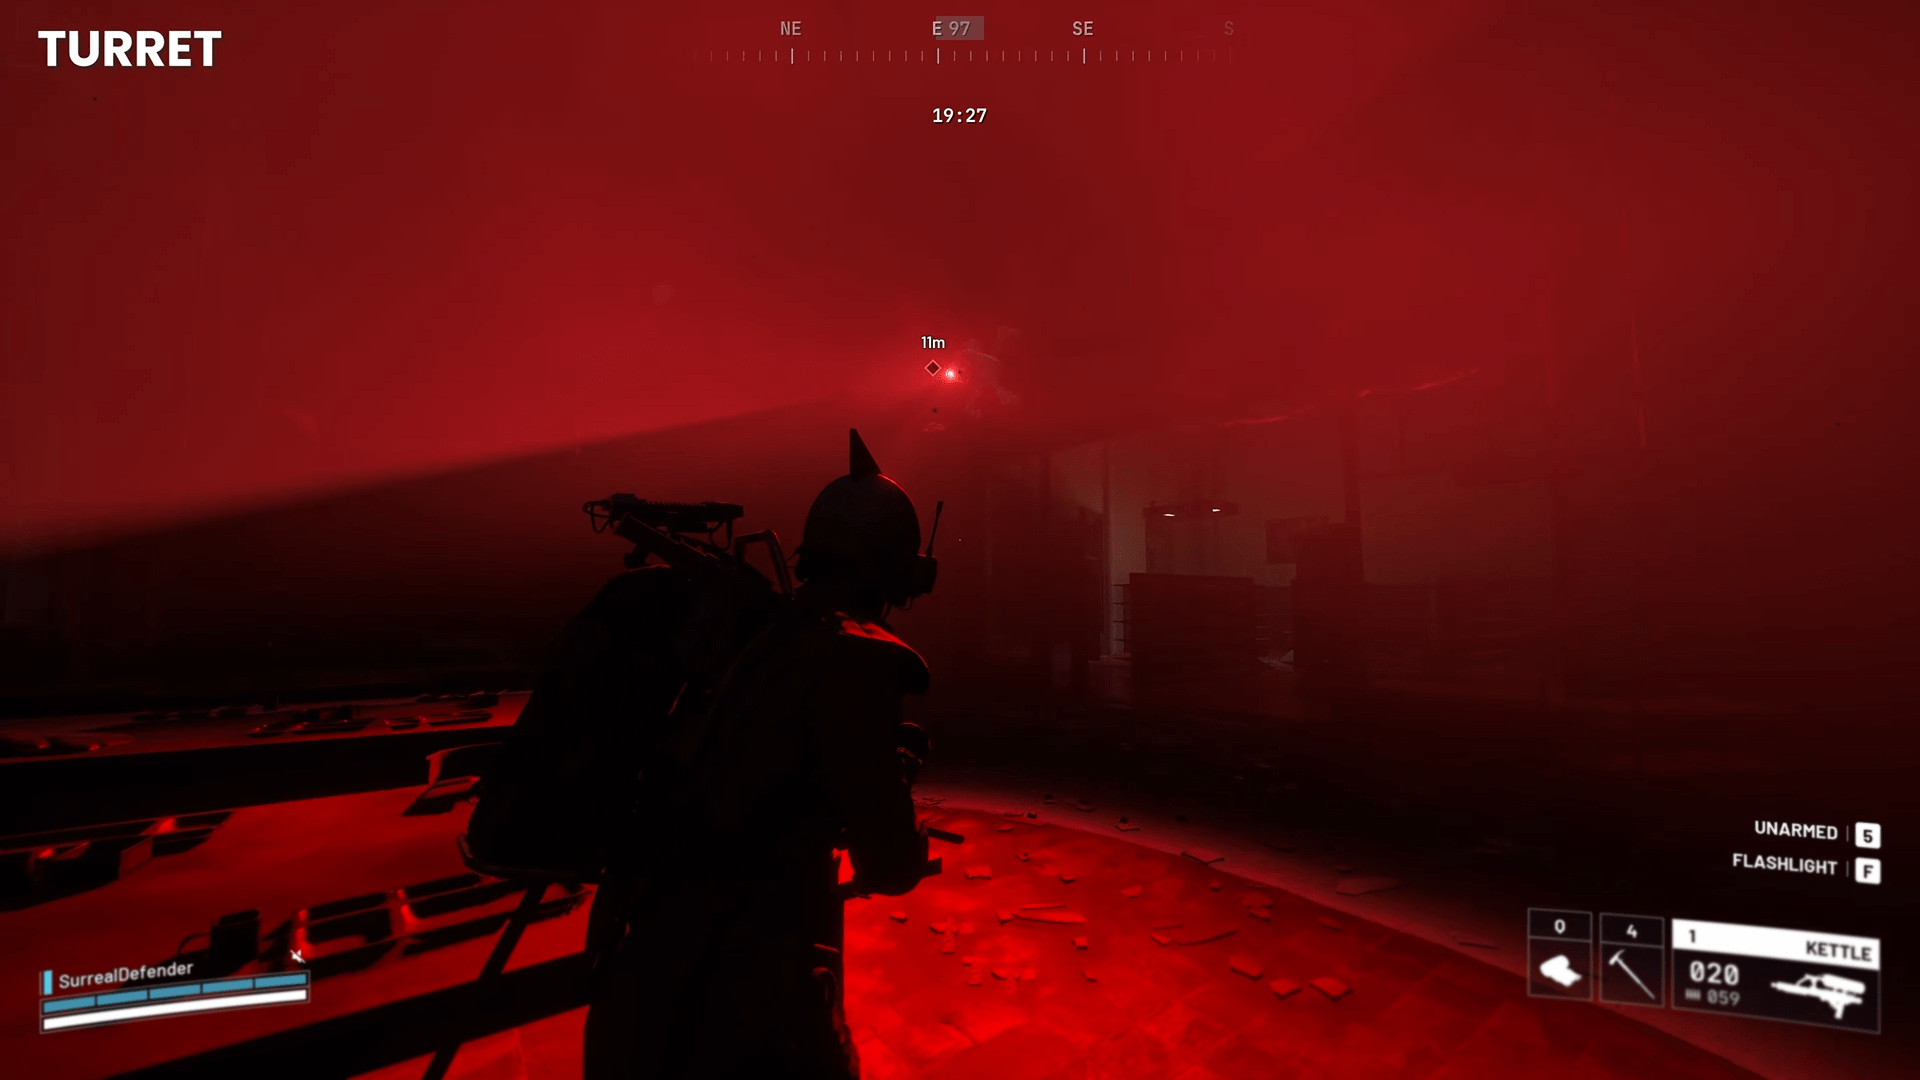
- Turret: Stationary gun turrets found in buildings or on walls. They pack heavy firepower and must be handled carefully.
Arc Raiders Controls
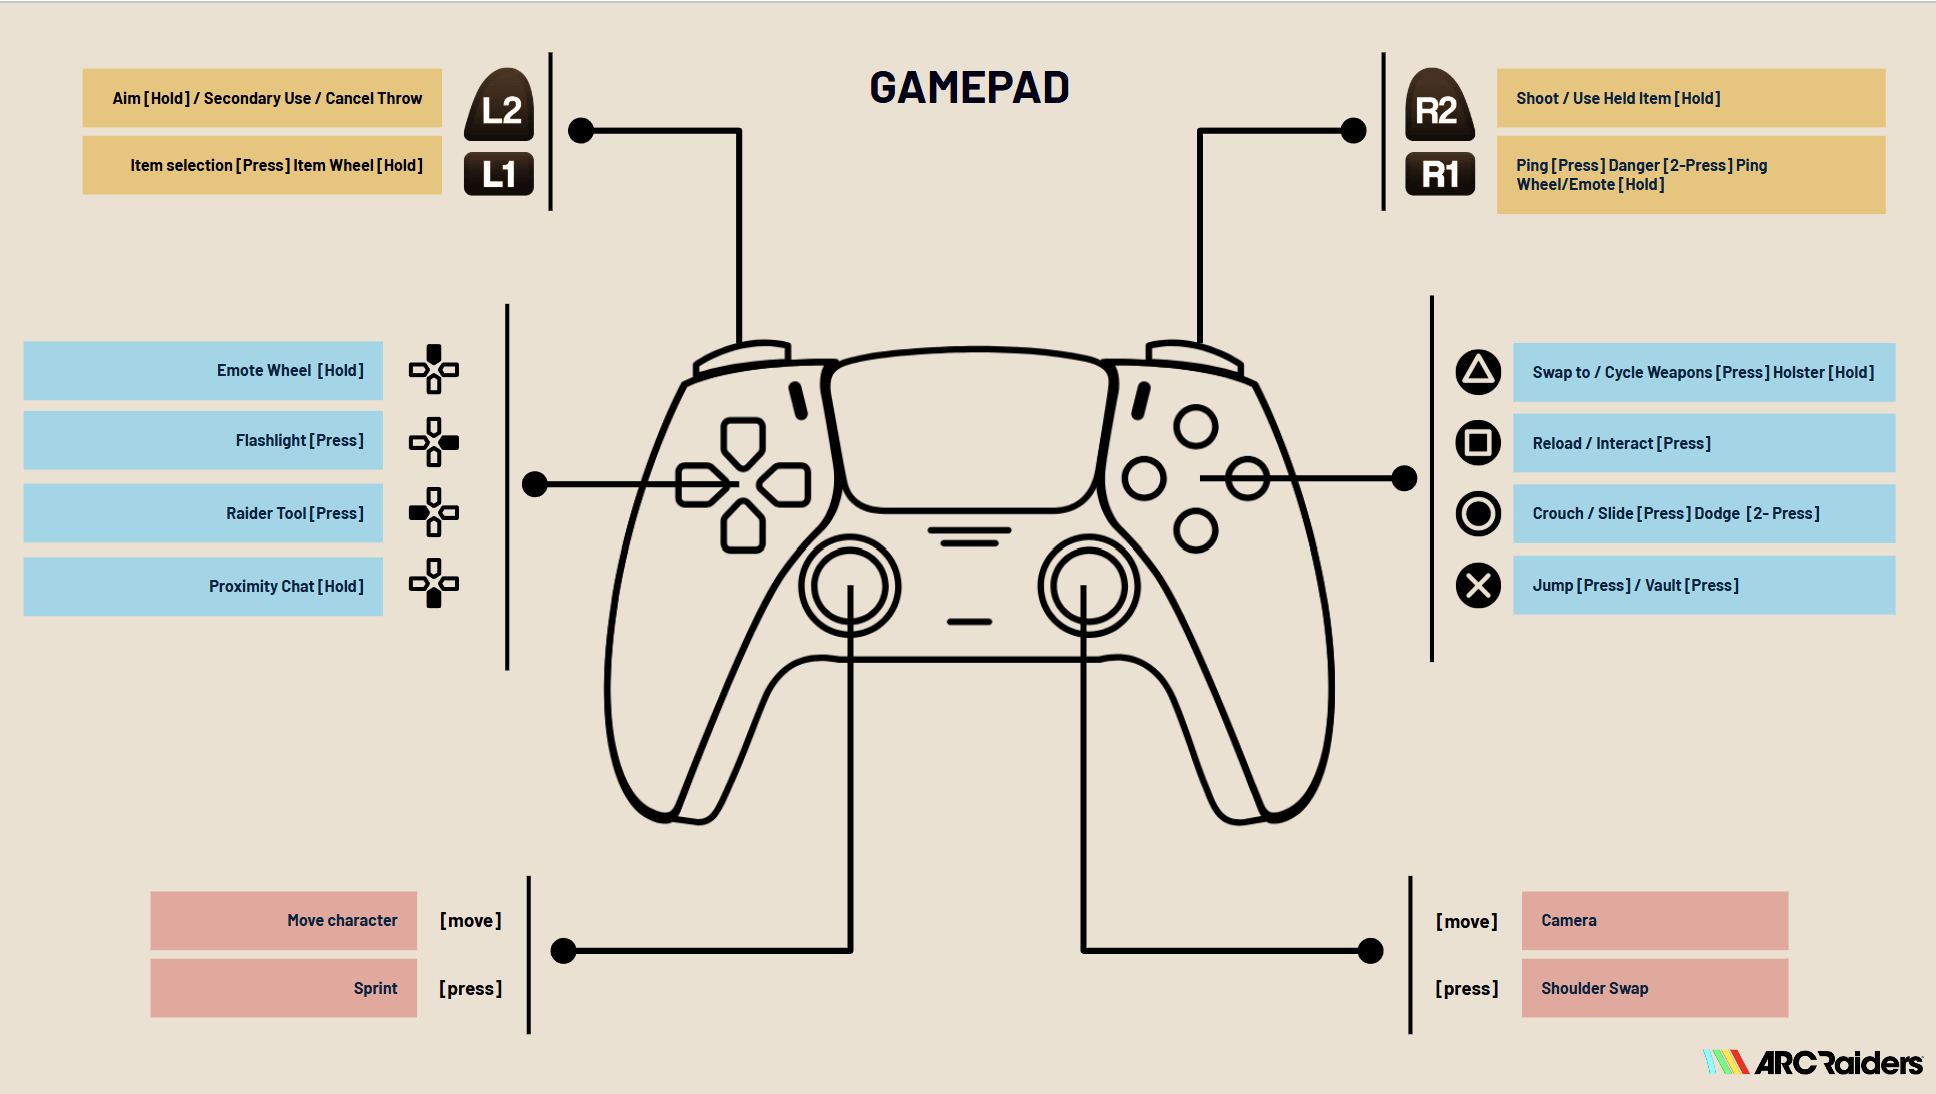
Arc Raiders uses standard third-person shooter controls with parkour elements. The in-game movement is smooth and agile. You can sprint (hold the sprint key/button until stamina runs out), jump to vault or climb over ledges, and crouch/slide for stealth approaches. Here’s a list of basic Arc Raiders controls:
- Movement: Use the left stick to move your character. Press for Sprint.
- Camera: Use the right stick to control the camera. Press for Shoulder Swap.
- Jump: The ‘X’ button on PlayStation and ‘A’ button on Xbox. Press for Vault.
- Crouch/Slide: The left stick click. Double click for Dodge.
- Shoot: R2 trigger.
- Aim Down Sights (ADS): L2 trigger. Also used for Secondary Use, Cancel Throw.
- Reload/Interact: ‘Square’ on PlayStation and ‘X’ on Xbox.
- Item Selection: L1 trigger. Hold for Item Wheel.
- Emote Wheel: Hold D-Pad Up ⇑.
- Flashlight: Press D-Pad Right ⇒.
- Raider Tool: Press D-Pad Left ⇐.
- Proximity Chat: Hold D-Pad Down ⇓.
Arc Raiders feels responsive and similar to other third-person shooters. Getting comfortable with the movement (sprinting, vaulting, crouching) is key — it lets you navigate fight zones quickly or slip past robot patrols unnoticed.
Arc Raiders Multiplayer
Arc Raiders is built as a PvPvE extraction co-op. You and up to two friends form a squad. The game supports cross-platform play across PC, Xbox Series X/S, and PlayStation 5, so you can team up with anyone.
Squad members are friendly and share loot and tactics, but all other Raiders you meet on a mission can be either cooperative or hostile — there are no forced alliances.
✏️ Tip: Coordinate roles with teammates (e.g., who carries heavy ammo vs. light ammo) and call out enemy positions. Since other players can be anywhere on the map, good communication can turn the tide.
Arc Raiders Skill Tree
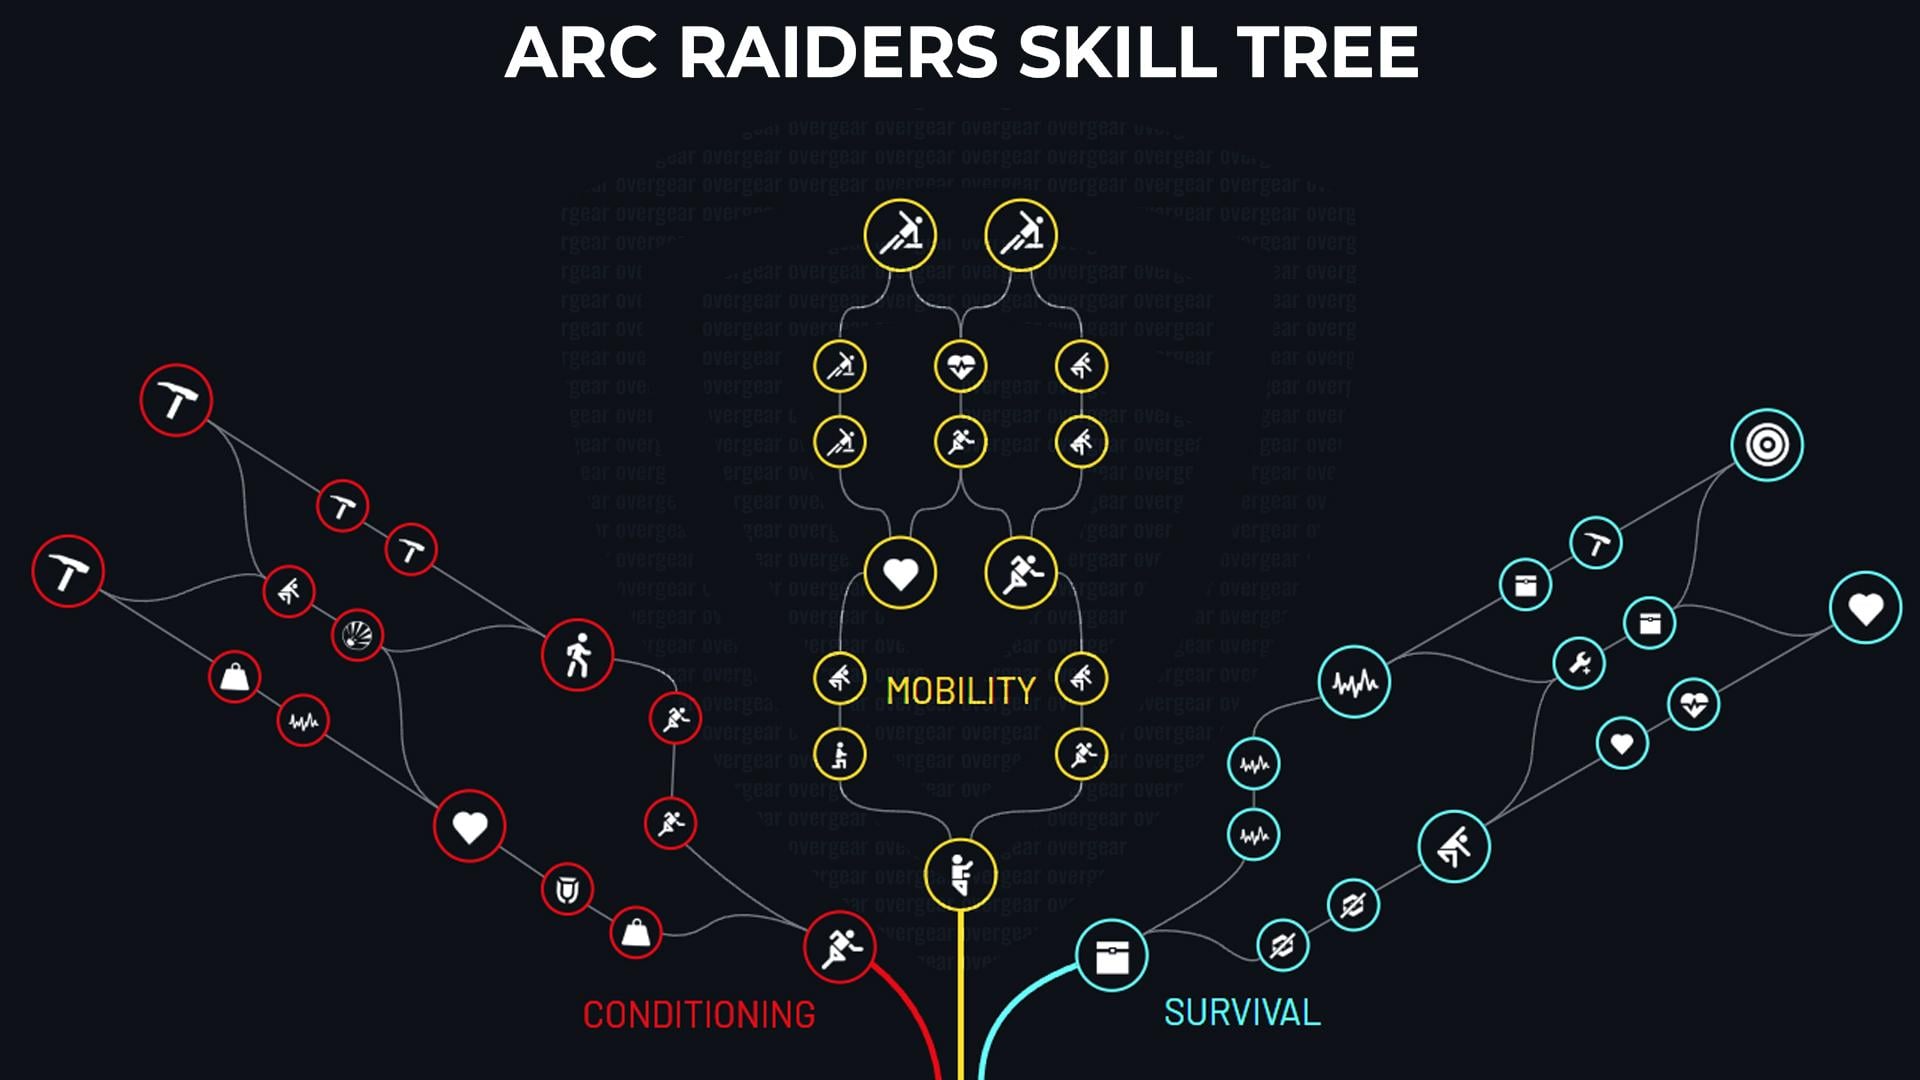

Your Raider has a persistent skill tree unlocked via XP gained every match from quests and general play. The tree has three branches — Conditioning, Survival, and Mobility — into which you can distribute points to create a custom build.
Conditioning Skills
| Name | Description | Skill Affected | Known Value(s) | Max Points | Requires |
|---|---|---|---|---|---|
| Youthful Lungs | Increase your max stamina. | Max Stamina | – | 5 | – |
| Stubborn Mule | Your stamina regeneration is less affected by being over-encumbered. | Stamina Regneration | – | 5 | Youthful Lungs |
| Proper Breathing | Your stamina regenerates faster | Stamina Regneration | – | 5 | Youthful Lungs |
| Used To The Weight | Wearing a shield doesn’t slow you down as much. | Movement Speed | – | 5 | Stubborn Mule |
| Three Deep Breaths | After an ability drains your stamina, you recover more quickly. | Stamina Regneration | – | 5 | Proper Breathing |
| Good As New | While under a healing effect, stamina regeneration is increased. | Stamina Regneration | – | 1 | Used To The Weight |
| Calming Stroll | While walking, your stamina regenerates as if you were standing still. | Stamina Regneration | – | 1 | Three Deep Breaths |
| Blast-Born | Your hearing is less affected by nearby explosions. | Hearing Enhancement | – | 5 | Good As New, Calming Stroll |
| Broad Shoulders | Increases the maximum weight you can carry. | Max Encumbrance | +2kg per point | 5 | Good As New |
| Sky-Clearing Swing | You deal more melee damage to drones. | Melee Damage | – | 5 | Calming Stroll |
| Sturdy Ankles | You take less fall damage when falling from a non-lethal height. | Fall Damage Reduction | – | 5 | Blast-Born |
| Loaded Arms | Your equipped weapon has less impact on your encumbrance. | Encumbrance Reduction | – | 1 | Broad Shoulders |
| Proficient Pryer | Breaching doors and containers takes less time | Breach Time Reduction | – | 5 | Sky-Clearing Swing |
| Security Breach | Lets you breach Security Lockers. | Loot Option | – | 1 | Loaded Arms, Sturdy Ankles |
| Flyswatter | A single melee attack destroys a Tick, Pop, Wasp and Turret. | Melee Damage | – | 1 | Proficient Pryer, Sturdy Ankles |
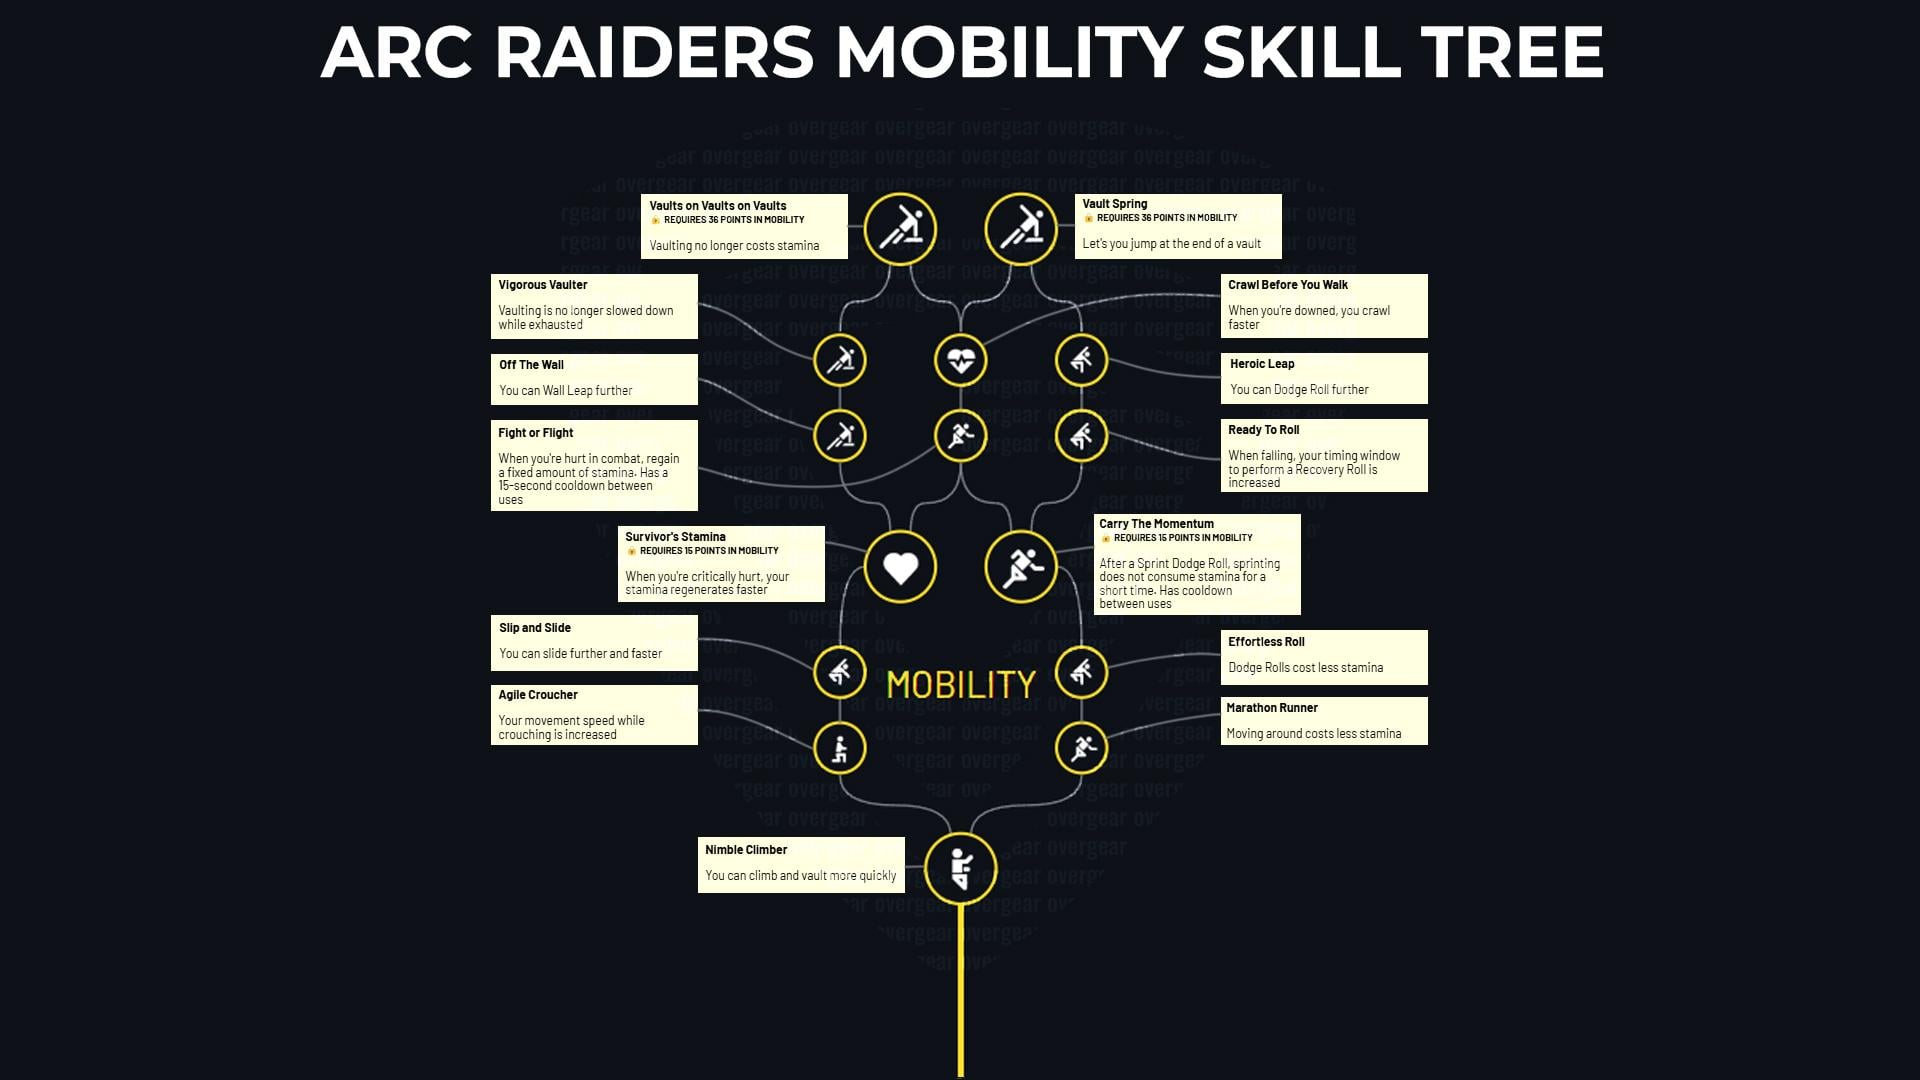
Mobility Skills
| Name | Description | Skill Affected | Known Value(s) | Max Points | Requires |
|---|---|---|---|---|---|
| Nimble Climber | You can climb and vault more quickly. | Climb and Vault Speed | – | 5 | – |
| Agile Croucher | Your movement speed while crouching is increased. | Movement Speed | – | 5 | Nimble Climber |
| Marathon Runner | Moving around costs less stamina. | Stamina Cost Reduction | – | 5 | Nimble Climber |
| Slip and Slide | You can slide further and faster | Movement Speed | – | 5 | Agile Croucher |
| Effortless Roll | Dodge Rolls cost less stamina. | Stamina Cost Reduction | – | 5 | Marathon Runner |
| Survivor’s Stamina | When you’re critically hurt, your stamina regenerates faster. | Stamina Regneration | – | 1 | Slip and Slide |
| Carry The Momentum | After a Sprint Dodge Roll, sprinting does not consume stamina for a short time. Has a cooldown between uses. | Stamina Cost Reduction | – | 1 | Effortless Roll |
| Fight Or Flight | When you’re hurt in combat, regain a fixed amount of stamina. Has a 15-second cooldown between uses. | Stamina Regneration | – | 5 | Survivor’s Stamina, Carry The Momentum |
| Off The Wall | You can Wall Leap further. | Wall Leap Distance | – | 5 | Survivor’s Stamina |
| Ready To Roll | When falling, your timing window to perform a Recovery Roll is increased. | Recover Roll Window | – | 5 | Carry The Momentum |
| Crawl Before You Walk | When you’re downed, you crawl faster. | Movement Speed | – | 5 | Fight Or Flight |
| Vigorous Vaulter | Vaulting is no longer slowed down while exhausted. | Climb and Vault Speed | – | 1 | Off The Wall |
| Heroic Leap | You can Dodge Roll further. | Roll Distance | – | 5 | Ready To Roll |
| Vaults on Vaults on Vaults | Vaulting no longer costs stamina. | Stamina Cost Reduction | – | 1 | Vigorous Vaulter, Crawl Before You Walk |
| Vault Spring | Lets you jump at the end of a vault. | Vault Jump | – | 1 | Heroic Leap, Crawl Before You Walk |
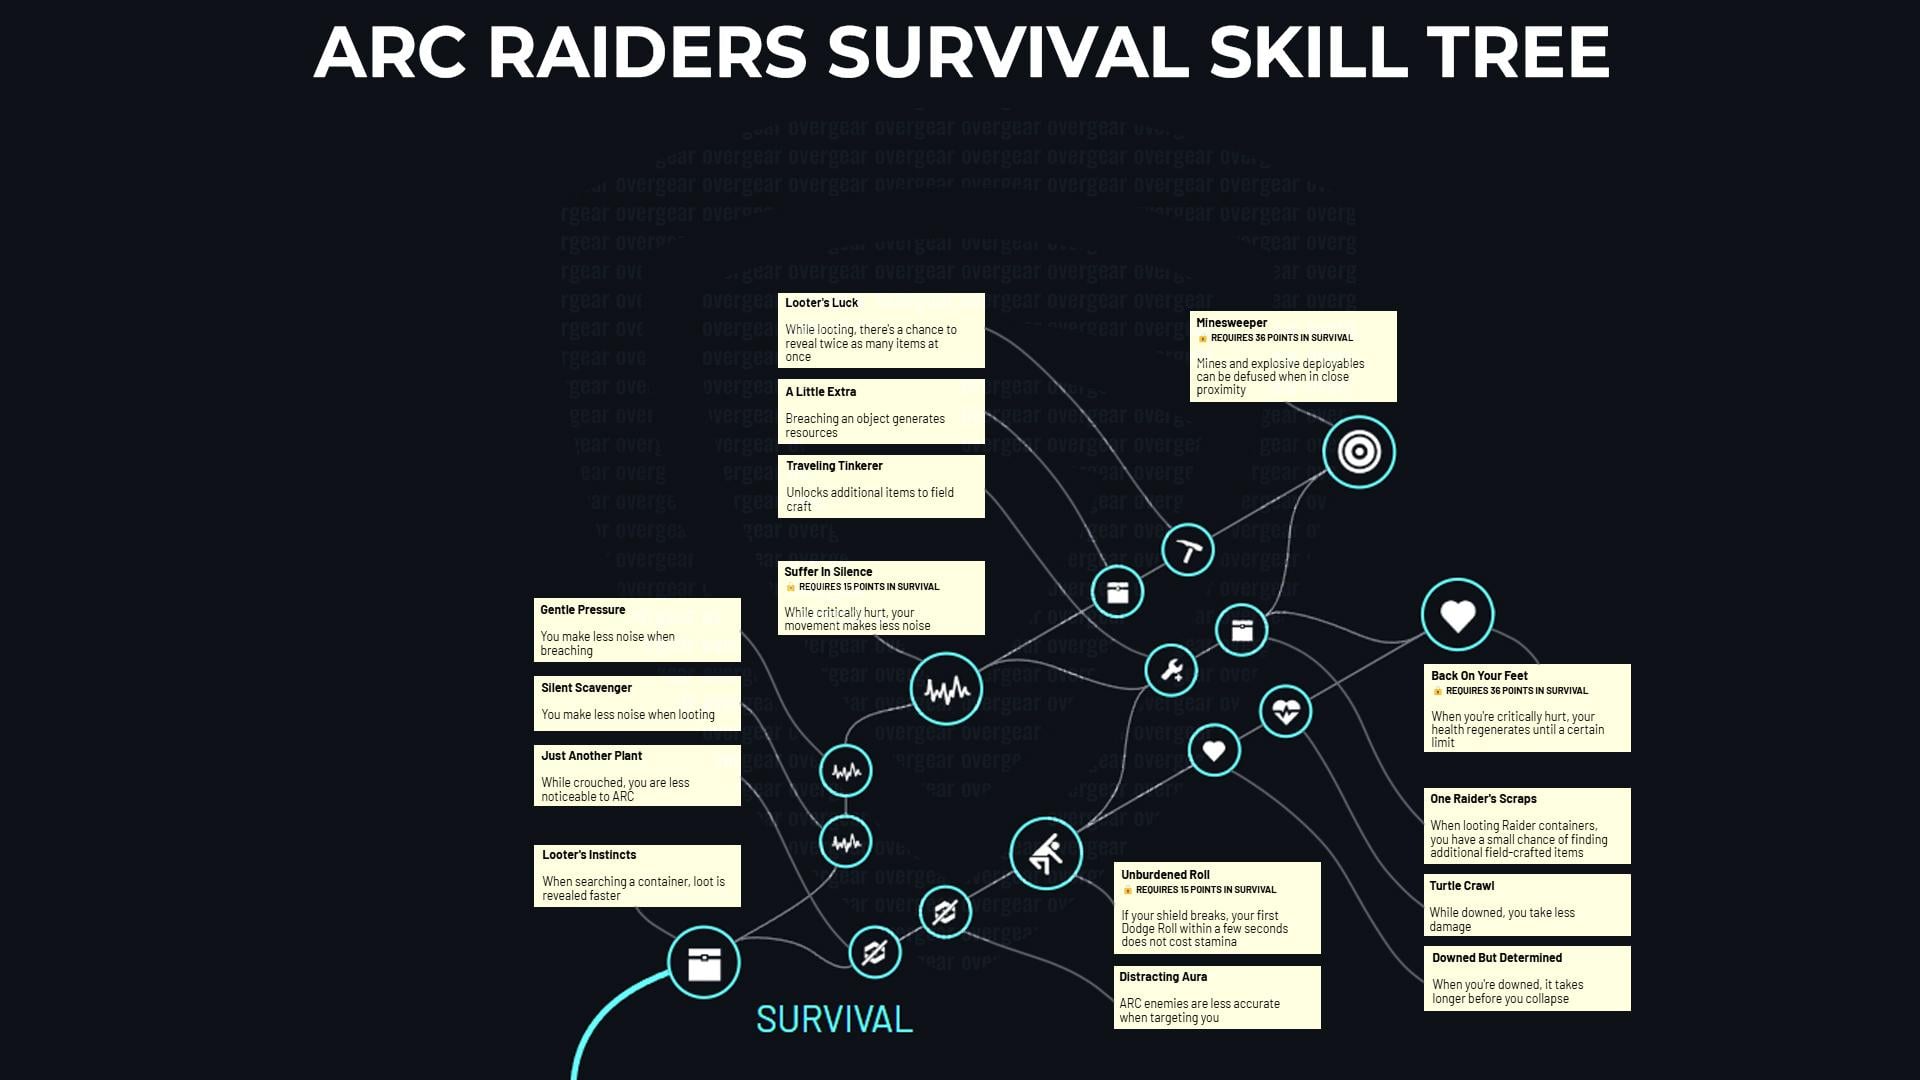
Survival Skills
| Name | Description | Skill Affected | Known Value(s) | Max Points | Requires |
|---|---|---|---|---|---|
| Looter’s Instincts | When searching a container, loot is revealed faster | Loot Speed | – | 5 | – |
| Silent Scavenger | You make less noise when looting. | Noise Reduction | – | 5 | Looter’s Instincts |
| Just Another Plant | While crouched, you are less noticeable to ARC | ARC Aggro Reduction | – | 5 | Looter’s Instincts |
| Gentle Pressure | You make less noise when breaching. | Noise Reduction | – | 5 | Silent Scavenger |
| Distracting Aura | ARC enemies are less accurate when targeting you. | ARC Accuracy Reduction | – | 5 | Just Another Plant |
| Suffer In Silence | While critically hurt, your movement makes less noise. | Noise Reduction | – | 1 | Gentle Pressure |
| Unburdened Roll | If your shield breaks, your first Dodge Roll within a few seconds does not cost stamina. | Stamina Cost Reduction | – | 1 | Distracting Aura |
| Traveling Tinkerer | Unlocks additional items to field craft. | Field Crafting | Raider Hatch Key, Grenade Traps | 5 | Suffer In Silence, Unburdened Roll |
| Looter’s Luck | While looting, there’s a chance to reveal twice as many items at once. | Loot Find Chance | – | 5 | Suffer In Silence |
| Downed But Determined | When you’re downed, it takes longer before you collapse. | Max Downtime | – | 5 | Unburdened Roll |
| One Raider’s Scraps | When looting Raider containers, you have a small chance of finding additional field-crafted items. | Loot Find Chance | – | 5 | Traveling Tinkerer |
| A Little Extra | Breaching an object generates resources. | Loot Find Chance | – | 1 | Looter’s Luck |
| Turtle Crawl | While downed, you take less damage. | Downtime Damage Reduction | – | 5 | Downed But Determined |
| Minesweeper | Mines and explosive deployables can be defused when in close proximity | Explosive Defuse | – | 1 | A Little Extra, One Raider’s Scraps |
| Back On Your Feet | When you’re critically hurt, your health regenerates until a certain limit. | Health Regeneration | – | 1 | Turtle Crawl, One Raider’s Scraps |
Arc Raiders Combat
Combat in Arc Raiders is high-stakes and tactical. ARC machines overrun the surface, so rushing in guns blazing is generally a losing strategy. Use cover and patience instead. Key Arc Raiders combat points:
- Utilize the Environment. Use gadgets and map elements to your advantage. Arc Raiders features deployables such as portable door-blockers, mobile barricades, and traps, as well as ziplines and cover walls. Use smoke or stun grenades to get out of sticky situations. Also, have bandages and shield rechargers ready to recover.
- Carry a balanced loadout. A rapidly firing gun (to handle players or soft targets) and a high-damage gun (for armored foes) are standard options. For example, most players pair a heavy rifle (like Kettle or Rattler) with the medium Ferro rifle (effective against ARCs). Use headshots to eliminate enemies quickly.
✏️ Tip: Remember, friendly fire on teammates is off, but avoid strafing in PvP fights to not become an obstacle for your allies.
- Stealth vs Aggression. If you find yourself caught in a gun battle, make a quick choice: retreat or relocate. Noise does count: ARC machines are equipped with sound detectors, so creep and crouch to remain stealthy. Other Raiders will try to lay an ambush upon you if you’re moving with loads of loot, so have your six in mind constantly. You can also ambush in front of valuable spots or exits in order to catch enemies exiting.
- Extraction Planning. Be mindful of extraction timers. The last few minutes of a match tend to be hotspots, with players scrambling to carry goods out as exits shut. Planning your route out early and barricading it if possible, is also important.
✏️ Tip: Engagements with players and bots alike benefit from patience. Don’t chase every firefight. Indeed, sometimes backing off and circling around leads to a better angle or allows you to chip away at opponents from safety.
Arc Raiders Weapons
There are 8 weapon types in Arc Riders that you can equip. They are Assault Rifles, Battle Rifles, Submachine Guns, Shotguns, Pistols, Light Machineguns, Sniper Rifles, and Special Weapons.
Below is a full breakdown of currently available weapons in Arc Raiders, organized by weapon type. Each gun has unique stats, including damage, ammo type, range, and firing mode.
Assault Rifles
| Weapon | Ammo Type | Damage | Firing Mode | Range |
|---|---|---|---|---|
| Kettle | Light Ammo | 10 | Single | 28 |
| Rattler | Medium Ammo | 9 | Auto | 51 |
| Arpeggio | Medium Ammo | 11 | Burst | 53.7 |
| Tempest | Medium Ammo | 12 | Auto | 54.2 |
Battle Rifles
| Weapon | Ammo Type | Damage | Firing Mode | Range |
|---|---|---|---|---|
| Ferro | Heavy Ammo | 40 | Single | 53.1 |
| Renegade | Medium Ammo | 35 | Single | 70.4 |
Submachine Guns
| Weapon | Ammo Type | Damage | Firing Mode | Range |
|---|---|---|---|---|
| Stitcher | Light Ammo | 8 | Auto | 38.9 |
| Bobcat | Light Ammo | 7 | Auto | 45.3 |
Shotguns
| Weapon | Ammo Type | Damage | Firing Mode | Range |
|---|---|---|---|---|
| Il Toro | Shotgun Ammo | 76.5 | Single | 22.3 |
| Vulcano | Shotgun Ammo | 58.5 | Single | 22.1 |
Pistols
| Weapon | Ammo Type | Damage | Firing Mode | Range |
|---|---|---|---|---|
| Hairpin | Light Ammo | 20 | Single | 39.8 |
| Burletta | Light Ammo | 10 | Single | 41.7 |
| Anvil | Heavy Ammo | 40 | Single | 51.3 |
| Venator | Medium Ammo | 18 | Single | 48.4 |
Light Machineguns
| Weapon | Ammo Type | Damage | Firing Mode | Range |
|---|---|---|---|---|
| Torrente | Medium Ammo | 7 | Auto | 49.9 |
Sniper Rifles
| Weapon | Ammo Type | Damage | Firing Mode | Range |
|---|---|---|---|---|
| Osprey | Medium Ammo | 45 | Single | 80.3 |
| Jupiter | Heavy Ammo | 55 | Single | 71.7 |
Special Weapons
| Weapon | Ammo Type | Damage | Firing Mode | Range |
|---|---|---|---|---|
| Equalizer | Energy Ammo | 8 | Auto | 68.6 |
Arc Raiders Missions
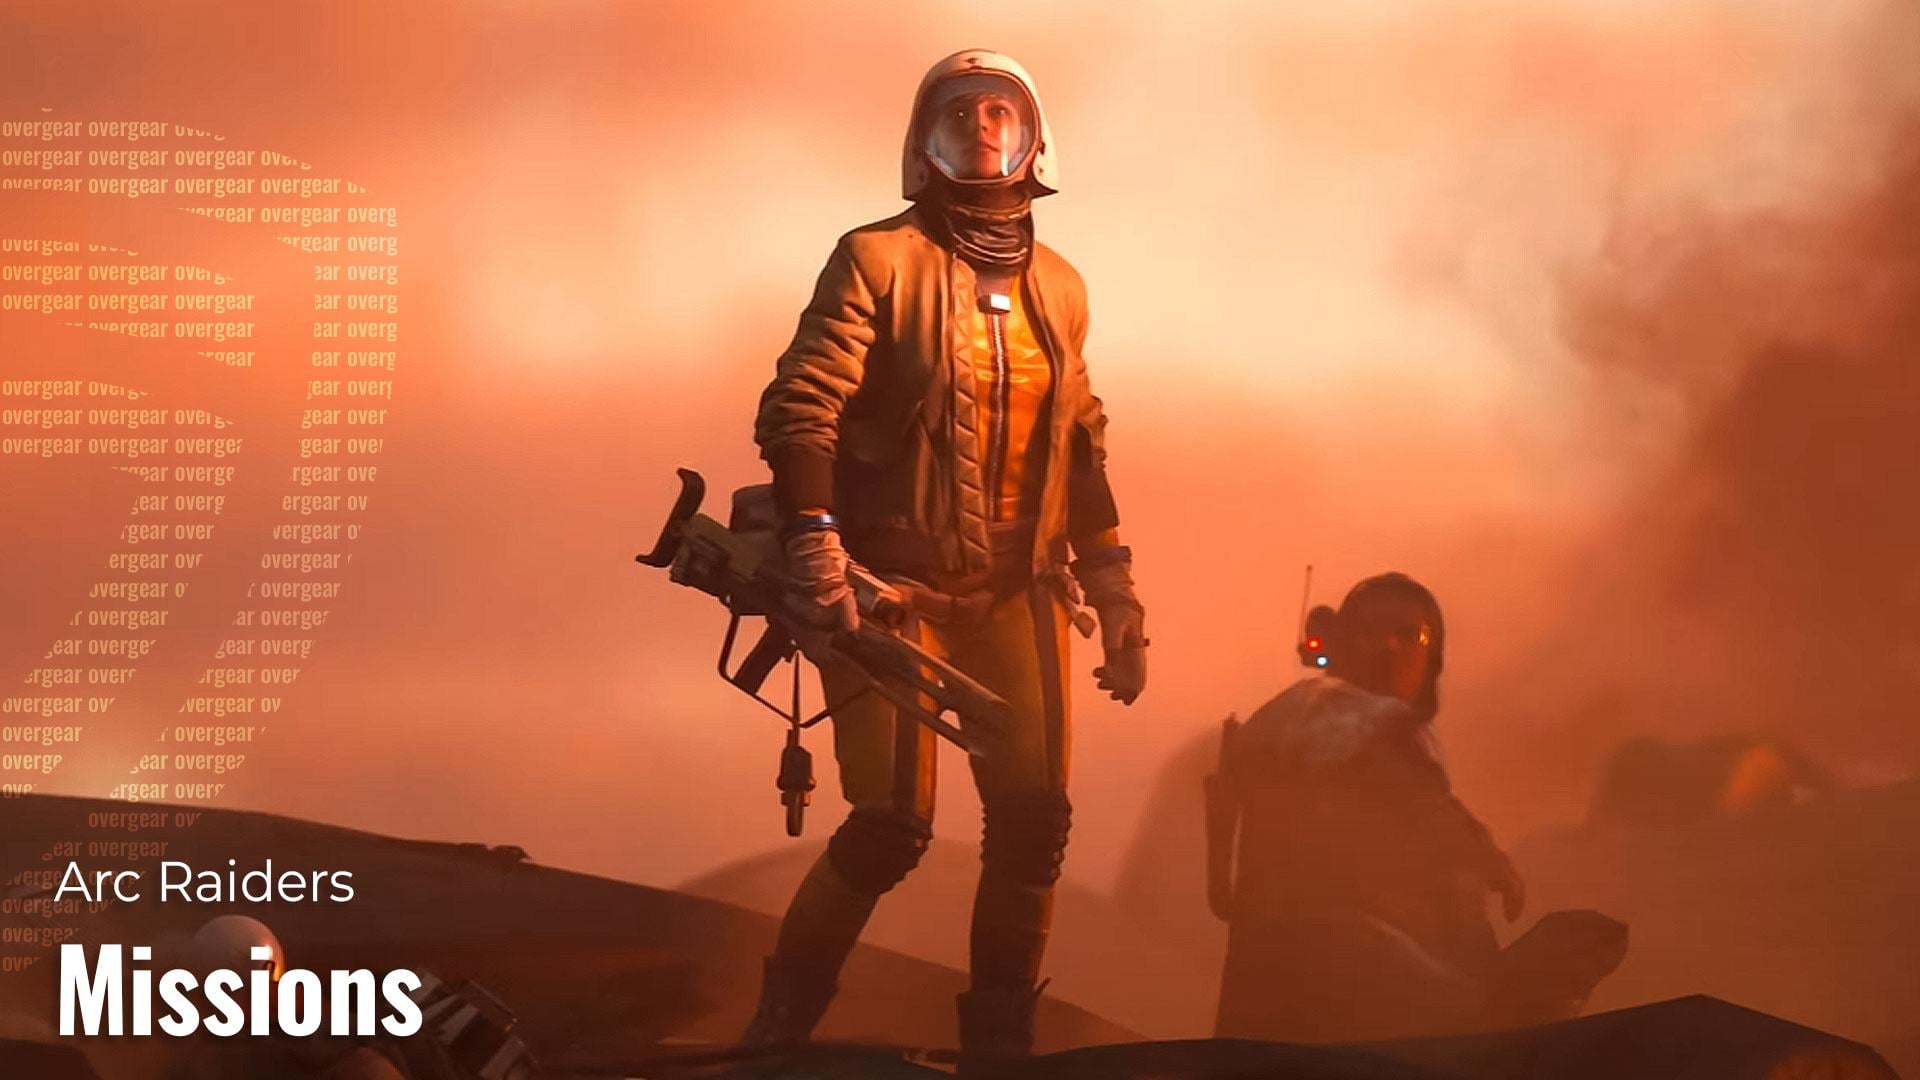
Arc Raiders revolves around extraction runs where each match tasks you with scavenging goals. You’ll gear up from your stash and drop into a map alongside other Raiders and hostile ARC machines. Often, you’ll have trader-given quests. For example, collect specific scrap or eliminate a number of robots, but you can also set your own objectives, like hunting high-tier loot or engaging enemy players.
Matches have a 30-minute limit, and you must extract via elevators or hatches before time’s up. Dying in the field costs you all the carried loot, so plan your route. The best tip is to hit objectives quickly and return through an extraction point once you’ve hit your goals or filled your inventory.
- Trader Quests: NPCs in the hub Speranza, hand out “shopping list” missions to fetch items or hunt ARCs. Completing these yields gear, resources, or XP for your skill tree.
- Dynamic Objectives: On the surface, random events (e.g., supply drops or robot patrols) may present opportunities for extra loot or loot caches. Therefore, stay alert for map indicators or audio cues.
- Self-Made Goals: Outside of assigned missions, you can freely search for rare weapons, ammo caches, or even plot ambushes on other Raiders. But remember, extraction windows are limited.
- Extraction: Anytime after deployment, you can call an exit (elevator/hatch) to leave with loot. Extraction points unlock gradually, so early exfiltration can be safer, while staying longer lets you gather more, but risk missing out if the exit closes or your timer hits 30 minutes.
✏️ Tip: Always carry a prized item in your Safe Pouch – that single item remains with you if you fall, even on death. Use it for something valuable you can’t afford to lose.
Arc Raiders Quests
Even though the game is still being tested, there’s a huge number of quests available in each Arc Raiders zone. They vary in difficulty, rewards, zones of completion, and, of course, the traders that you need to interact with. Additionally, there is a list of quests that do not have a definite location, meaning you can complete them on any map.
Buried City Quests
| Quest | Objective | Reward | Trader |
|---|---|---|---|
| A BETTER USE | Request in a Supply Drop from a Call Station Loot a Supply Drop | 1x Torrente I 32,000XP | Tian Wen |
| BRINGING DOWN A BISON | Destroy a Bison Obtain a Bison Driver | 1x Equalizer 34,000XP | Shani |
| BUILDING A LIBRARY | In one round: Locate the Library in the City Center Find 1 romance book Find 1 detective book Find 1 adventure book | 1x Buried City Town Hall Key 20,000XP | Apollo |
| COMMUNICATION HIDEOUT | In one round: Reach the Red Tower in Old Town Find missing battery cell Install the battery in the Generator Enable the power on the Generator Boot the antenna terminal near the Red Tower | 2x Zipline 25,000XP | Shani |
| DIGGING UP DIRT | Locate the Santa Maria Houses in Old Town Locate the Dead Drop inside the Santa Maria Houses in Old Town | 1x Buried City Residential Master Key 21,000XP | Celeste |
| ESPRESSO | In one round: Find an espresso machine to salvage for spare parts | 3x Adrenaline Shot 31,000XP | Apollo |
| ESR ANALYZER | In one round: Search for an ESR Analyzer inside any pharmacy in Buried City | 1x Tempest I 33,000XP | Lance |
| LIFE OF A PHARMACIST | Find the Arbuso Farmacia then search the apartment above Document the pharmacist’s hobbies, family, taste, and skills | 1x Buried City Hospital Key 29,000XP | Lance |
| MOVIE NIGHT | Get a Film Reel, 3 Electrical Components, and a Camera Lens for Apollo | 2x Show Stopper 9,000XP | Apollo |
| PIED PIPER | Get a Flute, Apricot, Empty Wine Bottle, 3 Light Impact Grenades, and Oil for Apollo | 3x Gas Grenades 31,000XP | Apollo |
| POWERING UP THE GREENHOUSE | Get 3 Sensors and Advanced Electrical Components for Tian Wen | 1x Raider Augment III 29,000XP | Tian Wen |
| RAIDER VERSUS ROCKETEER | Destroy a Rocketeer Obtain a Rocketeer Part | 2x WolfPack 33,000XP | Shani |
| SOAKING UP THE SUN | Find the secluded roof terrace southwest of the Southern Station Rewire the solar panel | 1x Padded Stock Recipe 30,000XP | Tian Wen |
| SPARKS FLY | Destroy a Hornet with a Snap Blast Grenade | 2x Trigger Nade 22,000XP | Apollo |
| THE ROOT OF THE MATTER | In one round: Go to the Research Building Search for the seed vault in the “room with a great view” | 1x Vita Spray 16,000XP | Celeste |
| AFTER RAIN COMES | Find the flooded solar panels near the Grandioso Apartments Repair the solar panels | 2x Show Stopper 24,000XP | Celeste |
| MIXED SIGNALS | Place a Jolt Mine Destroy a Rollbot with a Raider Tool | 1x Photoelectric Cloak 32,000XP | Shani |
Acerra Spaceport Quests
| Quest | Objective | Reward | Trader |
|---|---|---|---|
| FROM A DISTANCE | Ping a Rocketeer Ping a Bison | 1x Photoelectric Cloak 10,000XP | Shani |
| LANCE’S TEA PARTY | Get 2 Rubber Ducks for Lance Get 2 Faded Photographs for Lance | 2x Defibrillator 18,000XP | Lance |
| TURNABOUT | Go to the North Trench Tower Locate and upload the Blackmail Files to Celeste | 2x Barricade Kit 23,000XP | Celeste |
| PRESCRIPTIONS OF THE PAST | In one round: Visit the Departure Building in Spaceport Find the Medical Exam Room inside the Departure Building Search for the records | 1x Spaceport Container Storage Key 25,000XP | Lance |
| SWITCHING THE SUPPLY | In one round: Find the tunnels under the Spaceport Find and turn the valve in the tunnels under Spaceport | 1x Spaceport Warehouse Key 28,000XP | Celeste |
| UNEXPECTED INITIATIVE | Obtain a Water Filter Obtain 3 Lemons Obtain a Water Pump | 1x Osprey I 28,000XP | Tian Wen |
| POWER OUT | In one round: Find the Electrical Substation south of the Spaceport, next to the Checkpoint Find any sign of the missing engineer Carry the fuse/battery back to the Electrical Substation Enable the power switch on the Fuse Box | 2x Show Stopper 32,000XP | Celeste |
| THE CONTROL TOWER | In one round: Visit Control Tower B6 Reach the top of Control Tower B6 Interact with the data terminal at the top of Control Tower B6 | 1x Snap Hook 33,000XP | Shani |
Dam Battlegrounds Quests
| Quest | Objective | Reward | Trader |
|---|---|---|---|
| DORMANT BARONS | Find and loot a Baron Husk Get an ARC Powercell for Shani | 1x Silencer I 13,000XP | Shani |
| OUR PRESENCE UP THERE | In one round: Visit the Pattern House in The Dam Find and interact with the Power Switch Complete the antenna installation on the roof | 1x Silencer I Recipe 14,000XP | Shani |
| A BALANCED HARVEST | In one round: Go to the Research & Administration building Search for any traces of the agricultural research project | 3x Sterilized Bandages 14,000XP | Celeste |
| UNTENDED GARDEN | In one round: Go to the Hydroponic Dome Complex Upload the data to the computer terminal in any Field Depot | 1x Vita Shot 15,000XP | Celeste |
| HANDOVER | In one round: Visit the Pattern House in The Dam Mark the Pattern Outpost | 2x Jolt Mine 17,000XP | Tian Wen |
| TRIBUTE TO TOLEDO | Get an ARC Powercell for Celeste | 1x Dam Staff Room Key 19,000XP | Celeste |
| WATER TROUBLES | In one round: Locate the Flood Access Tunnel under the Red Lake Berm Find the intake to the District’s Water Supply Sample the water | 1x Burletta I 26,000XP | Celeste |
| SOURCE OF THE CONTAMINATION | Reach the Water Treatment Building in The Dam Search for the Flood Spill Intake near the Swamp Investigate any suspicious objects | 1x Burletta Recipe 27,000XP | Celeste |
| THE LEAGUE | In one round: Get a Deflated Football for Apollo Get a Duct Tape for Apollo | 1x Padded Stock 30,000XP | Apollo |
| FLICKERING THREAT | Enter the Power Generation Complex by The Dam Find the Generator Room Repair the Generator Find the Ventilation Shaft Enable the power via the power switch underneath the stairs | 1x Dam Utility Key 33,000XP | Celeste |
Other Quests
| Quest | Objective | Reward | Trader |
|---|---|---|---|
| TOPSIDE | Go topside for the first time Optional – Ping any ARC | 1x Ferro 20x Heavy Ammo 4,000XP | Shani |
| THE BANDAGE RUN | Search 5 containers Get 15 pieces of Fabric for Lance | 3x Herbal Bandages 4,000XP | Lance |
| SMALL, BUT SINISTER | Destroy a Tick Get a Tick Pod for Shani | 2x Lure Grenade 5,000XP | Shani |
| CONTROLLED DEMOLITION | Get 2 Explosive Mixtures for Apollo | 2x Jump Mines 5,000XP | Apollo |
| FIGHT FIRE WITH FIRE | Destroy a Fireball with a Ferro | 3x Blaze Grenades 5,000XP | Tian Wen |
| HATCH REPAIRS | Repair the leaking hydraulic pipes near a Raider Hatch Investigate the ARC husk near the hatch | 1x Raider Hatch Key 6,000XP | Shani |
| A BAD FEELING | Find and search any ARC Probe, ARC Courier, or husk | 1x Raider Augment I 7,000XP | Celeste |
| SAFE PASSAGE | Destroy a Turret using Light Impact Grenades | 2x Snap Grenade 7,000XP | Apollo |
| FINDERS KEEPERS | Loot 3 containers in any Raider camp | 2x Heavy Fuse Grenade 8,000XP | Tian Wen |
| WASPS AND HORNETS | Destroy a Wasp Destroy a Hornet Get a Wasp Driver for Shani Get a Hornet Driver for Shani | Wasp Driver Hornet Driver Mechanical Components Electrical Components 9,000XP | Shani |
| WHAT GOES AROUND | Destroy a Fireball using a Fireball Burner | 2x Blaze Grenade 12,000XP | Apollo |
Arc Raiders Requirements
| Component | Minimum | Recommended |
|---|---|---|
| RAM | 12 GB | 16 GB |
| Storage Space | 100 GB | |
| CPU | Intel Core i5-6600K | Intel Core i5-9600K |
| GPU | NVIDIA GeForce GTX 970 | NVIDIA GeForce RTX 2070 |
Arc Raiders requires at least 100 GB of free disk space. SSD installation is highly recommended to reduce loading times and stutter during large-scale events. While the game is playable on mid-tier hardware, you’ll need a modern graphics card like the RTX 2070 or better to get consistent high FPS in chaotic PvPvE encounters, especially during Night Raids and boss fights.
🎲 Multiplayer Reminder: Arc Raiders is an always-online game. Ensure your internet connection is stable for matchmaking and loot progression.
Arc Raiders Characters
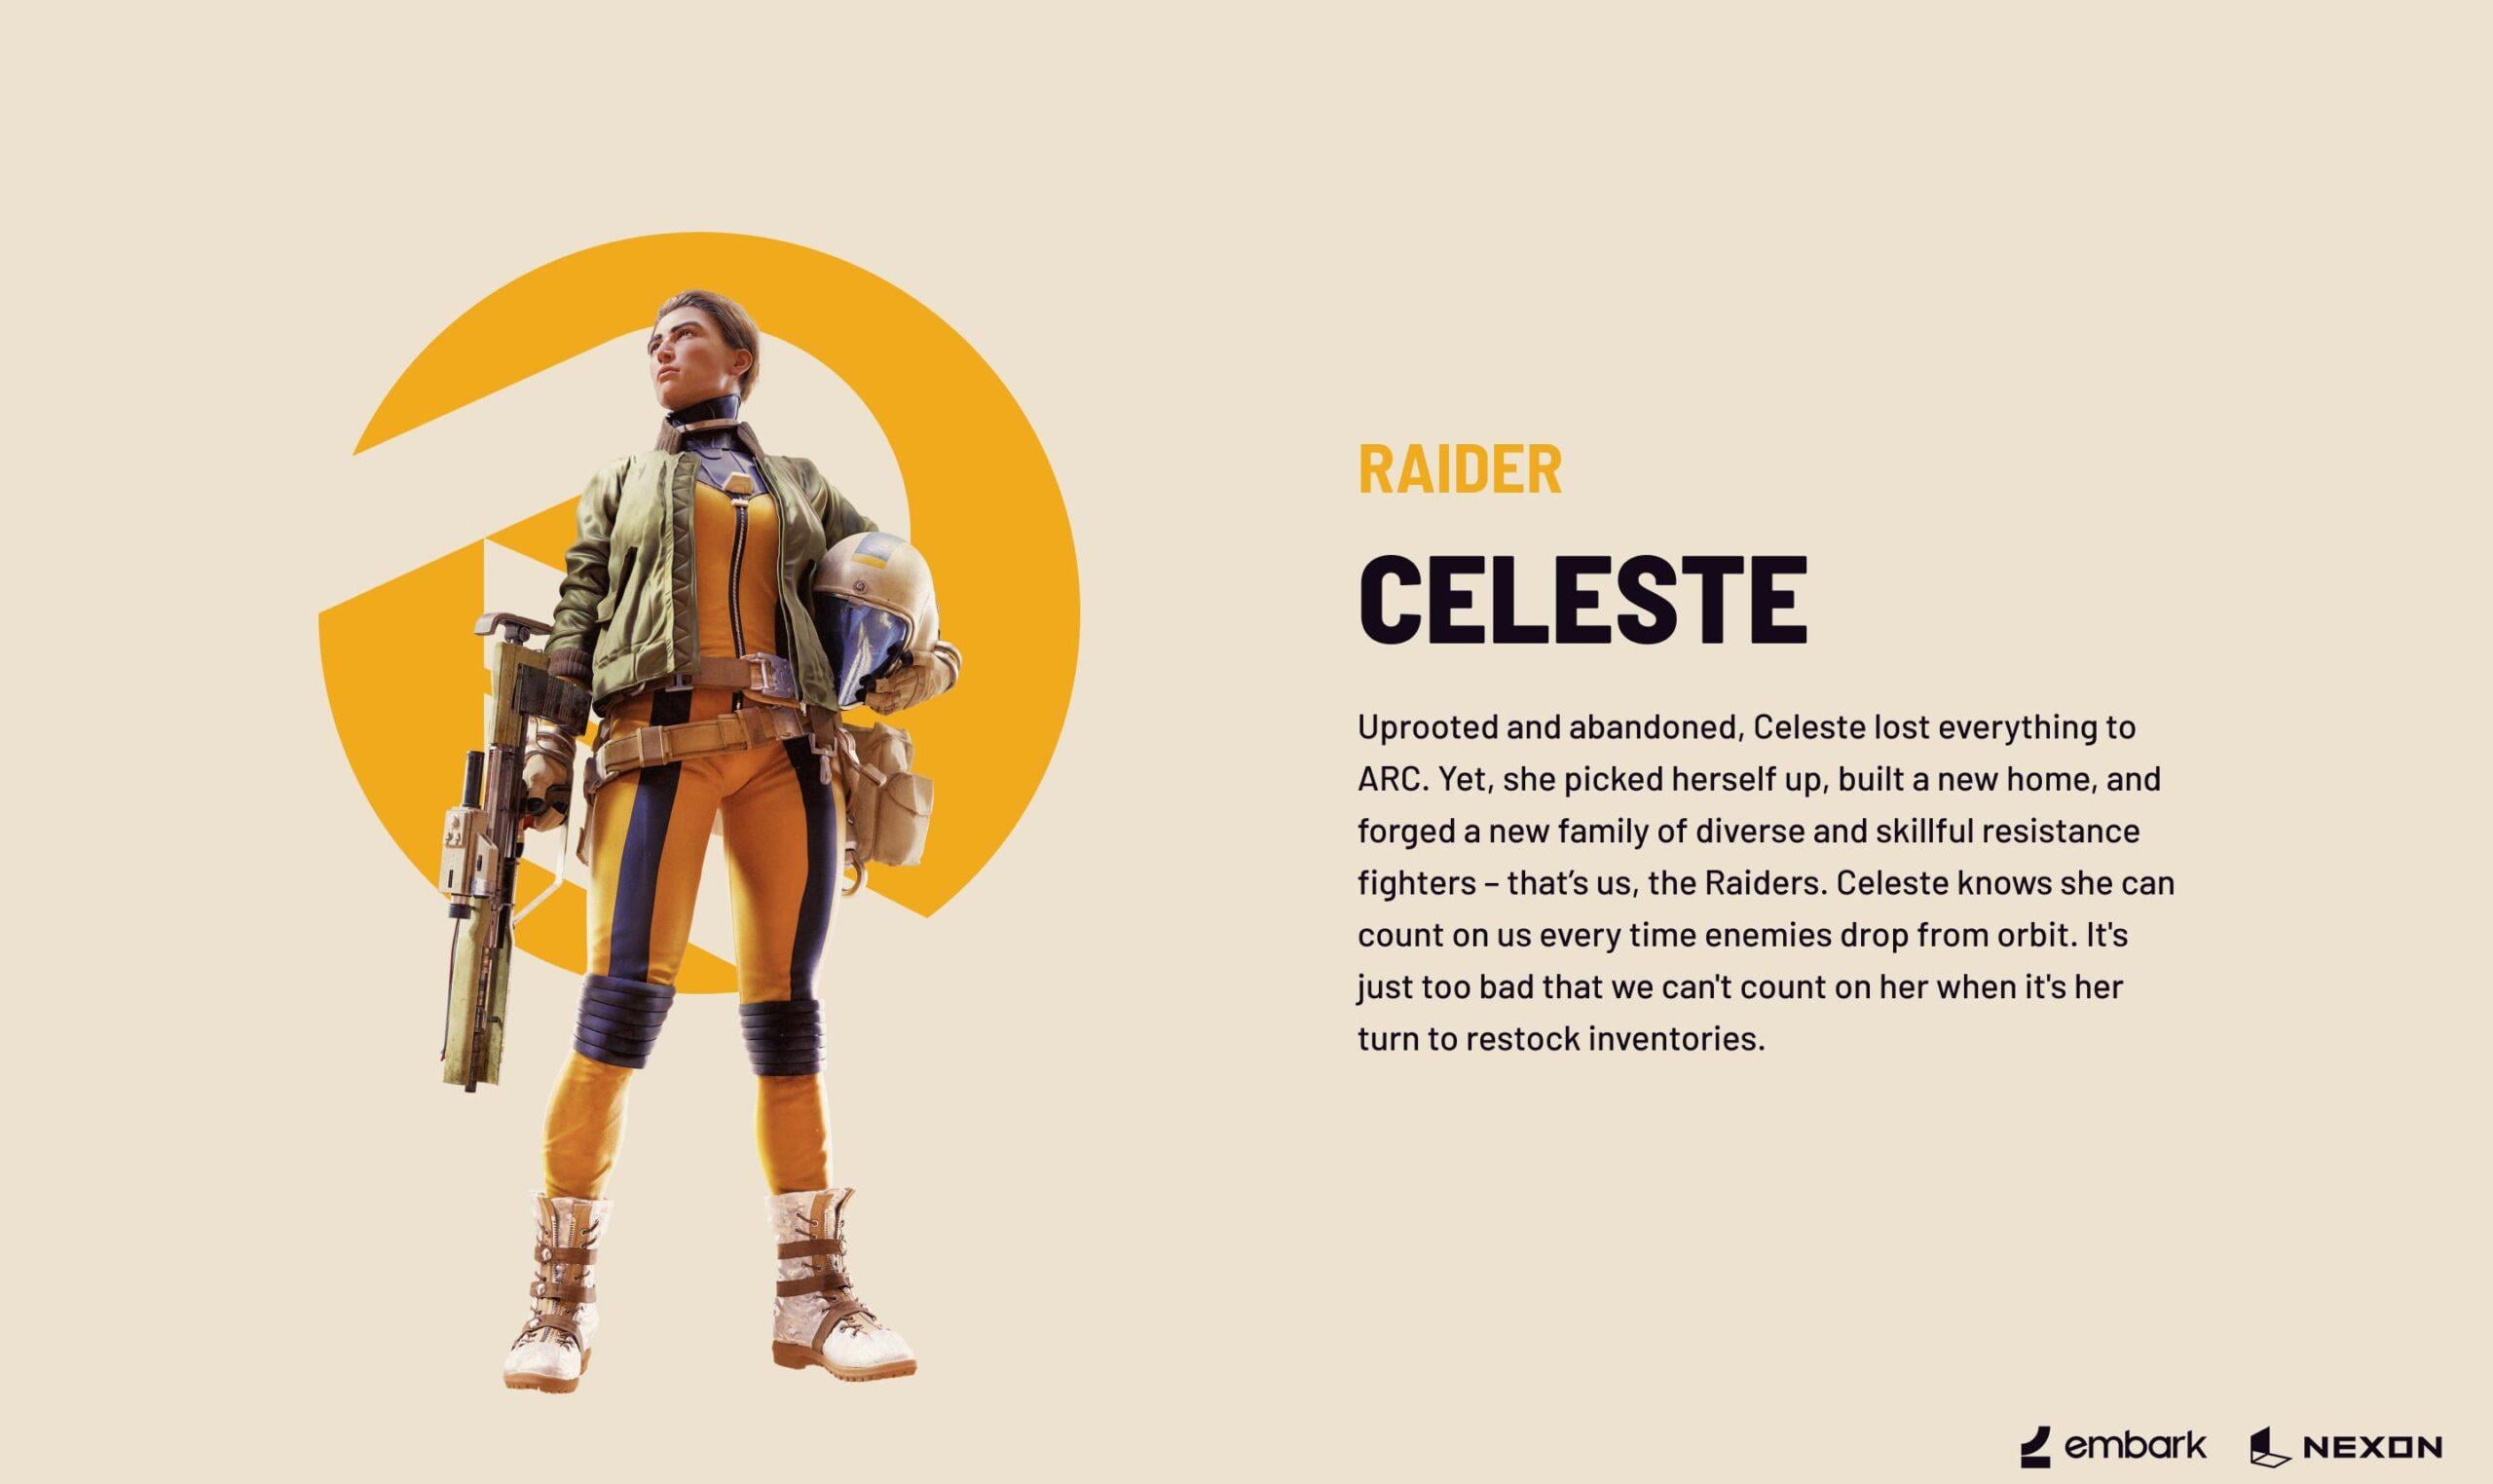
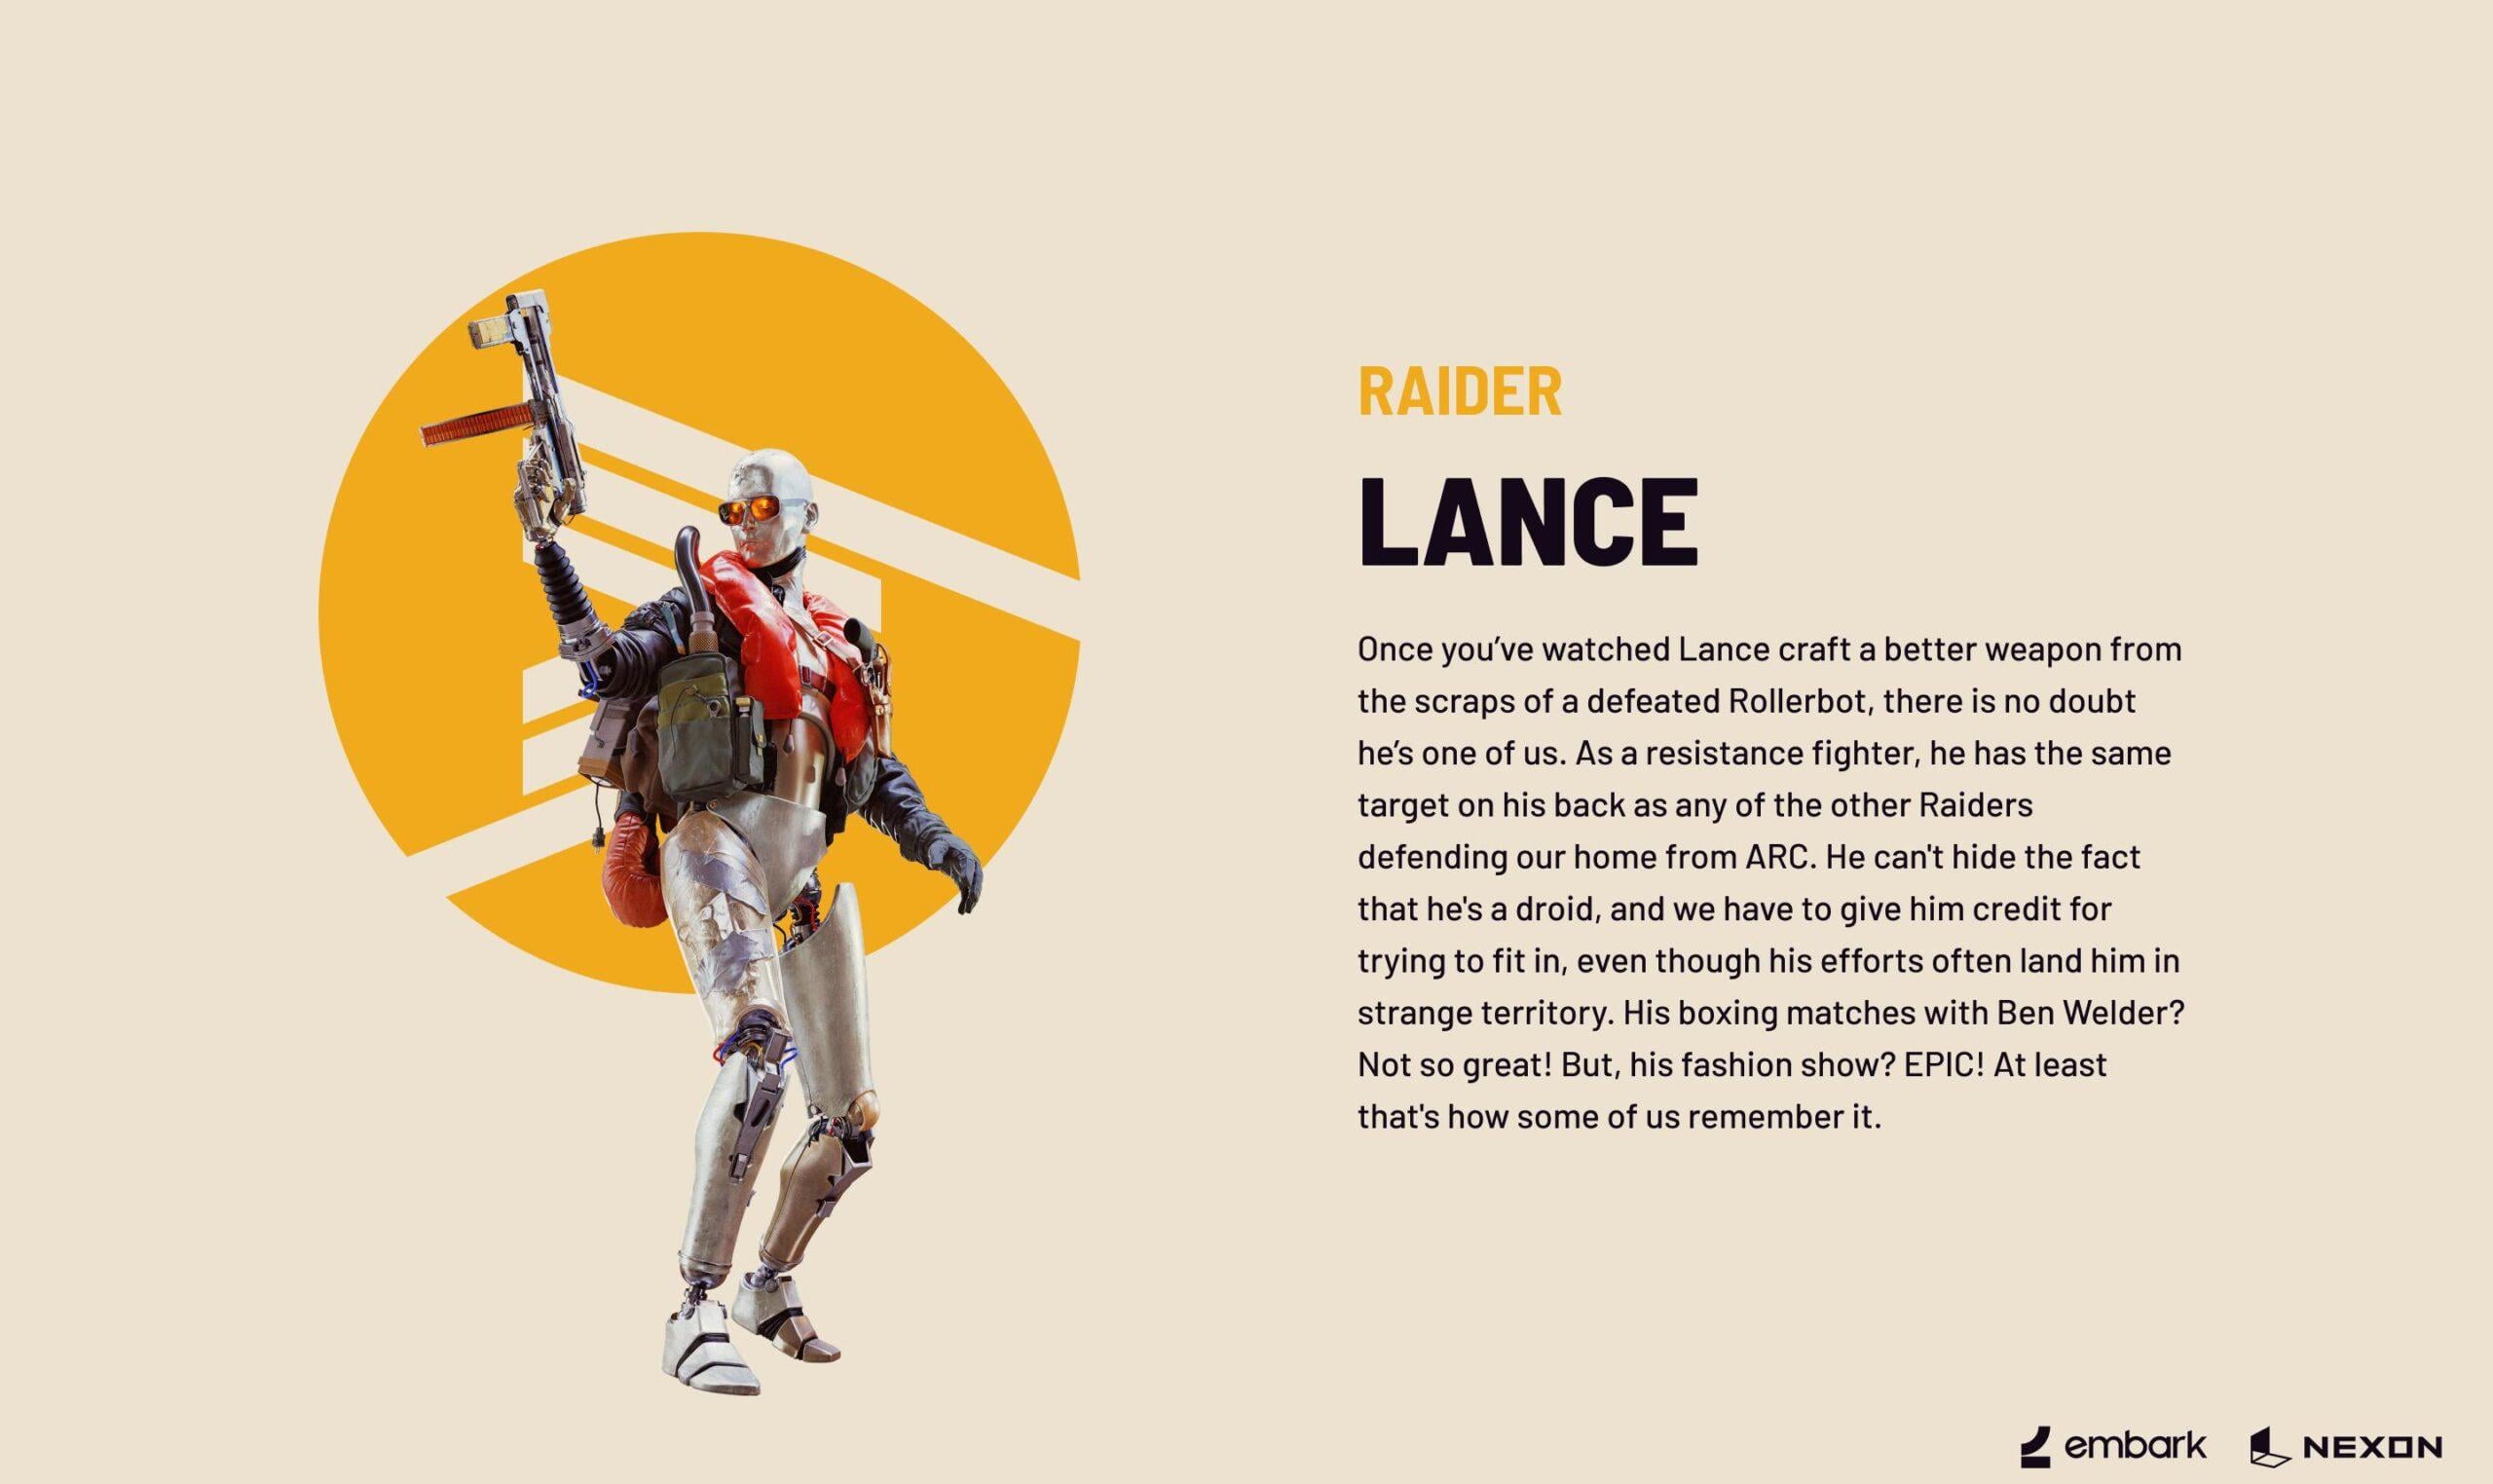
Embark Studios didn’t share much of details about the characters that you’ll see in the game. However, we know about two of them for sure: Celeste and Lance. These characters are the first to meet you, and they will assign you your first missions and sell weapons.
Arc Raiders Character Customization
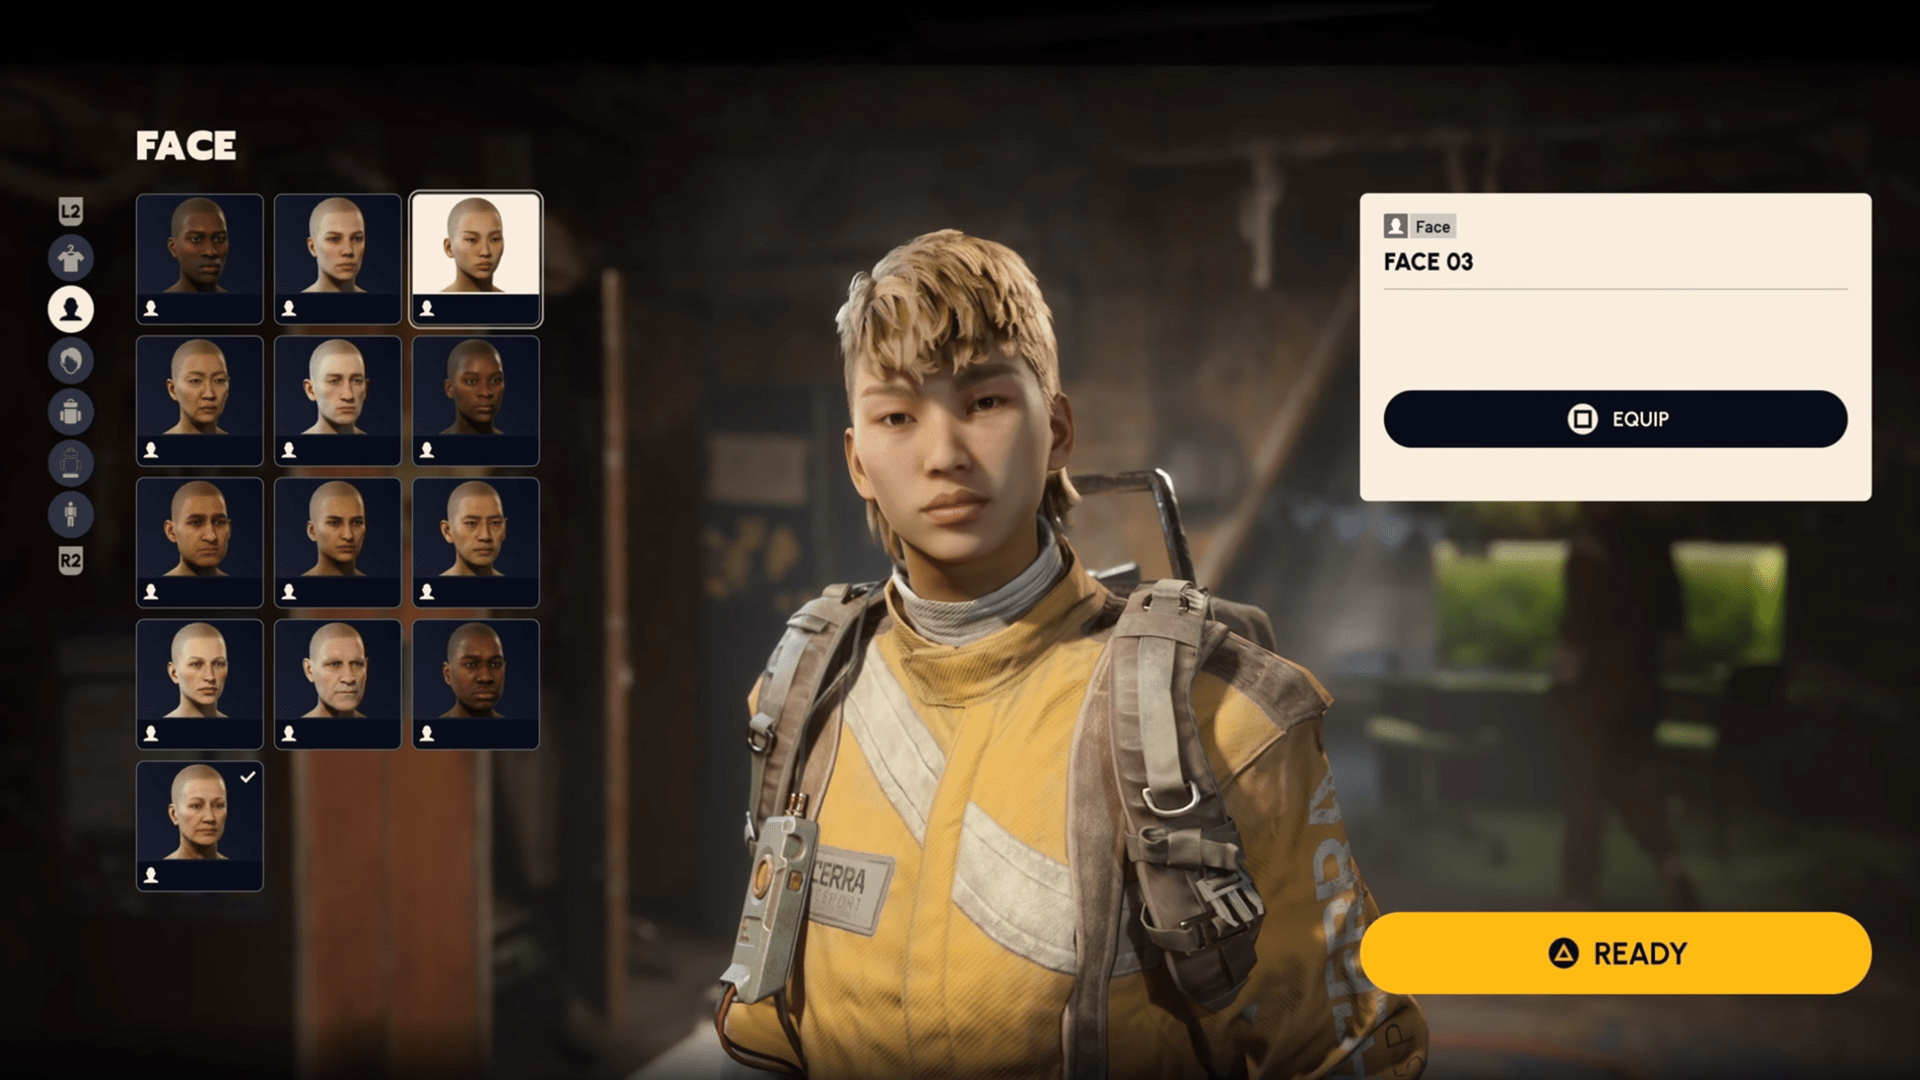
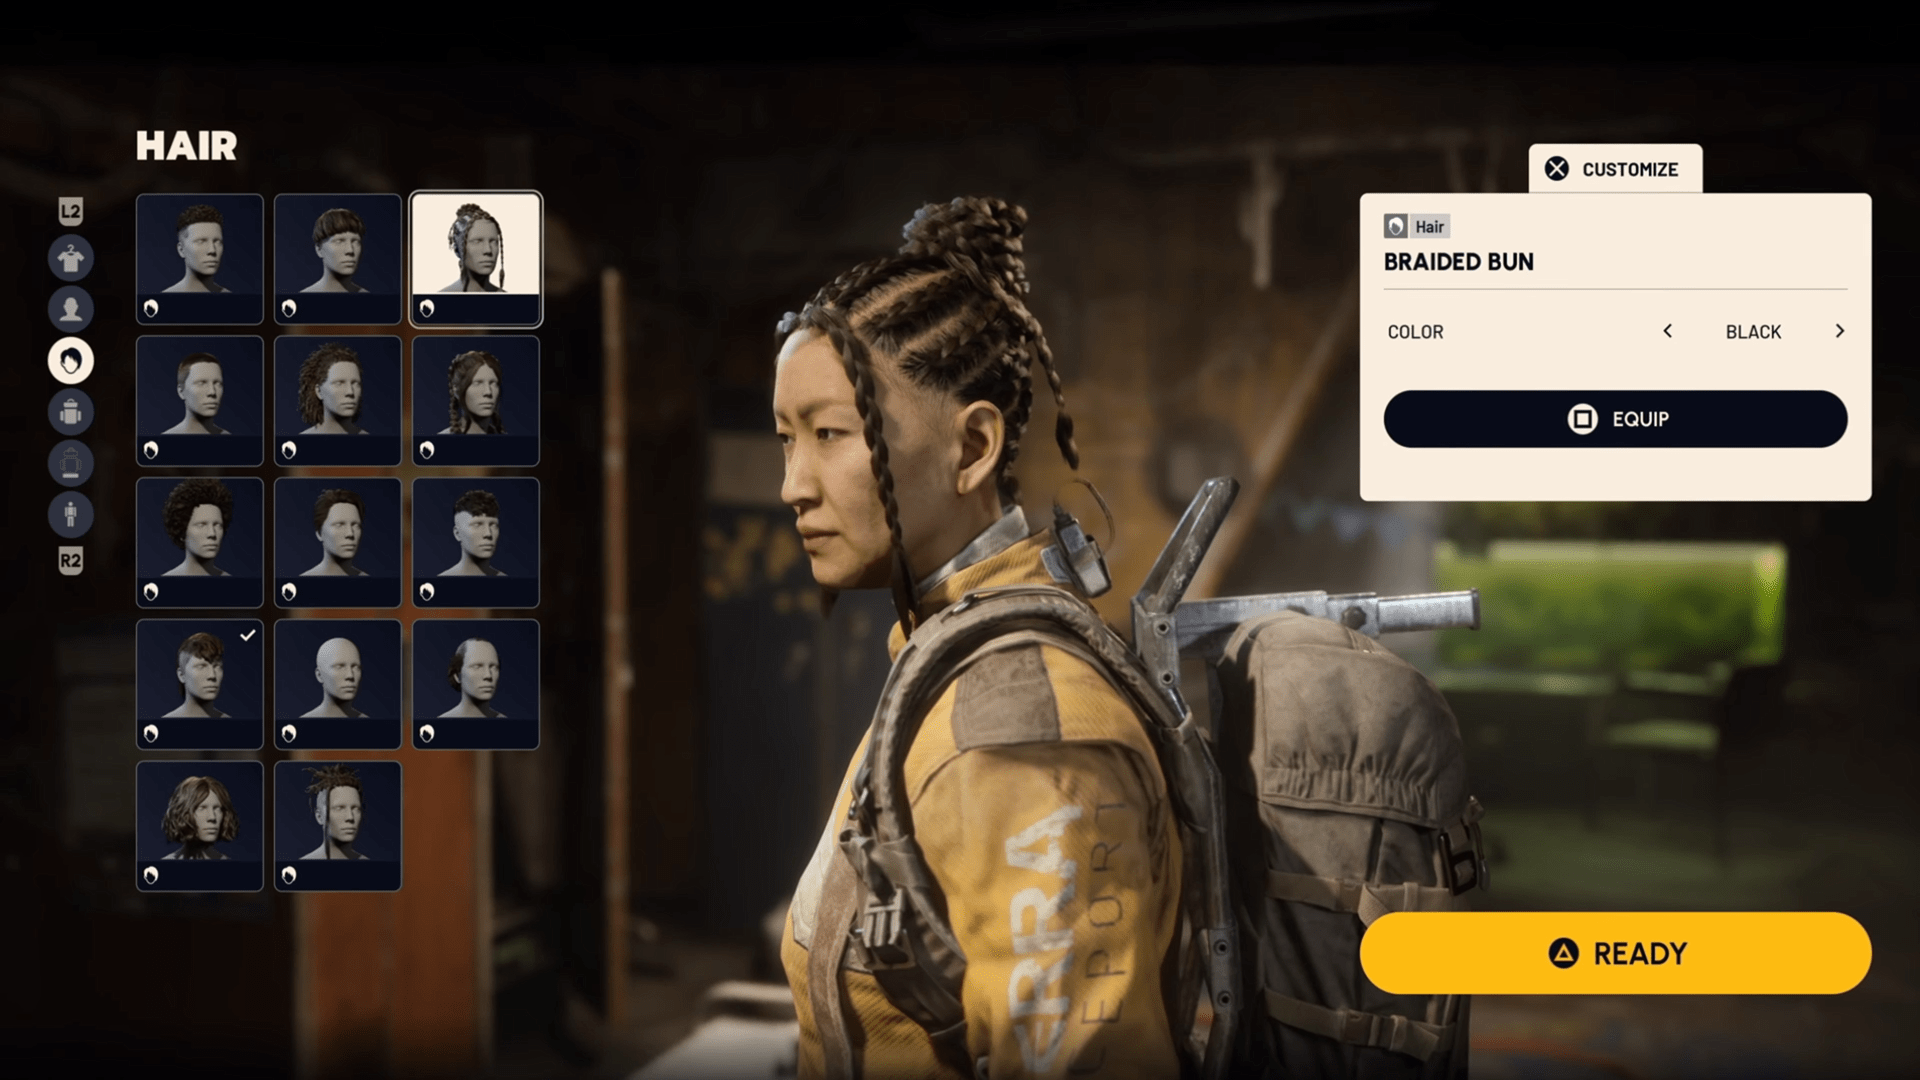
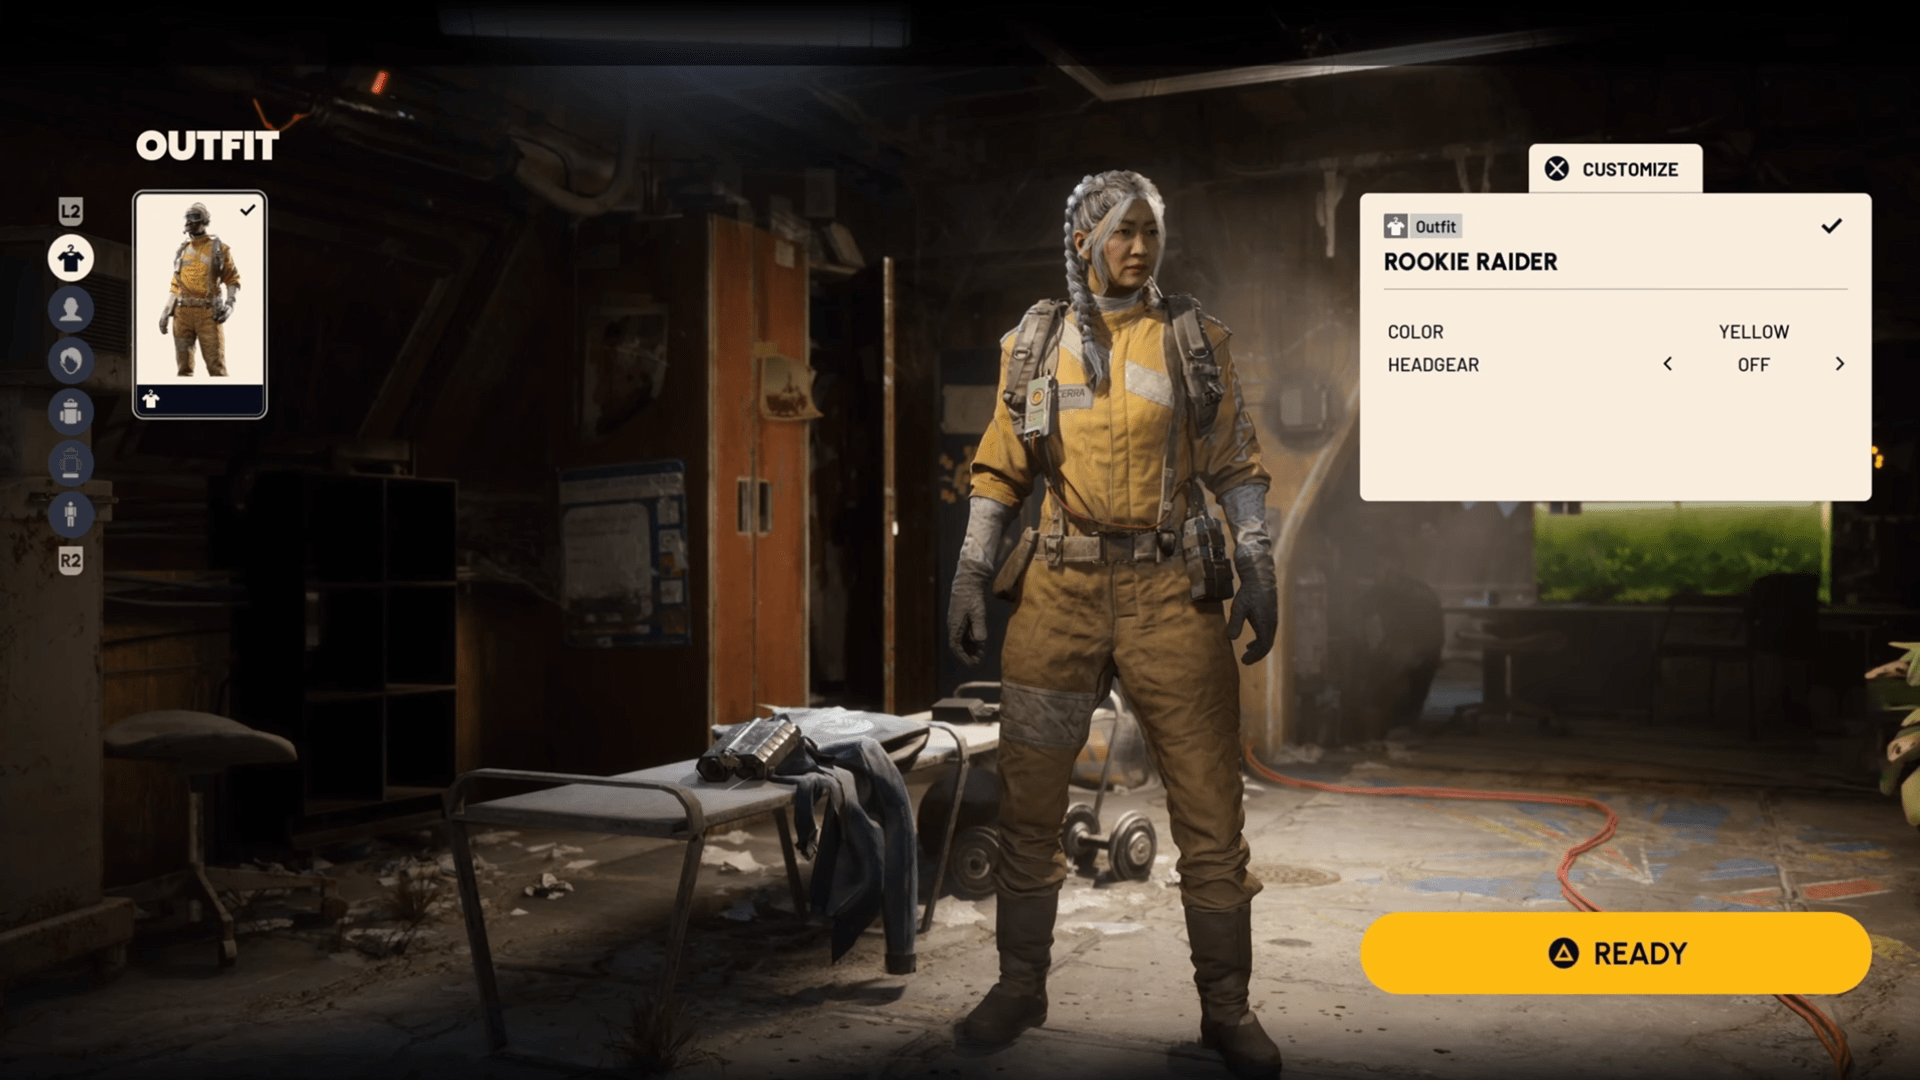
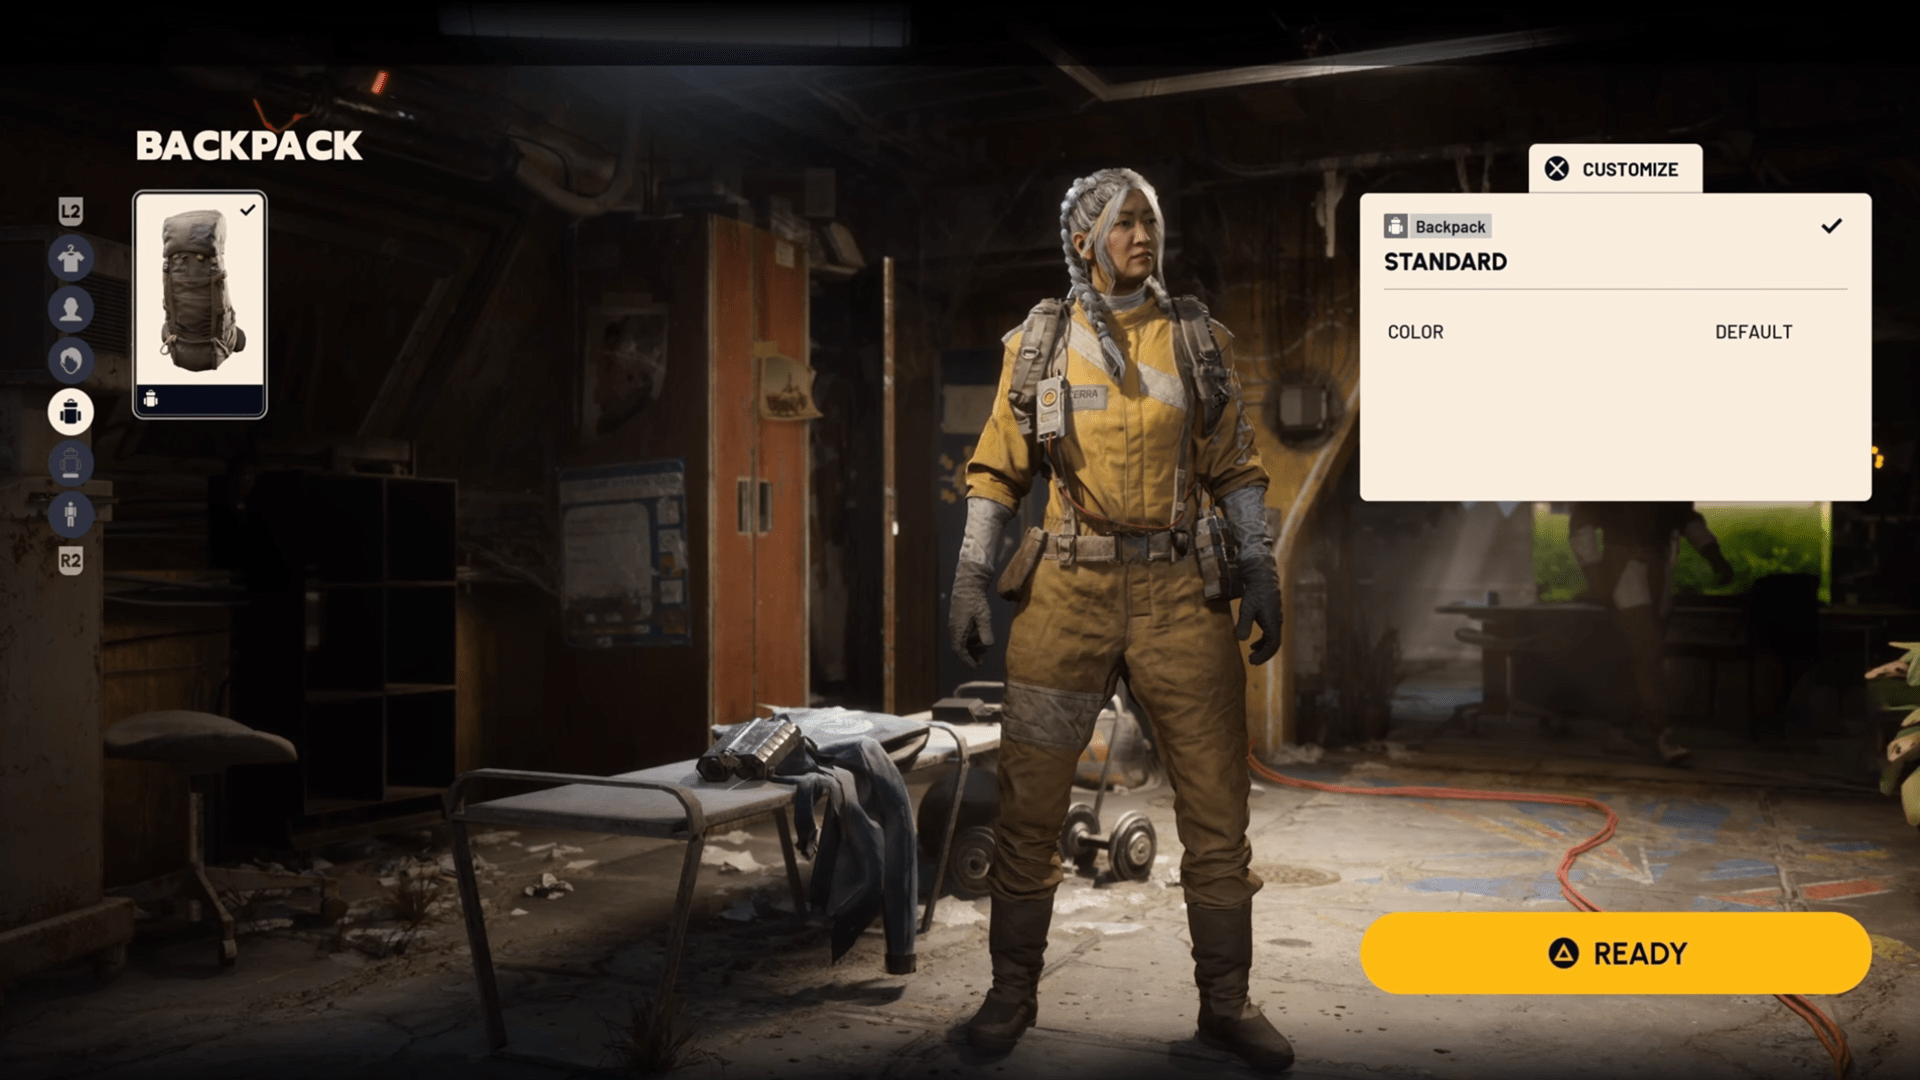
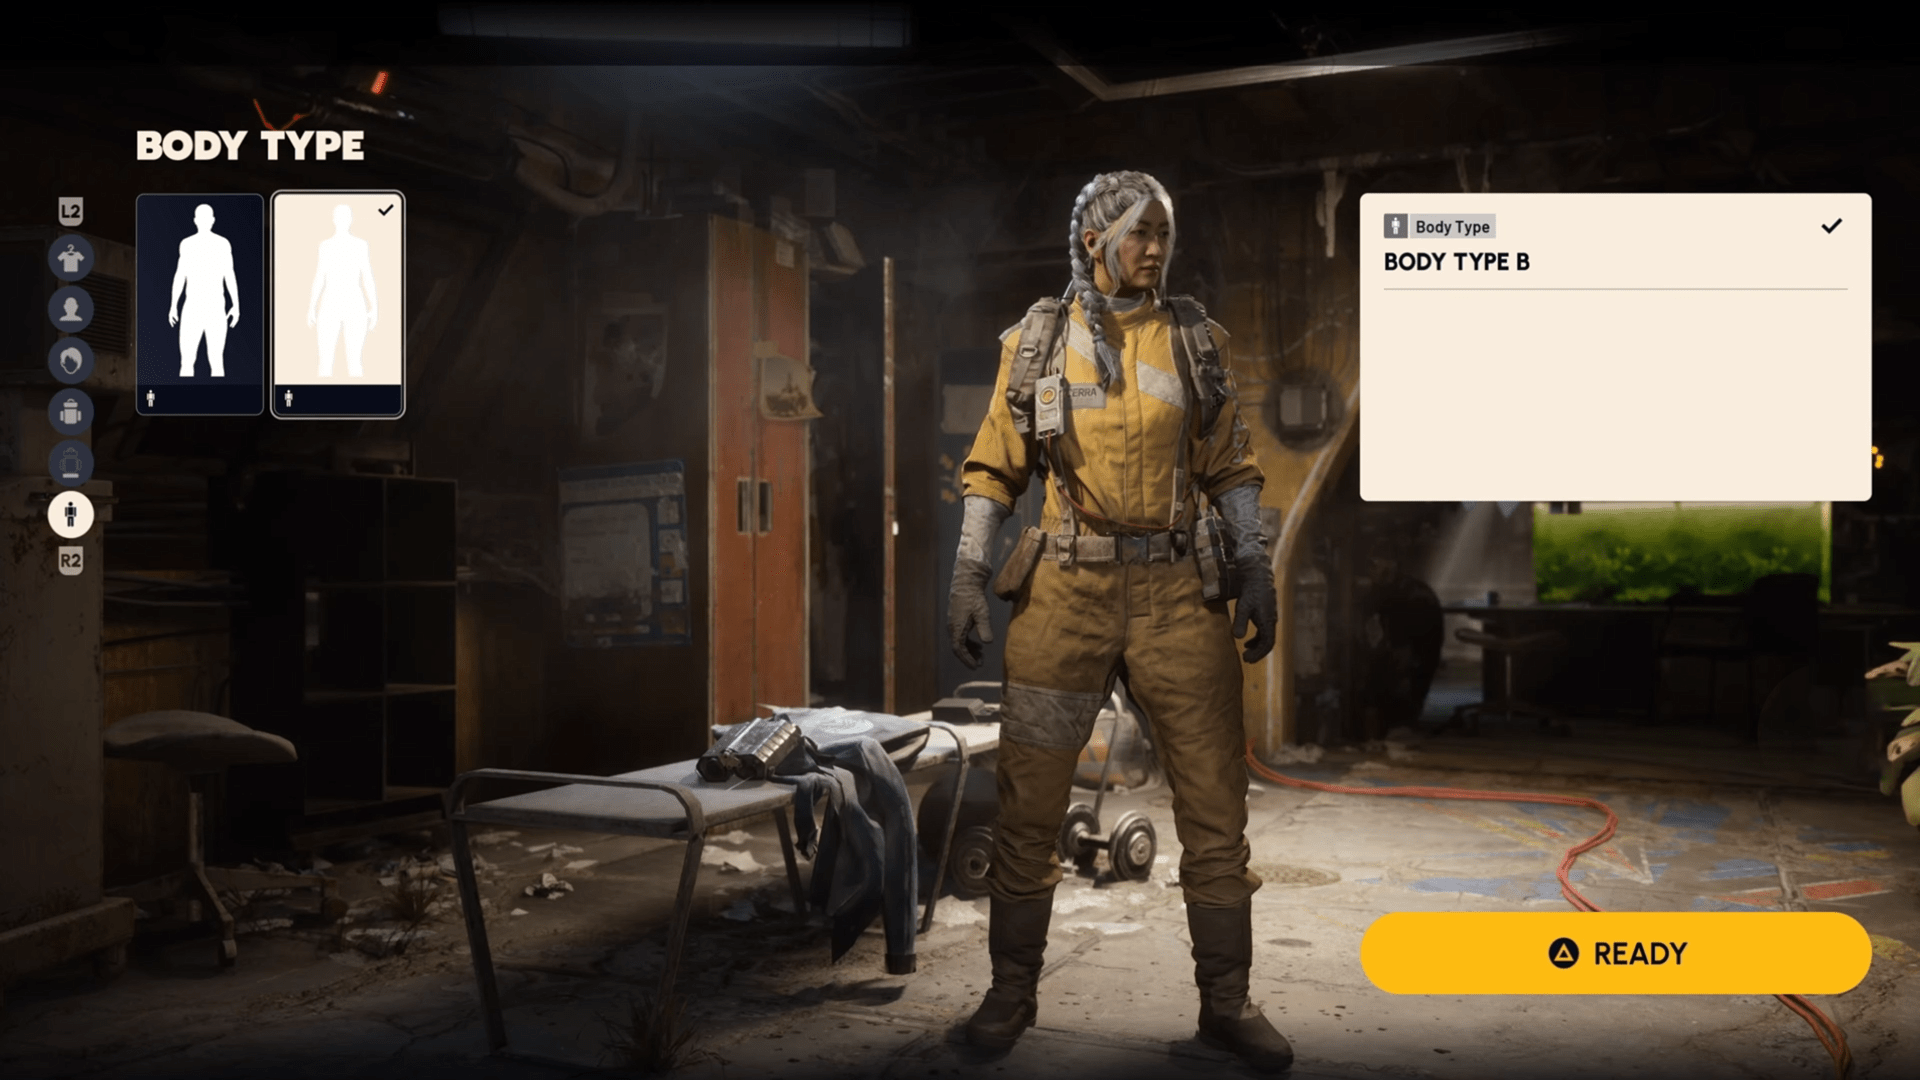
You step into the boots of a custom Raider — a survivor outfitted with scavenged gear. There are no fixed character classes; instead, you build your Raider’s appearance, abilities, and loadout through equipment and skills. Character customization options in Arc Raiders are a bit limited compared to many contemporary shooters, yet they offer just enough to create a unique character.
Tests show 13 pre-made facial models, 14 hairstyles with color selection, a backpack and backpack attachments, and 1 available outfit option colored yellow, where you can also show or hide your headgear. Additionally, you can choose between body types A and B, and there are no gender markers.
Finally, cosmetic customization is also present but limited in early tests. Players can change basic outfits and gear colors at the start of each run, but detailed character creation tools are sparse so far. Given the “character customization” tag on Steam, we expect more options (skins, armor styles, emotes) to be added by launch.
That wraps up our ARC Raiders overview — a full breakdown of the game’s mechanics, enemies, missions, and progression systems. You’re now better equipped to survive in Arc Raiders locations, complete objectives, and master your raider loadout. If you found this guide helpful or insightful, be sure to hit the like button below to support more content like this.